Cynthia Snyder Dionisio - Microsoft Project For Dummies
Здесь есть возможность читать онлайн «Cynthia Snyder Dionisio - Microsoft Project For Dummies» — ознакомительный отрывок электронной книги совершенно бесплатно, а после прочтения отрывка купить полную версию. В некоторых случаях можно слушать аудио, скачать через торрент в формате fb2 и присутствует краткое содержание. Жанр: unrecognised, на английском языке. Описание произведения, (предисловие) а так же отзывы посетителей доступны на портале библиотеки ЛибКат.
- Название:Microsoft Project For Dummies
- Автор:
- Жанр:
- Год:неизвестен
- ISBN:нет данных
- Рейтинг книги:4 / 5. Голосов: 1
-
Избранное:Добавить в избранное
- Отзывы:
-
Ваша оценка:
Microsoft Project For Dummies: краткое содержание, описание и аннотация
Предлагаем к чтению аннотацию, описание, краткое содержание или предисловие (зависит от того, что написал сам автор книги «Microsoft Project For Dummies»). Если вы не нашли необходимую информацию о книге — напишите в комментариях, мы постараемся отыскать её.
You’ll also find:
Totally updated guidance that applies to both the desktop version and Microsoft’s new subscription-based Microsoft Project Online Helpful information on integrating Agile practices and techniques into your project “Golden rules” that keep a project on-track and on-time Ways to effectively manage your resources with Microsoft Project’s built-in functionality Managing a project, big or small, is no easy task. Luckily,
can take a lot of the hassle out of your day-to-day life. Learn how to take advantage of this powerful software today!
Microsoft Project For Dummies — читать онлайн ознакомительный отрывок
Ниже представлен текст книги, разбитый по страницам. Система сохранения места последней прочитанной страницы, позволяет с удобством читать онлайн бесплатно книгу «Microsoft Project For Dummies», без необходимости каждый раз заново искать на чём Вы остановились. Поставьте закладку, и сможете в любой момент перейти на страницу, на которой закончили чтение.
Интервал:
Закладка:
Scope: Works with the product owner to communicate the priorities in the project backlog.
Schedule: Facilitates sprint planning, demonstrations, and daily stand-up (or scrum) meetings.
Resources: Protects the team from outside interference. Removes barriers or impediments so team members can accomplish work.
Process: Helps the team and other stakeholders understand and follow agile processes. Works with the team to improve team dynamics and the processes used to create and deliver value.
Risk: Reduces uncertainty by experimenting with different solutions, building prototypes, and providing demonstrations to relevant stakeholders throughout the project.
 A product owner determines the vision and scope for the project, makes decisions about the product, and establishes priorities. Where necessary, they interact with external stakeholders to understand needs and then communicate those needs to the team.
You can see that project managers and Scrum masters both use their skills and knowledge to accomplish the project work. The approach is different with the project manager providing more direct oversight and accountability for the outcomes, whereas the Scrum master operates as a supportive role for team members, empowering and enabling them to accomplish the work.
In a hybrid project you may see a project manager for the overall project with a Scrum master working on software development aspects of the project. You might also see the project manager adapting more of the servant leadership behaviors while still maintaining overall accountability for the project. Ultimately, the best approach is one that works in your environment.
Regardless of the approach, having software to help organize and structure the work makes managing the project and leading the team less daunting. That’s where Project can help.
Introducing Microsoft Project
Microsoft Project is a scheduling tool that helps you organize, manage, and control the variables identified in the preceding section. In this book, I show you how to use Project to organize and manage your work, create realistic schedules, and optimize your use of resources.
Take a moment to look at some of the wonderful ways in which Project can help you organize, manage, and control your project:
Use built-in templates to get a head start on your project. Project templates are prebuilt plans for a typical business project, such as commercial construction, an engineering project, a new product rollout, software development, or an office move.
Organize your project by phase, deliverable, geography, or any other method. The outline format allows you to progressively elaborate the information in greater granularity depending on how detailed you want your plan to be.
Determine costs by your chosen method. Examples are time period, resource type, deliverable, or cost type.
Organize resources by resource type. Level your resources to avoid overallocation, or determine the impact on the duration of a task based on a change in resources.
Calculate costs and timing based on your input. You can quickly calculate what-if scenarios to solve resource conflicts, maintain costs within your budget, or meet a deliverable deadline.
Use views and reports with the click of a button. A wealth of information is now available to you — and those you report to. You no longer have to manually build a report on total costs to date to meet a last-minute request from your boss.
Set up a Sprints Project. Run a project with a backlog, a Task Board, sprints, and other adaptive practices.
Manage complex algorithms (that you couldn’t even begin to figure out on your own) to complete such tasks as leveling resource assignments to solve resource conflicts, filtering tasks by various criteria, modeling what-if scenarios, and calculating the dollar value of work performed to date.
 No matter how cool the tool, you have to take the time to enter meaningful data. Great software doesn’t ensure great outcomes; it only makes them easier to achieve.
Getting to Know You
The file you create in Project is a schedule model. It’s a model because it models what you think will happen given what you know at the time. However, for ease of reference, I just refer to it as a schedule. The schedule has a plethora of data about various aspects of your project as well as graphical representations of that information.
Some people refer to the project schedule as the project plan. In reality, the project plan contains the project schedule — plus information such as the budget, work breakdown structure, project life cycle, risk management plan, and many other ingredients necessary to effectively manage a project.
When you first open Project, you see several options for starting a new project, as shown in Figure 1-2.
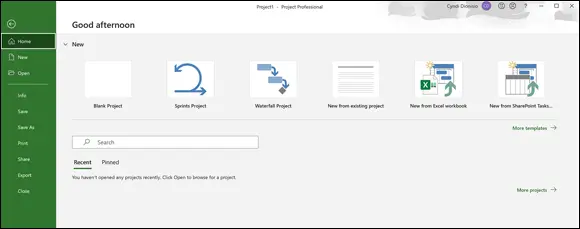
© John Wiley & Sons, Inc.
FIGURE 1-2:What you see when you open Project.
You can open a blank project, create a new project from an existing project, or create a new project by importing information from Microsoft Excel or SharePoint. You can also take advantage of premade templates for common project types, such as these examples:
Residential construction
Software development
New product launch
Merger or acquisition evaluation
If you don’t see the template you need, you can click More Templates and, as you can see in Figure 1-3, a whole host of options appears. You can also search for online templates by entering keywords in the Search box.
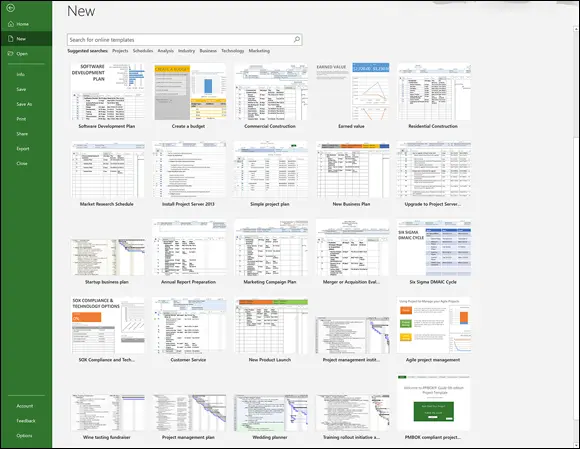
© John Wiley & Sons, Inc.
FIGURE 1-3:Project templates.
For purposes of this discussion, I assume that you’re starting with a new, blank project.
When you open a new project, you see the Quick Access toolbar, a few Ribbon tabs, the Ribbon, the Timeline, a pane with a sheet and a chart, and the status bar, as shown in Figure 1-4.
In Figure 1-4, you see Gantt Chart view. (I discuss views in Chapter 6.) For now, here’s an overview of the major elements in Project (refer to Figure 1-4):
Quick Access toolbar: The Quick Access toolbar, above and to the left of the Ribbon, is onscreen at all times and in all views.
Ribbon tabs: The Ribbon tabs organize commands based on a particular type of activity. For example, if you’re working with resources, you’ll likely find the command or setting you want on the Resource tab.© John Wiley & Sons, Inc. FIGURE 1-4:A blank project.
Ribbon: The Ribbon provides easy access to the most commonly used tools and commands. When you change tabs, the available tools on the Ribbon change.
Group: A group is a set of related commands or choices on the Ribbon. For example, to update the percent complete for a task, first find the formatting information you need in the Schedule group on the Task tab of the Ribbon.
Timeline: The Timeline provides an overview of the entire project — a graphical view of the project from start to finish. You have the option of showing the Timeline or hiding it.
Читать дальшеИнтервал:
Закладка:
Похожие книги на «Microsoft Project For Dummies»
Представляем Вашему вниманию похожие книги на «Microsoft Project For Dummies» списком для выбора. Мы отобрали схожую по названию и смыслу литературу в надежде предоставить читателям больше вариантов отыскать новые, интересные, ещё непрочитанные произведения.


Обсуждение, отзывы о книге «Microsoft Project For Dummies» и просто собственные мнения читателей. Оставьте ваши комментарии, напишите, что Вы думаете о произведении, его смысле или главных героях. Укажите что конкретно понравилось, а что нет, и почему Вы так считаете.