Cynthia Snyder Dionisio - Microsoft Project For Dummies
Здесь есть возможность читать онлайн «Cynthia Snyder Dionisio - Microsoft Project For Dummies» — ознакомительный отрывок электронной книги совершенно бесплатно, а после прочтения отрывка купить полную версию. В некоторых случаях можно слушать аудио, скачать через торрент в формате fb2 и присутствует краткое содержание. Жанр: unrecognised, на английском языке. Описание произведения, (предисловие) а так же отзывы посетителей доступны на портале библиотеки ЛибКат.
- Название:Microsoft Project For Dummies
- Автор:
- Жанр:
- Год:неизвестен
- ISBN:нет данных
- Рейтинг книги:4 / 5. Голосов: 1
-
Избранное:Добавить в избранное
- Отзывы:
-
Ваша оценка:
Microsoft Project For Dummies: краткое содержание, описание и аннотация
Предлагаем к чтению аннотацию, описание, краткое содержание или предисловие (зависит от того, что написал сам автор книги «Microsoft Project For Dummies»). Если вы не нашли необходимую информацию о книге — напишите в комментариях, мы постараемся отыскать её.
You’ll also find:
Totally updated guidance that applies to both the desktop version and Microsoft’s new subscription-based Microsoft Project Online Helpful information on integrating Agile practices and techniques into your project “Golden rules” that keep a project on-track and on-time Ways to effectively manage your resources with Microsoft Project’s built-in functionality Managing a project, big or small, is no easy task. Luckily,
can take a lot of the hassle out of your day-to-day life. Learn how to take advantage of this powerful software today!
Microsoft Project For Dummies — читать онлайн ознакомительный отрывок
Ниже представлен текст книги, разбитый по страницам. Система сохранения места последней прочитанной страницы, позволяет с удобством читать онлайн бесплатно книгу «Microsoft Project For Dummies», без необходимости каждый раз заново искать на чём Вы остановились. Поставьте закладку, и сможете в любой момент перейти на страницу, на которой закончили чтение.
Интервал:
Закладка:
 Collapsing and expanding tasks
Creating recurring tasks
Creating milestones
Deleting tasks and making tasks inactive
Entering a task note
The foundational unit in a project schedule is the project task; everything starts with it. After you identify and document your tasks, you can work with resources, dependencies, costs, durations, and other elements.
To be an effective task master, you need to be nimble in managing your tasks: Determine how to summarize work with a summary task, move work around, start and stop work in the middle of a task, and do all kinds of other tricks that help your schedule reflect what you want to happen on your project.
Creating Summary Tasks and Subtasks
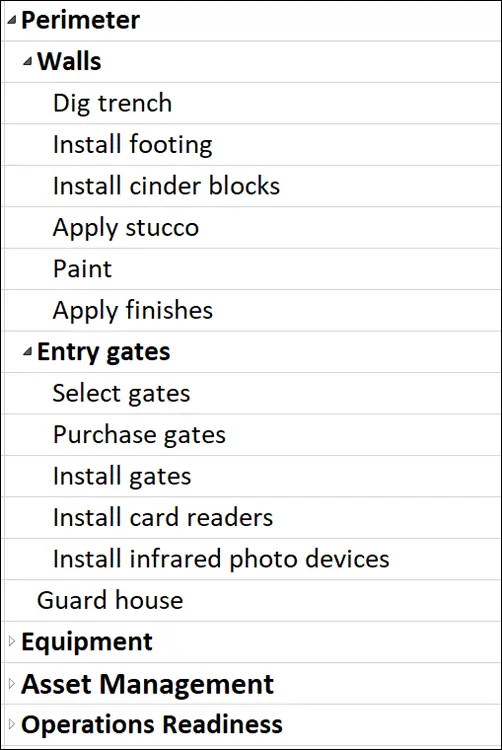
When you look at a project work breakdown structure, also known as WBS (refer to Chapter 2), or a project task list, such as the one shown in Figure 3-1, you see that it organizes tasks into levels. The upper levels are from the WBS. The lower level consists of tasks that have been decomposed from the WBS. A task that has other tasks indented below it in this outline structure is a summary task, or parent task. The tasks indented below the summary task are sometimes known as subtasks or child tasks. Summary tasks are indicated in bold in the Project outline. You can tell when a summary task has subtasks even when they are hidden because a little clear triangle is displayed to the left of the summary task. When you click the triangle with the tip of the pointer, the task expands to show the list of subtasks, and the summary task adds a black triangle to its left.
© John Wiley & Sons, Inc.
FIGURE 3-1:Summary tasks and subtasks.
In Figure 3-1 you can see that the Walls and Entry Gates summary tasks show all their subtasks. The summary tasks of Equipment, Asset Management, and Operations Readiness have hidden subtasks.
All information about a family of tasks is rolled up into its highest-level summary task. Therefore, any task with subtasks has no timing or cost information of its own: It gathers its total duration and cost from the sum of its parts.
This roll-up functionality is cumulative: The lowest-level task rolls up to its parent, which might roll up into another summary task, which rolls up (for example) into a project summary task. Any task with tasks below it gets its duration and cost information from a roll-up of its subtasks, no matter how deeply nested it may be in the hierarchy.
 When you need to reorganize an outline, you can move a summary task and all its subtasks come with it, regardless of whether it’s expanded.
If a summary task is manually scheduled, the roll-up functionality doesn’t work, and Project displays warnings telling you so. The Gantt bar for the summary task has a red warning bar that shows you the calculated duration of the subtasks when they don’t match up with the summary task’s duration. The summary task’s Finish field entry also has a red, squiggly underline to indicate a potential scheduling problem. To deal with this situation, you can change the summary task to use auto-scheduling, in which case it calculates roll-up data correctly. If you want the summary task to continue to be manually scheduled, you can edit its finish date or use the Task Inspector, as described in Chapter 11, to fix the summary task schedule.
How many levels can you go?
You have no practical limit on how many levels of tasks you can create in an outline. Project enables you to indent to more levels of detail than you’ll need for all but the most complex schedules. Remember, though: At some point, you have to deal with assigning timing and resources to each of these tasks and then track their progress. Too much detail can make your schedule difficult to manage. For example, if your project is a few months long, you don’t want to track to a level where tasks last only a few hours. Best practices suggest that you always set up your schedule to the level to which you want to manage your team — typically, business (working) days or weeks.
For longer projects, you can schedule by using rolling wave planning, a method of progressively elaborating the amount of detail for near-term work and keeping at a higher level any work that’s further out. For example, if you have a two-year project, you may have the first three months planned out in detail, the next three months at a higher level, and the remainder of the project schedule showing only milestones and key deliverables. As you progress through the project, you start to add more detail for six months and beyond. A good rule of thumb is to keep a good amount of detail for 90 days out.
 Rolling wave planning isn’t an excuse to add scope; it’s only the elaboration of existing scope.
The project summary task
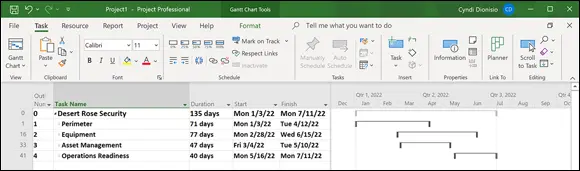
A project summary task represents the highest (least detailed) level of information and is often simply the title of the project, such as New Product Rollout. When you tell Project to display the project summary task, every task in the project falls under it in the outline, as shown in Figure 3-2.
© John Wiley & Sons, Inc.
FIGURE 3-2:The project summary task.
The summary task rolls up all data from other tasks into one line item. Thus, the project summary task’s duration reflects the duration of the entire project. From a monetary angle, the project summary task’s total cost reflects the total costs for the entire project. Figures such as these can be handy to have at your fingertips — and that’s one value of a summary task.
As you build your project, you can easily create a project summary task yourself (indent other tasks beneath it) or use a Project feature to generate one automatically at any time — even after you build all the phases of your project. To have Project automatically display a project summary task, follow these steps:
1 In the Gantt Chart view, select the Format tab in the Gantt Chart Tools context tab group.
2 In the Show/Hide group, select the Project Summary Task check box.
As you can see in Figure 3-2, Task 0, Desert Rose Security, is the project summary task. Notice the bar for the project summary task on the chart is gray and that the bars for other summary tasks are black.
Читать дальшеИнтервал:
Закладка:
Похожие книги на «Microsoft Project For Dummies»
Представляем Вашему вниманию похожие книги на «Microsoft Project For Dummies» списком для выбора. Мы отобрали схожую по названию и смыслу литературу в надежде предоставить читателям больше вариантов отыскать новые, интересные, ещё непрочитанные произведения.


Обсуждение, отзывы о книге «Microsoft Project For Dummies» и просто собственные мнения читателей. Оставьте ваши комментарии, напишите, что Вы думаете о произведении, его смысле или главных героях. Укажите что конкретно понравилось, а что нет, и почему Вы так считаете.