Ralph Grabowski - AutoCAD For Dummies
Здесь есть возможность читать онлайн «Ralph Grabowski - AutoCAD For Dummies» — ознакомительный отрывок электронной книги совершенно бесплатно, а после прочтения отрывка купить полную версию. В некоторых случаях можно слушать аудио, скачать через торрент в формате fb2 и присутствует краткое содержание. Жанр: unrecognised, на английском языке. Описание произведения, (предисловие) а так же отзывы посетителей доступны на портале библиотеки ЛибКат.

- Название:AutoCAD For Dummies
- Автор:
- Жанр:
- Год:неизвестен
- ISBN:нет данных
- Рейтинг книги:5 / 5. Голосов: 1
-
Избранное:Добавить в избранное
- Отзывы:
-
Ваша оценка:
AutoCAD For Dummies: краткое содержание, описание и аннотация
Предлагаем к чтению аннотацию, описание, краткое содержание или предисловие (зависит от того, что написал сам автор книги «AutoCAD For Dummies»). Если вы не нашли необходимую информацию о книге — напишите в комментариях, мы постараемся отыскать её.
AutoCAD For Dummies
AutoCAD For Dummies
AutoCAD For Dummies — читать онлайн ознакомительный отрывок
Ниже представлен текст книги, разбитый по страницам. Система сохранения места последней прочитанной страницы, позволяет с удобством читать онлайн бесплатно книгу «AutoCAD For Dummies», без необходимости каждый раз заново искать на чём Вы остановились. Поставьте закладку, и сможете в любой момент перейти на страницу, на которой закончили чтение.
Интервал:
Закладка:
 You don’t have to toggle Snap mode on and off. It’s on only when you’re using a command that asks you to specify a point. For example, when Snap is on, you can move your crosshairs freely around the screen, but when you start the Line command, Snap mode kicks in, and your cursor jumps to the closest snap point.
Set the grid and the snap intervals in the Drafting Settings dialog box by following these steps:
1 Right-click the Snap Mode or Grid Display button on the status bar and choose Settings from the menu that appears.The Drafting Settings dialog box appears with the Snap and Grid tab selected, as shown in Figure 4-4.The Snap and Grid tab has six sections, but the Snap Spacing and Grid Spacing areas on that tab are all you need to worry about for most 2D drafting work.
2 Select the Snap On check box to turn on Snap mode.This action enables default snaps half a unit apart (ten units apart if you’re working with the default metric template). FIGURE 4-4:Get your drafting settings here! AutoCAD usually has several ways of doing things. You can also click the Snap Mode button on the status bar to toggle snap on and off; the same goes for the Grid Display button and the grid setting. Or you could press the function keys: F7 toggles the grid off and on, and F9 does the same for Snap mode.
3 Enter the snap interval you want in the Snap X Spacing text box.Use the information in the sections preceding these steps to decide on a reasonable snap spacing. If the Equal X and Y Spacing check box is selected, the Y spacing changes automatically to equal the X spacing, which is almost always what you want. Deselect the check box if you want to specify snap spacings that are different vertically and horizontally.
4 Select the Grid On check box to turn on the grid.
5 Enter the desired grid spacing in the Grid X Spacing text box.Use the information in the sections preceding these steps to decide on a reasonable grid spacing.As with snap spacing, if the Equal X and Y Spacing check box is selected, the Y spacing automatically changes to equal the X spacing. Again, you usually want to leave it that way. X measures horizontal distance; Y measures vertical distance. The AutoCAD drawing area normally displays an X and a Y icon in the lower-left corner in case you forget. If you’re an old AutoCAD hand and find the graph paper grid too obtrusive, select the Display Dotted Grid in 2D Model Space check box in the Grid Style area to switch to the old-style rows and columns of dots. Interestingly, it seems most beginners like the grid because it lets them get a sense of scale, but most experienced users turn it off.
6 Specify additional grid display options in the Grid Behavior area: Adaptive Grid: AutoCAD changes the density or spacing of the grid lines or dots as you zoom in and out. Allow Subdivision Below Grid Spacing : Select this check box in conjunction with the Adaptive Grid check box. The spacing can go lower than what you’ve set, and it may go higher if you’re zoomed a long way out of your drawing. (If it didn’t, you wouldn’t be able to see your drawing for the grid!) Display Grid Beyond Limits: This allows the grid to display over the entire drawing area, no matter how far you’re zoomed out. Clearing this check box makes AutoCAD behave the way it always behaved in earlier releases — that is, the grid is displayed only in the area defined by the drawing limits. Follow Dynamic UCS: This option (not available in AutoCAD LT) is a 3D-specific feature that changes your drawing plane as you mouse over 3D objects. I cover this feature in Chapter 21.
7 Click OK to close the Drafting Settings dialog box.
Setting linetype, text, and dimension scales
Even if you’ve engraved the drawing scale factor on your desk and written it on your hand — not vice versa — AutoCAD doesn’t know the drawing scale until you enter it. Keeping AutoCAD in the dark is fine as long as you’re just drawing continuous lines and curves representing real-world geometry because you draw these objects at their real-world size, without worrying about plot scale.
However, as soon as you start using text, dimensions, and noncontinuous dash-dot linetypes (line patterns that contain gaps in them), you need to tell AutoCAD how to scale the gaps in the linetypes based on the plot scale. If you forget this, the dash-dot linetype patterns can look waaaay too big or too small. Figure 4-5 shows what I mean.
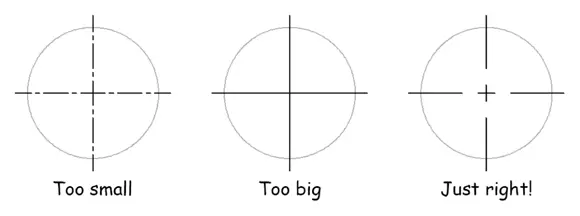
FIGURE 4-5:And this little center line looks juuuust right!
The process of setting the three relevant scale factors was messy in earlier releases but is now trivial. The Annotation Scale button near the right-hand end of the status bar displays the current drawing scale, which by default is 1:1/100%. Click it to display a list of 25 standard drawing scales.
 You can always change the current drawing scale later if the need arises.
At some point in your career, you may encounter a drawing that was created in an earlier release. In the appropriate chapters, I explain how to deal with scale factors in these older drawings.
Entering drawing properties
I recommend one last bit of housekeeping before you’re finished with model space drawing setup: Enter summary information in the Drawing Properties dialog box, as shown in Figure 4-6. Click the Application button; in the Drawing Utilities section, choose Drawing Properties to open the Drawing Properties dialog box; then click the Summary tab. Enter the drawing scale and the drawing scale factor you’re using in the Comments area, plus any other information you think useful.
Don’t confuse drawing properties (which are really file properties) with your drawing’s object properties — they’re different things. The properties you enter here can help you or others you love when they open your drawing and wonder how you set it up. Object properties are a big enough topic to merit their own chapter. See Chapter 9.
Want to find a specific file hidden on your hard drive? You can search for values you've entered in the Drawing Properties dialog box by using Windows Explorer’s search functions.
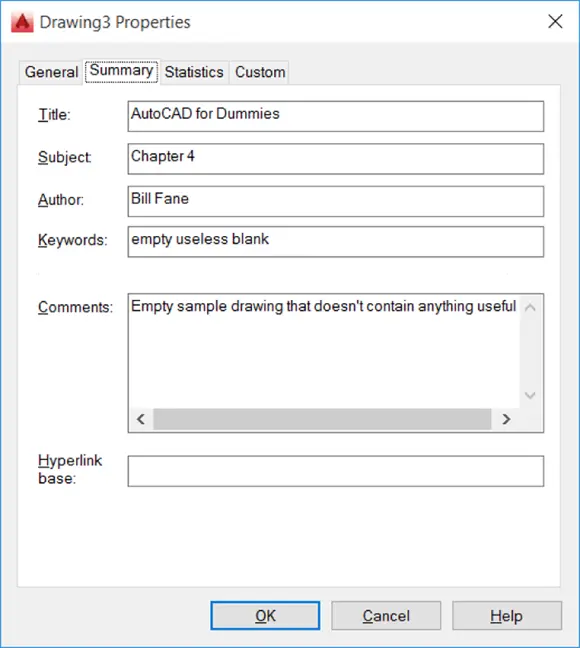
FIGURE 4-6:Surveying your drawing’s properties.
Making Templates Your Own
You can create a template from any DWG file by using the Save Drawing As dialog box. Follow these steps to save your drawing as a template:
1 Click Save As on the Quick Access toolbar.The Save Drawing As dialog box appears, as shown in Figure 4-7. FIGURE 4-7:Saving a drawing as a template and applying options.
2 From the Files of Type drop-down list, choose AutoCAD Drawing Template (*.dwt) or AutoCAD LT Drawing Template (*.dwt).
3 Navigate to the folder where you want to store the drawing template.The default folder for AutoCAD drawing templates is buried deep in the bowels of your Windows user profile, which by default isn’t visible in Windows Explorer. Hey, I never said this made any sense! Save your templates there if you want them to appear in AutoCAD’s Select Template list. You can save your templates in another folder, but if you want to use them later, you have to navigate to that folder every time you want to use them unless you change your Options settings. I explain how to do this later in the chapter.
Читать дальшеИнтервал:
Закладка:
Похожие книги на «AutoCAD For Dummies»
Представляем Вашему вниманию похожие книги на «AutoCAD For Dummies» списком для выбора. Мы отобрали схожую по названию и смыслу литературу в надежде предоставить читателям больше вариантов отыскать новые, интересные, ещё непрочитанные произведения.


Обсуждение, отзывы о книге «AutoCAD For Dummies» и просто собственные мнения читателей. Оставьте ваши комментарии, напишите, что Вы думаете о произведении, его смысле или главных героях. Укажите что конкретно понравилось, а что нет, и почему Вы так считаете.