Julie Adair King - Nikon Z fc For Dummies
Здесь есть возможность читать онлайн «Julie Adair King - Nikon Z fc For Dummies» — ознакомительный отрывок электронной книги совершенно бесплатно, а после прочтения отрывка купить полную версию. В некоторых случаях можно слушать аудио, скачать через торрент в формате fb2 и присутствует краткое содержание. Жанр: unrecognised, на английском языке. Описание произведения, (предисловие) а так же отзывы посетителей доступны на портале библиотеки ЛибКат.
- Название:Nikon Z fc For Dummies
- Автор:
- Жанр:
- Год:неизвестен
- ISBN:нет данных
- Рейтинг книги:5 / 5. Голосов: 1
-
Избранное:Добавить в избранное
- Отзывы:
-
Ваша оценка:
Nikon Z fc For Dummies: краткое содержание, описание и аннотация
Предлагаем к чтению аннотацию, описание, краткое содержание или предисловие (зависит от того, что написал сам автор книги «Nikon Z fc For Dummies»). Если вы не нашли необходимую информацию о книге — напишите в комментариях, мы постараемся отыскать её.
Nikon Z fc For Dummies
Nikon Z fc For Dummies
Nikon Z fc For Dummies — читать онлайн ознакомительный отрывок
Ниже представлен текст книги, разбитый по страницам. Система сохранения места последней прочитанной страницы, позволяет с удобством читать онлайн бесплатно книгу «Nikon Z fc For Dummies», без необходимости каждый раз заново искать на чём Вы остановились. Поставьте закладку, и сможете в любой момент перейти на страницу, на которой закончили чтение.
Интервал:
Закладка:
You also can customize the displays you see when you’re reviewing photos and recording videos. Check out Chapter 8for details on playback options; see Chapter 7for video recording options.
Magnifying the display
 Whether you’re using the monitor or viewfinder to compose your shot, you can magnify the display by pressing the Zoom In button. You might want to zoom the display to double-check focus, for example.
Figure 1-23 shows the monitor display at the normal magnification (left) and after one press of the Zoom In button. Each button press increases the magnification level. While the display is zoomed, a reference box appears briefly, as shown on the right in Figure 1-23. The yellow box indicates the area of the frame you’re inspecting. Press the edges of the Multi Selector to scroll the display to view hidden areas of the scene.
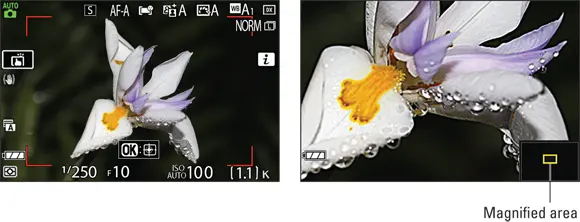
FIGURE 1-23:Press the Zoom In button to magnify the display; press Zoom Out to reduce the magnification.
 To reduce the magnification, press the Zoom Out button. Again, each press reduces the magnification level further.
You also can magnify the displays during picture playback to inspect small details, such as whether someone’s eyes are closed in a portrait. (Blinkers, whaddya gonna do?) During playback, though, pressing the Zoom Out button also enables you to view thumbnails of multiple images on the screen and to switch to Calendar display view. Chapter 8explains these playback zoom features and a few others that are unavailable during shooting.
 One final note on zooming the shooting display: You can take a picture while the display is magnified, but the picture will contain the entire, unmagnified frame area. When the camera is set to record video, pressing the Record button restores the unmagnified view and, as with photo shooting, the entire frame is captured.
Using the Touch Shutter (or Not)
Another feature to get to know during your meet-and-greet with the camera is the Touch Shutter. The Touch Shutter enables you to focus and take a picture by simply tapping your subject once on the monitor. The focusing part of the feature assumes that the camera and lens are set to use autofocusing. (If you use the 16–50mm kit lens, that setting is the default.)
The Touch Shutter comes in handy on occasion — for example, when you’re using the Self-Portrait mode, outlined near the end of this chapter. But more often than not, I find myself mistakenly tapping the screen and taking a picture when I had no intention of doing so. Because the feature is enabled by default for photo shooting, my guess is that you’ve snapped a few errant pics as well. too. The good news is that you can disable the Touch Shutter or use it only for autofocusing, which is my choice. To cycle through the available settings, tap the Touch Shutter symbol on the monitor, labeled in Figure 1-24.
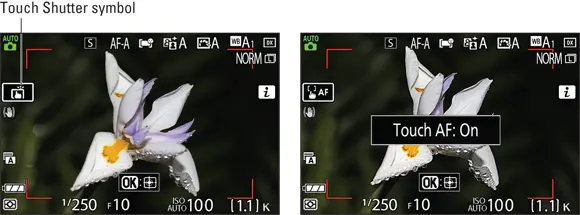
FIGURE 1-24:Tap the Touch Shutter symbol to cycle through the settings that determine what happens when you tap your subject on the monitor.
You can choose from four Touch Shutter settings, represented on the monitor by the symbols that appear in the margins here:
Touch Shutter/Touch AF: The camera system sets focus on the spot you touch and then releases the shutter when you lift your finger off the monitor. Again, this setting is the default for photo shooting. It’s unavailable for video shooting.
Touch AF: The camera sets focus on the object you tap but doesn’t release the shutter to take the picture. Instead, you use the shutter button to release the shutter.
Off: Choose this option to disable both tap-to-focus and tap-to-shoot. By default, the camera then chooses the focus point for you; see Chapter 4to find out how to take over that role.
Position Focus Point: Tapping the screen selects a focus point but doesn’t initiate autofocusing. Press the shutter button halfway to start autofocusing.
When you use the default autofocus settings and the camera detects a moving subject, the camera begins tracking the movement as soon as you tap the touchscreen. As the subject moves, the camera adjusts the focusing distance or the focus-point position as necessary to keep your subject in its autofocus sights until the time you take the picture. You can get schooled on this feature and other focusing topics in Chapter 4.
Exploring a Few Lens Features
Aside from the basics of attaching a retractable Z-mount lens, which I provide at the start of this chapter, it’s difficult to provide specifics about using your lens, because I don’t know which make or model of lens you own. Features vary from lens to lens, so I urge you to read the lens instruction manual carefully for use and care information. I can offer the following general guidelines about how lenses work with the Z fc, though:
You can mount certain non-Z lenses on the camera by using the FTZ adapter. For example, Figure 1-25 shows a Nikon F-mount lens — specifically, the AF-S Nikkor 18–140mm lens — connected via the adapter. The adapter currently costs about $249. Check the adapter instruction manual to find out how to use it as a bridge between your lens and camera. FIGURE 1-25:Using the FTZ adapter enables me to use one of my older Nikon lenses with the Z fc. Not all lenses that fit the adapter can take advantage of all camera features. Some lenses aren’t compatible with the camera’s autofocusing system, for example, forcing you to rely on manual focusing. To get the scoop on how a lens will work with the camera, check the lens manufacturer’s website: Leading manufacturers provide information on Z-mount compatibility. In some cases, you may need to update the lens firmware (the software that operates the lens), which the manufacturer website should discuss as well.
With most zoom lenses, you zoom in and out by rotating the zoom barrel. The position of this lens component varies. Figure 1-25 shows you where to find it on the AF-S Nikkor 18–140mm lens; Figure 1-26, the Z-mount 16–50mm kit lens. Some zoom lenses have a push/pull arrangement instead, so again, consult the lens manual for specifics. FIGURE 1-26:Here’s a look at the important components of the Z-mount 16–50mm lens.
The angle of view that a lens can capture is determined by its focal length . Focal length is measured in millimeters. The shorter the focal length, the wider the angle of view. As focal length increases, the angle of view narrows, and the subject occupies more of the frame.Generally speaking, lenses with focal lengths shorter than 35mm are considered wide angle lenses, and lenses with focal lengths greater than 80mm are considered telephoto lenses. Anything in the middle is a “normal” lens, suitable for shooting scenes that require neither a wide nor narrow angle of view.Focal length also affects depth of field, or the distance over which focus appears acceptably sharp. The shorter the focal length, the larger the depth of field. ( Chapter 4shows examples.)
Читать дальшеИнтервал:
Закладка:
Похожие книги на «Nikon Z fc For Dummies»
Представляем Вашему вниманию похожие книги на «Nikon Z fc For Dummies» списком для выбора. Мы отобрали схожую по названию и смыслу литературу в надежде предоставить читателям больше вариантов отыскать новые, интересные, ещё непрочитанные произведения.


Обсуждение, отзывы о книге «Nikon Z fc For Dummies» и просто собственные мнения читателей. Оставьте ваши комментарии, напишите, что Вы думаете о произведении, его смысле или главных героях. Укажите что конкретно понравилось, а что нет, и почему Вы так считаете.