Jason Gumster - Blender For Dummies
Здесь есть возможность читать онлайн «Jason Gumster - Blender For Dummies» — ознакомительный отрывок электронной книги совершенно бесплатно, а после прочтения отрывка купить полную версию. В некоторых случаях можно слушать аудио, скачать через торрент в формате fb2 и присутствует краткое содержание. Жанр: unrecognised, на английском языке. Описание произведения, (предисловие) а так же отзывы посетителей доступны на портале библиотеки ЛибКат.
- Название:Blender For Dummies
- Автор:
- Жанр:
- Год:неизвестен
- ISBN:нет данных
- Рейтинг книги:5 / 5. Голосов: 1
-
Избранное:Добавить в избранное
- Отзывы:
-
Ваша оценка:
Blender For Dummies: краткое содержание, описание и аннотация
Предлагаем к чтению аннотацию, описание, краткое содержание или предисловие (зависит от того, что написал сам автор книги «Blender For Dummies»). Если вы не нашли необходимую информацию о книге — напишите в комментариях, мы постараемся отыскать её.
Author Jason van Gumster shares his insight as an independent animator and digital artist to help Blender newcomers turn their ideas into three-dimensional drawings. From exporting and sharing scenes to becoming a part of the Blender community, this accessible book covers it all!
Create 3D characters—no experience required Build scenes with texture and real lighting features Animate your creations and share them with the world Avoid common rookie mistakes This book is the ideal starting place for newcomers to the world of 3D modeling and animation.
Blender For Dummies — читать онлайн ознакомительный отрывок
Ниже представлен текст книги, разбитый по страницам. Система сохранения места последней прочитанной страницы, позволяет с удобством читать онлайн бесплатно книгу «Blender For Dummies», без необходимости каждый раз заново искать на чём Вы остановились. Поставьте закладку, и сможете в любой момент перейти на страницу, на которой закончили чтение.
Интервал:
Закладка:
The selection tools I just mentioned are also available without going to the Toolbar, so you can still select large groups of vertices without changing your active tool. They operate a little bit differently from the dedicated Toolbar tools:Box Select by pressing B. Then you can left-click and drag your mouse cursor to add to your selection. Deselection is done with middle-click and drag. Get out of Box Select by right-clicking or pressing Esc.Circle Select is activated by pressing C. In this case, you can quick change the radius of your selection brush by scrolling your mouse wheel.To use Lasso Select functionality, Ctrl+right-click and drag your mouse cursor around the vertices you want to select. Anything within that selection region is added to your selection.
 Although the hotkey approach to these selection tools is a much faster way to work than constantly going to the Toolbar to switch tools, you do lose the ability to navigate the 3D Viewport while selecting with them. So if you’re doing a complex selection that requires you to move around your scene, the dedicated tools are probably the better way to go.
And, of course, all these selection tools also work in Object mode. Figure 4-6 shows what the various selection tools look like when in use.
 For a slightly faster way to switch between dedicated tools, you can use the Shift+Spacebar hotkey combination to open a little Toolbar menu next to your mouse cursor. Figure 4-7 shows what this menu looks like.
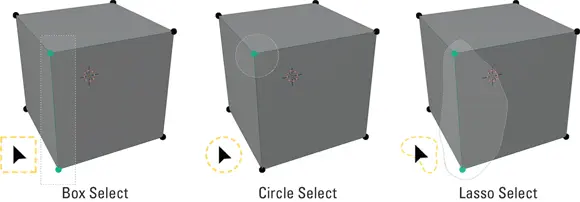
FIGURE 4-6:Border Select, Circle Select, and Lasso Select.
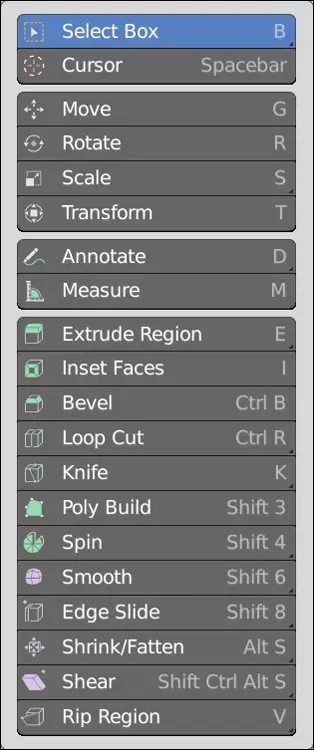
FIGURE 4-7:You can open a little Toolbar menu near your mouse cursor by pressing Shift+Spacebar.
 If you’re using Blender’s default settings, you can’t see through your model. You can’t select the vertices, edges, and faces on the back side of the model unless you orbit the 3D Viewport to see those vertices or drop into the wireframe viewport shading setting. (Press Z to open the viewport shading pie menu.) On occasion, however, you may find it useful to see (and select) those hidden vertices while in one of the other viewport shading types. To do so, click the Show X-ray button. Located to the left of the viewport shading types block in the 3D Viewport’s header, this button has an icon of a cube with a dotted line of its back face visible through it. By default, the Show X-ray toggle is disabled, but you can click this button to reveal the vertices, edges, and faces on the back of your model. The hiding of those rear vertices is often referred to as backface culling, and it’s incredibly useful when you’re working with complex models. For faster access, you can press Alt+Z.
Working with linked vertices
Another handy way to select things in Edit mode is by selecting linked vertices. Linked vertices are a set of vertices within a mesh that are connected by edges. In order to understand linked vertices better, go through the following steps:
1 Select your default cube in Blender and tab into Edit mode (or switch to the Modeling workspace).All the vertices are selected. If not, press A.
2 With all the vertices selected, choose Mesh ⇒ Duplicate from the 3D Viewport’s header or press Shift+D to duplicate your selection.Blender creates a copy of your selection and automatically switches to grab mode, allowing you to move the duplicate set of vertices, edges, and faces immediately.
3 Use your mouse to move your new cube off the original and confirm your placement by left-clicking or pressing Enter.None of the vertices in the original cube are selected. Each cube represents a set of linked vertices. So what if you want to select all the vertices in that cube, too? Sure, you can use the various selection tools in the Toolbar, but on complex meshes, even those tools can get cumbersome. Instead, move to the next step.
4 Place your mouse cursor near any vertex in the original cube and press L.Blam! All the vertices in both your cubes are selected.
Of course, the natural next question is, “How do I deselect linked vertices?” That’s just as easy. Place your mouse cursor near any vertex on the duplicate cube you created and press Shift+L. All vertices connected to the one near your mouse cursor are deselected. I’ve found myself using L and Shift+L pretty heavily when trying to place teeth in a mouth I’ve modeled. These hotkeys are very handy.
Quite a few more selection options are available to you when working with meshes. I describe these selection methods in detail in Chapter 5.
 While you’re in Edit mode, you can work only with the current selected objects. You can’t select and manipulate other objects while you’re in Edit mode. That said, as of Blender 2.80, it is possible to have more than one object in Edit mode at the same time. Simply select multiple objects and tab into Edit mode as you normally would with just one object. The only caveat is that this works only on objects of the same type. If, for example, you have a mesh and a metaball selected, only one of them (typically the last one selected) will go into Edit mode when you press Tab.
Still Blender’s No. 1 modeling tool: Extrude
Besides transform operations (see Chapter 3), the most commonly used modeling tool in Blender is the Extrude operator. In meatspace, extrusion is a process whereby some material is pushed through a shaped hole of some sort. When you were a kid, did you ever cut out a shape in cardboard and force clay or mud or Play-Doh through it? If so, you were extruding. If not, you certainly missed out on a good solid five to ten minutes of fun (but don’t worry, it’s never too late to start).
A WORD ON NGONS
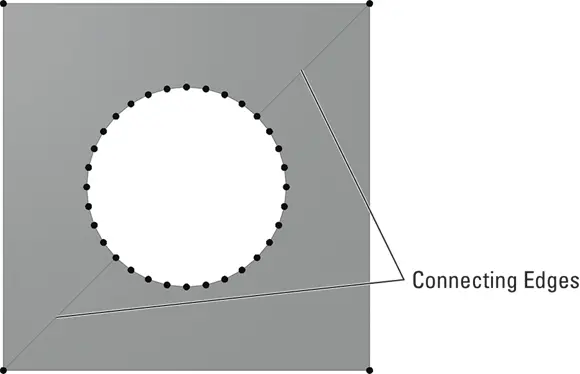
Ngons are a fantastic help when modeling 3D meshes. However, there are still some limitations. For example, an ngon cannot currently have a hole in it — not on its own, at least. As the figure shows, to get a hole, you need to have two faces. There need to be edges that connect from the inner ring of vertices to the outer ring.
As mentioned earlier in the chapter, it’s best to think of ngons as a process tool. On any mesh that’s likely to be used in animation (like a character model) or included in real-time environment like a video game, the finished mesh should be composed of only tris and quads. An exception to this rule of thumb might be for architectural models or models intended to be rendered as still images. Because those meshes won’t be deformed by something like an armature or a lattice and they don’t have to work in a game engine, often you can get away with leaving ngons in them.
Читать дальшеИнтервал:
Закладка:
Похожие книги на «Blender For Dummies»
Представляем Вашему вниманию похожие книги на «Blender For Dummies» списком для выбора. Мы отобрали схожую по названию и смыслу литературу в надежде предоставить читателям больше вариантов отыскать новые, интересные, ещё непрочитанные произведения.


Обсуждение, отзывы о книге «Blender For Dummies» и просто собственные мнения читателей. Оставьте ваши комментарии, напишите, что Вы думаете о произведении, его смысле или главных героях. Укажите что конкретно понравилось, а что нет, и почему Вы так считаете.