Jason Gumster - Blender For Dummies
Здесь есть возможность читать онлайн «Jason Gumster - Blender For Dummies» — ознакомительный отрывок электронной книги совершенно бесплатно, а после прочтения отрывка купить полную версию. В некоторых случаях можно слушать аудио, скачать через торрент в формате fb2 и присутствует краткое содержание. Жанр: unrecognised, на английском языке. Описание произведения, (предисловие) а так же отзывы посетителей доступны на портале библиотеки ЛибКат.
- Название:Blender For Dummies
- Автор:
- Жанр:
- Год:неизвестен
- ISBN:нет данных
- Рейтинг книги:5 / 5. Голосов: 1
-
Избранное:Добавить в избранное
- Отзывы:
-
Ваша оценка:
Blender For Dummies: краткое содержание, описание и аннотация
Предлагаем к чтению аннотацию, описание, краткое содержание или предисловие (зависит от того, что написал сам автор книги «Blender For Dummies»). Если вы не нашли необходимую информацию о книге — напишите в комментариях, мы постараемся отыскать её.
Author Jason van Gumster shares his insight as an independent animator and digital artist to help Blender newcomers turn their ideas into three-dimensional drawings. From exporting and sharing scenes to becoming a part of the Blender community, this accessible book covers it all!
Create 3D characters—no experience required Build scenes with texture and real lighting features Animate your creations and share them with the world Avoid common rookie mistakes This book is the ideal starting place for newcomers to the world of 3D modeling and animation.
Blender For Dummies — читать онлайн ознакомительный отрывок
Ниже представлен текст книги, разбитый по страницам. Система сохранения места последней прочитанной страницы, позволяет с удобством читать онлайн бесплатно книгу «Blender For Dummies», без необходимости каждый раз заново искать на чём Вы остановились. Поставьте закладку, и сможете в любой момент перейти на страницу, на которой закончили чтение.
Интервал:
Закладка:
That said, once you’re in a workspace, you still have the ability to re-organize and adjust it, adding and removing areas and editors as you see fit. As noted in the previous chapter, a Blender area can contain any editor type. You can see what editor types are available by left-clicking the button on the far left of that editor’s header. Figure 2-1 shows the menu that appears when you press this button.
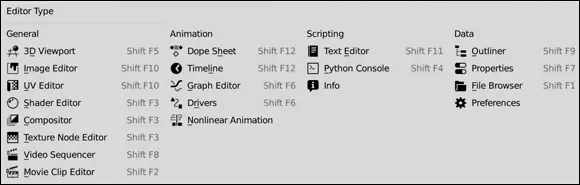
FIGURE 2-1:The Editor Type menu.
Each editor type serves a specific purpose, but you can organize them into four basic categories, as shown in the menu: general editors, animation editors, scripting editors, and data editors. The following subsections give you an overview of each editor, organized by category.
General editors
The editors covered in this section are usually the most common way of interfacing with objects in your 3D scene and actually creating things in Blender.
 You may notice that the same hotkey combination gets listed for multiple editors. The reason for this re-use of hotkeys is because those editors often get used together in a particular workflow or have a similar work paradigm, so having the same hotkey allows you to quickly toggle or shuffle through those editors.
MENUS IN BLENDER
There’s a somewhat unique quirk of Blender’s menus. Because editors and their headers can literally be just about anywhere in a Blender window, depending on how you’ve split it, menus will either roll down or up from wherever you click, depending on where there’s the most available space. Furthermore, the menus are designed to help you by keeping the distance you need to move your mouse cursor as short as possible. In practice, this means that when you open a menu from an editor’s header near the bottom of the Blender window, it flows upward with the first menu item at the bottom, closest to your mouse cursor. When you open a header menu near the top of the Blender window, it flows downward and the first item is at the top.
For floating menus like the Add (Shift+A) menu in the 3D Viewport (covered in Chapter 4), the behavior is a little bit different. Those menus always list the first item at the top; however , Blender remembers the last item you picked in any of these floating menus and automatically places that item under your mouse cursor. Again, this is for speedy workflow. The idea is that if you chose one menu item last time, it’s likely that you want to pick it again this time. To reduce the distance you have to move the mouse cursor, Blender facilitates this notion by jumping directly to the last menu item you chose.
These are editors you use to make things in a Blender scene:
3D Viewport (Shift+F5): Arguably the most-used editor in Blender, the 3D Viewport shows you the three-dimensional view of your model or scene and provides access to many of the tools you can use to modify it.
Image Editor (Shift+F10): With the Image Editor, you can do basic image editing, masking, and digital painting.
UV Editor (Shift+F10): To apply images to the surface of your 3D objects, you often need to go through a process called unwrapping to edit the texture coordinates for your models (see Chapter 9). The UV Editor gives you the bulk of the tools necessary to complete that process.
Shader Editor (Shift+F3): Blender has a node-based editor for creating and modifying materials and textures. Both Cycles and Eevee, Blender’s two integrated render engines, make heavy use of the Shader Editor for materials and lighting. Chapters 8to 10cover materials, textures, and lighting extensively.
Compositor (Shift+F3): Similar to the Shader Editor, Blender uses a node-based system for compositing , or mixing images after they’ve been rendered. To find out all about the Compositor, have a look at Chapter 18.
Texture Node Editor (Shift+F3): The Shader Editor is a great place to generate materials for your 3D objects, but sometimes you need a specific interface for building textures. That’s what the Texture Node Editor is for. Think of it as a Compositor of image data before you render. I get into the Texture Node Editor a little bit in Chapter 9.
Video Sequencer (Shift+F8): Blender’s Video Sequencer is a lightweight video editor. The Video Sequencer isn’t as powerful as some other programs created specifically for editing video, but it’s quite effective for stringing a sequence of scenes together and doing basic effects, overlays, and transitions. See Chapter 17for more on the Video Sequencer.
Movie Clip Editor (Shift+F2): The Movie Clip Editor is the primary go-to editor for Blender’s motion tracking features. Motion tracking is a process where the software analyzes moving parts of a video in an effort to relate them to 3D space. With video that’s been successfully motion tracked, you can integrate 3D models into recorded video. Have you ever wondered how they get computer-generated monsters to look like they’re in the same room as living actors? Motion tracking! Chapter 19is all about motion tracking in Blender.
Animation editors
The following editors relate specifically to animation:
Dope Sheet (Shift+F12): The Dope Sheet is where you create and adjust your overall animation using actions or keying sets. You can use actions to animate all of a character’s movement in a scene, or you can mix them together in the NLA Editor. Keying sets give you the ability to group together a bunch of different animatable attributes.
Timeline (Shift+F12): If you’re working on an animation, the Timeline editor offers you a convenient way to quickly jump from one moment in your animation to another as well as play back the animation. You can also do some simple keyframe editing from this editor.
Graph Editor (Shift+F6): Blender’s Graph Editor shows a graphical representation of animatable attributes in your scene as they change over time.
Drivers (Shift+F6): Drivers are a bit of an advanced rigging topic. Simply put, drivers give you the ability to control one animatable parameter with the values of another. For example, you could control the Z-axis rotation of one object with the Y-axis location of another. The Drivers editor is what you use to map and define that relationship.
Nonlinear Animation: The Nonlinear Animation editor allows you to mix pre-animated actions on a single character (such as mixing a waving hand animation with a walking animation to have your character walk and wave her hand at the same time).
Scripting editors
The following editors are useful for automating tasks within Blender:
Text Editor (Shift+F11): Blender’s integrated Text Editor is not only handy for keeping notes about your scenes and models, but once you become a more advanced user, it’s also a convenient place to write and test your own Python scripts and material shaders in Blender.
Python Console (Shift+F4): The Console is a pretty handy editor that’s more often utilized by advanced users to help write custom Python scripts. It’s a “live” console where you can use the Python language to directly issue commands to Blender.
Info: The Info editor displays basic information about your scene. It also serves as a report space where warnings and errors are logged. This can be used to figure out what happened if a feature doesn’t work as expected.
Data editors
Интервал:
Закладка:
Похожие книги на «Blender For Dummies»
Представляем Вашему вниманию похожие книги на «Blender For Dummies» списком для выбора. Мы отобрали схожую по названию и смыслу литературу в надежде предоставить читателям больше вариантов отыскать новые, интересные, ещё непрочитанные произведения.


Обсуждение, отзывы о книге «Blender For Dummies» и просто собственные мнения читателей. Оставьте ваши комментарии, напишите, что Вы думаете о произведении, его смысле или главных героях. Укажите что конкретно понравилось, а что нет, и почему Вы так считаете.