James C. Kessler - Fundamentals of Fixed Prosthodontics
Здесь есть возможность читать онлайн «James C. Kessler - Fundamentals of Fixed Prosthodontics» — ознакомительный отрывок электронной книги совершенно бесплатно, а после прочтения отрывка купить полную версию. В некоторых случаях можно слушать аудио, скачать через торрент в формате fb2 и присутствует краткое содержание. Жанр: unrecognised, на английском языке. Описание произведения, (предисловие) а так же отзывы посетителей доступны на портале библиотеки ЛибКат.
- Название:Fundamentals of Fixed Prosthodontics
- Автор:
- Жанр:
- Год:неизвестен
- ISBN:нет данных
- Рейтинг книги:3 / 5. Голосов: 1
-
Избранное:Добавить в избранное
- Отзывы:
-
Ваша оценка:
Fundamentals of Fixed Prosthodontics: краткое содержание, описание и аннотация
Предлагаем к чтению аннотацию, описание, краткое содержание или предисловие (зависит от того, что написал сам автор книги «Fundamentals of Fixed Prosthodontics»). Если вы не нашли необходимую информацию о книге — напишите в комментариях, мы постараемся отыскать её.
Fundamentals of Fixed Prosthodontics — читать онлайн ознакомительный отрывок
Ниже представлен текст книги, разбитый по страницам. Система сохранения места последней прочитанной страницы, позволяет с удобством читать онлайн бесплатно книгу «Fundamentals of Fixed Prosthodontics», без необходимости каждый раз заново искать на чём Вы остановились. Поставьте закладку, и сможете в любой момент перейти на страницу, на которой закончили чтение.
Интервал:
Закладка:
When the mandible has “dropped back,” firm pressure is applied to seat the condyles anterosuperiorly in the glenoid fossae (centric relation). An upward-lifting force is applied on the inferior border of the mandible by the fingers of each hand while a downward force is applied to the symphysis by the thumbs ( Fig 4-3). With firm seating pressure, the dentist should once again open and close the mandible in small increments of 2.0 to 5.0 mm while gradually closing the mandible to the point of first tooth contact. The mandible should not be allowed to deviate from this arc while closing. This position of initial tooth contact with the mandible in the optimum position is the centric relation contact position (CRCP).
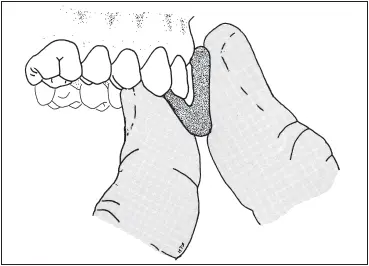
Fig 4-4Green stick compound is molded to form the anterior programming device.
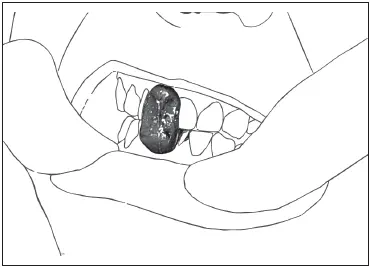
Fig 4-5The patient is guided into centric relation to complete formation of the anterior programming device.
A piece of 28-gauge green wax is lightly adapted over both quadrants of the maxillary teeth, and the mandible is again manipulated into centric relation. At this position, the teeth are tapped together lightly until perforations are made in the wax at CRCP. The wax is removed and stored in a cup of cool water. This is used in the articulation of casts in chapter 5.
An anterior programming device, or jig, is made to establish a predetermined stop to vertical closure with the condyles in optimum position. The absence of deflecting incline tooth contact allows muscle function to be reprogrammed to eliminate the adaptive arc of closure. A 2.5-cm (1.0-inch) length of green stick compound is softened in hot tap water and bent into a J. The compound is placed over the midline between the two maxillary central incisors, with the short leg of the J on the facial surface, extending approximately halfway between the incisal edge and the gingiva. While the compound is still quite soft, it should be quickly adapted to the maxillary teeth using the following three-step procedure:
1 The facial portion of the compound should be firmly adapted into the labial embrasure with the thumb while the compound is thinned out to an approximate thickness of 2.0 mm.
2 Both thumbs should be placed on the facial and both index fingers on the lingual, with approximately 6.0 mm (1/4 inch) of space between the tips. The compound should be molded to the lingual surface by squeezing tightly ( Fig 4-4).
3 While the finger posture and pressure in step 2 are maintained, the fingertips should be pushed closer together to form a spine of compound at approximately the midline. (The entire process described should take no more than a few seconds, and the compound should still be soft enough to mold further as the patient’s mandible is closed into it.)
While the compound is still soft, the mandibular positioning previously rehearsed should be repeated, guiding the patient into a centric relation position while arcing the mandible closed until the mandibular incisors have made an indentation in the compound and the posterior teeth are 1.0 mm out of contact ( Fig 4-5). The compound is cooled, and the accuracy of the programming device is confirmed. There are two important points to be checked at this time:
1 The condyles are in the optimum position in their fossae, confirmed by lightly tapping the mandibular incisors into the compound. The patient should close precisely into the programming device with no deflection.
2 The patient must not be closed to the point of contact between the maxillary and mandibular teeth. The mandibular teeth should make contact only with the compound programming device and be no closer than 1.0 mm to the maxillary teeth at any location in the arch.
If the patient’s posture is maintained with the chair back and the chin up, the face will be parallel with the floor, and a well-adapted compound programming device should stay firmly in place. If necessary, it can be held in place by the patient, using his or her index finger ( Fig 4-6). It need not be removed until the centric relation registration has been completed.
With the programming device in the mouth, the twin-barrel cartridge of bite registration material (eg, Stat BR, Kerr; Regisil PB, Dentsply Caulk) should be placed in the impression material dispenser and a new tip locked on ( Fig 4-7). The registration material is then mixed by expressing it from the dispenser with steady pressure on the trigger.
Fig 4-6The patient holds the programming device in position while the operator manipulates the mandible.
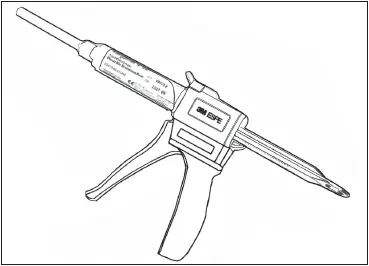
Fig 4-7The cartridge of bite registration material is placed in the impression material dispenser with a new tip.
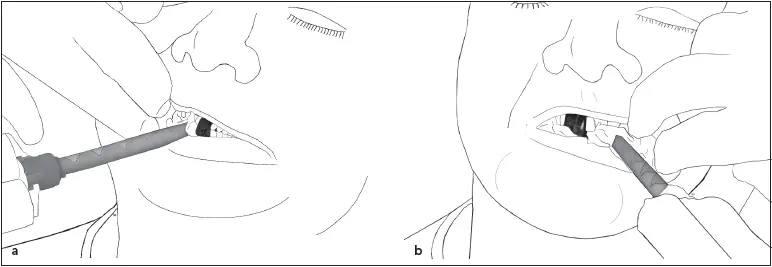
Fig 4-8Registration material is injected between the teeth on the right (a) and left (b) sides.
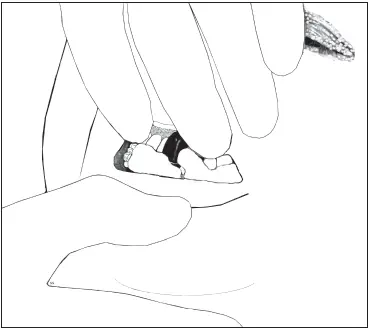
Fig 4-9The patient is assisted in opening the mouth.
The registration material should be injected between the teeth on both sides of the arch and allowed to harden ( Fig 4-8). When the registration material has set, the patient is assisted in opening the mouth ( Fig 4-9). The bite registrations are removed from each side of the mouth ( Fig 4-10) and rinsed with running water. The programming device is also removed at this time. A sharp laboratory knife is used to remove excess registration material that extends gingivally beyond the occlusal one-third of the tooth ( Fig 4-11). Both the maxillary and mandibular sides of the registrations are trimmed, leaving only the cusp tips of the teeth. The registrations are then trimmed on the facial and lingual sides. The lingual aspect is trimmed, leaving the entire cusp tip indentation in place ( Fig 4-12). The facial aspect is trimmed through the facial cusp tips ( Fig 4-13). Trimming through the facial cusp tips allows complete seating of the registration to be visualized on the maxillary and mandibular casts ( Fig 4-14). The registration is then rinsed with a hospital-grade disinfectant and placed in an unsealed sterilization bag until ready to be used.
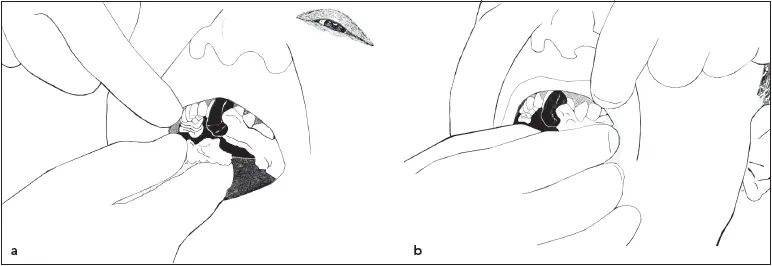
Fig 4-10The registrations are removed from the right (a) and left (b) sides of the mouth.

Fig 4-11 (a and b) Registration material extending gingival to the occlusal one-third of the teeth is removed.
Читать дальшеИнтервал:
Закладка:
Похожие книги на «Fundamentals of Fixed Prosthodontics»
Представляем Вашему вниманию похожие книги на «Fundamentals of Fixed Prosthodontics» списком для выбора. Мы отобрали схожую по названию и смыслу литературу в надежде предоставить читателям больше вариантов отыскать новые, интересные, ещё непрочитанные произведения.


Обсуждение, отзывы о книге «Fundamentals of Fixed Prosthodontics» и просто собственные мнения читателей. Оставьте ваши комментарии, напишите, что Вы думаете о произведении, его смысле или главных героях. Укажите что конкретно понравилось, а что нет, и почему Вы так считаете.