James C. Kessler - Fundamentals of Fixed Prosthodontics
Здесь есть возможность читать онлайн «James C. Kessler - Fundamentals of Fixed Prosthodontics» — ознакомительный отрывок электронной книги совершенно бесплатно, а после прочтения отрывка купить полную версию. В некоторых случаях можно слушать аудио, скачать через торрент в формате fb2 и присутствует краткое содержание. Жанр: unrecognised, на английском языке. Описание произведения, (предисловие) а так же отзывы посетителей доступны на портале библиотеки ЛибКат.
- Название:Fundamentals of Fixed Prosthodontics
- Автор:
- Жанр:
- Год:неизвестен
- ISBN:нет данных
- Рейтинг книги:3 / 5. Голосов: 1
-
Избранное:Добавить в избранное
- Отзывы:
-
Ваша оценка:
Fundamentals of Fixed Prosthodontics: краткое содержание, описание и аннотация
Предлагаем к чтению аннотацию, описание, краткое содержание или предисловие (зависит от того, что написал сам автор книги «Fundamentals of Fixed Prosthodontics»). Если вы не нашли необходимую информацию о книге — напишите в комментариях, мы постараемся отыскать её.
Fundamentals of Fixed Prosthodontics — читать онлайн ознакомительный отрывок
Ниже представлен текст книги, разбитый по страницам. Система сохранения места последней прочитанной страницы, позволяет с удобством читать онлайн бесплатно книгу «Fundamentals of Fixed Prosthodontics», без необходимости каждый раз заново искать на чём Вы остановились. Поставьте закладку, и сможете в любой момент перейти на страницу, на которой закончили чтение.
Интервал:
Закладка:
15. Whitsett LD, Shillingburg HT Jr, Keenan MP. Modifications of a new semi-adjustable articulator for use with a caliper style ear face-bow. J Calif Dent Assoc 1977;5(4):32–38.
Table 3-1 Accuracy of arbitrary hinge axis points*
| Measurements and landmarks for arbitrary hinge axis points | Arbitrary points within 6 mm of kinematic hinge axis points (%) | Investigator(s) |
|---|---|---|
| 13 mm from posterior margin of tragus to canthus | 98.0 92.158.3 | Schallhorn 7Beyron 8Beck 9 |
| 13 mm in front of anterior margin of meatus | 16.7 40.0 | Beck 9Lauritzen and Bodner 10 |
| 13 mm from foot of tragus to canthus | 33.0 | Teteruck and Lundeen 12 |
| 10 mm anterior to center of external auditory meatus and 7 mm below Frankfort plane | 83.3 | Beck 9 |
| Ear axis | 75.5 | Teteruck and Lundeen 12 |
*Data from Whitsett et al. 15
4 Interocclusal Records
After the maxillary cast has been accurately affixed to the articulator using a facebow, the mandibular cast must be oriented to the maxillary cast with equal exactitude to be able to diagnose the patient’s occlusion. 1,2Centric relation records are used to replicate, on the articulator, the relationship between the maxillary and mandibular arches that exists when the condyles are in their most anterosuperior position in the glenoid fossae. Lateral interocclusal records are used to adjust the condylar guidance of the articulator. Then, it is possible to observe tooth relationships and identify deflective contacts and/or other occlusal discrepancies from the casts on the articulator. When this information has been gathered and assessed, a determination can be made as to what corrective measures, if any, will be performed on the occlusion.
A distinction must be made between mounting for diagnosis and mounting for treatment. The attachment of casts to an articulator for diagnosis will be done with the condyles in a centric relation position. When casts are articulated for restoration of a significant portion of the occlusion, it also may be done with the condyles in the centric relation position. However, the beginning operator usually restores only limited segments of the occlusion at one time. Mounting casts for restoration of only a small part of the occlusion generally is done with the teeth in a position of maximal intercuspation.
Centric Relation Record
To mount the mandibular cast on the articulator, it is necessary to record the relationship of the dental arches to each other. There are three techniques that are frequently used in locating the centric relation position: (1) chin point guidance, (2) bilateral manipulation, and (3) the unguided method. With a computer-assisted three-dimensional mandibular recording device, Hobo and Iwata 3analyzed condylar position achieved by the three methods. Chin point guidance puts the condyles in the most posterior and superior position, while the bilateral and unguided methods allow the muscles to guide the condyles into a physiologic anterosuperiorly braced position on the articular disc along the articular eminence.
The unguided method produces a physiologic “muscle position,” but it can be difficult to achieve consistent results because of the patient’s muscle activity. Muscle proprioception is minimized by separating the teeth with a leaf gauge composed of several 0.1-mm-thick plastic strips, which help to eliminate direct proprioceptor responses. While the patient occludes with light pressure, strips are added one at a time in the anterior region until the patient no longer feels any posterior tooth contact. This permits the muscles to act freely and allows the condyles to move into a physiologic position. 4,5Then the muscles will rotate the mandible anteriorly and superiorly.
Armamentarium
Cotton rolls
Green stick compound
Polyvinyl siloxane registration material
Impression material dispenser
Laboratory knife with no. 25 blade
28-gauge green wax
No. 10 red-inked silk ribbon
Technique
The most consistent, repeatable results can be accomplished using the technique of “bimanual manipulation” described by Dawson. 6,7The neuromuscular system monitors all sensory impulses from the teeth and jaws and programs occlusal contact to occur where the protective stimuli are minimal. This position, through repeated closures, becomes habitual and is maintained at the expense of normal muscle function. 8To enable the condyles to be placed in an unstrained position, the musculature must first be deprogrammed from its habitual closing pattern.
A simple means of doing this is to place a cotton roll between the anterior teeth and instruct the patient to “bite on your back teeth.” It should be confirmed that there is no contact of the posterior teeth. If the cotton roll is placed as soon as the patient is seated, the operator and assistant can prepare the materials for the subsequent interocclusal record during the 5 minutes that the patient’s jaws remain closed. After this time, the “memory” of the position in which the teeth intercuspate fully will likely have been lost, and the mandible can be manipulated more easily into its optimum position. As soon as the cotton roll has been removed, mandibular manipulation should be initiated. The patient should not be allowed to close the teeth together again, as this will permit the musculature to readapt to a tooth-guided closure.
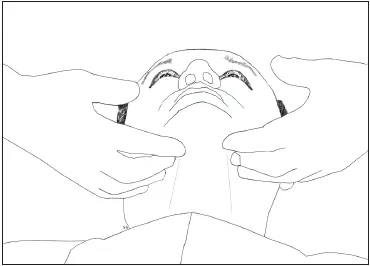
Fig 4-1The fingers are placed along the inferior border of the mandible.
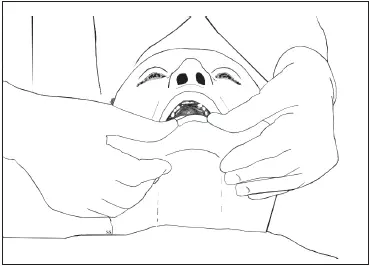
Fig 4-2With the thumbs in position, the mandible is manipulated into a centric relation position.
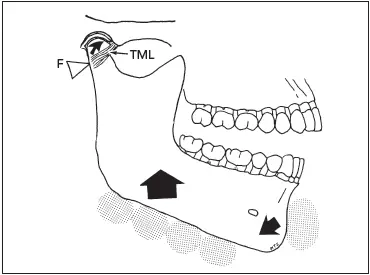
Fig 4-3The temporomandibular ligament (TML) acts as the posterior limit and fulcrum (F). The downward force of the thumbs and upward force of the fingers help to seat the condyles in the posterosuperior portion of the glenoid fossa. (Modified from Dawson 7with permission.)
The patient should be seated with the chair back approximately 45 degrees from the floor. The patient’s head should be tilted back with the chin up so that the face is parallel with the floor. This position tends to keep the patient from protruding the mandible. The dentist should take a position behind the patient that will facilitate stabilization of the patient’s head between the dentist’s rib cage and forearm. The patient’s head must not move while the mandible is being manipulated. All four fingers of each hand should be placed on the lower border of the mandible, making sure that the fingertips are in direct contact with bone ( Fig 4-1).
The thumbs should be placed lightly over the mandibular symphysis so that they touch each other at the midline. The patient is instructed to open approximately 35 mm and then asked to relax the jaw as the dentist closes it, guiding the mandible posteriorly into a terminal hinge relationship with a gentle motion ( Fig 4-2). Observation of the patient’s mandible will demonstrate that it shifts posteriorly with this gentle motion.
Читать дальшеИнтервал:
Закладка:
Похожие книги на «Fundamentals of Fixed Prosthodontics»
Представляем Вашему вниманию похожие книги на «Fundamentals of Fixed Prosthodontics» списком для выбора. Мы отобрали схожую по названию и смыслу литературу в надежде предоставить читателям больше вариантов отыскать новые, интересные, ещё непрочитанные произведения.


Обсуждение, отзывы о книге «Fundamentals of Fixed Prosthodontics» и просто собственные мнения читателей. Оставьте ваши комментарии, напишите, что Вы думаете о произведении, его смысле или главных героях. Укажите что конкретно понравилось, а что нет, и почему Вы так считаете.