Dwight Spivey - iPhone For Seniors For Dummies
Здесь есть возможность читать онлайн «Dwight Spivey - iPhone For Seniors For Dummies» — ознакомительный отрывок электронной книги совершенно бесплатно, а после прочтения отрывка купить полную версию. В некоторых случаях можно слушать аудио, скачать через торрент в формате fb2 и присутствует краткое содержание. Жанр: unrecognised, на английском языке. Описание произведения, (предисловие) а так же отзывы посетителей доступны на портале библиотеки ЛибКат.

- Название:iPhone For Seniors For Dummies
- Автор:
- Жанр:
- Год:неизвестен
- ISBN:нет данных
- Рейтинг книги:4 / 5. Голосов: 1
-
Избранное:Добавить в избранное
- Отзывы:
-
Ваша оценка:
iPhone For Seniors For Dummies: краткое содержание, описание и аннотация
Предлагаем к чтению аннотацию, описание, краткое содержание или предисловие (зависит от того, что написал сам автор книги «iPhone For Seniors For Dummies»). Если вы не нашли необходимую информацию о книге — напишите в комментариях, мы постараемся отыскать её.
can help you take your first iPhone steps and save you the trouble of finding someone to answer your questions. It features the tasks that you most likely want to do—like chatting on FaceTime, shooting videos and photos, and connecting on social media. It also introduces you to the App store so that you can break away from the iPhone’s pre-installed apps and really personalize your shiny gadget.
The easy-to-follow steps in this book with its accompanying illustrations help you manage, personalize, and communicate using your iPhone. You discover how to do everything from shopping online and organizing appointments to taking and sharing pictures and downloading and listening to your favorite music. It provides help with brand new iPhone models as well as older devices, including how to upgrade older iPhones with the latest software. Topics include how to:
Swipe, tap, and scroll through the iPhone interface Capture memorable photos and home videos Find apps in the App store Customize your iPhone’s accessibility features Bypass the keyboard and use Siri Read books and listen to music Keep your iPhone working If you’re new to the iPhone or just need a reminder on how to do a few things,
gives you all the tips and tricks you need. You’ll soon be swiping and tapping its screen as if you’ve been doing it forever.
iPhone For Seniors For Dummies — читать онлайн ознакомительный отрывок
Ниже представлен текст книги, разбитый по страницам. Система сохранения места последней прочитанной страницы, позволяет с удобством читать онлайн бесплатно книгу «iPhone For Seniors For Dummies», без необходимости каждый раз заново искать на чём Вы остановились. Поставьте закладку, и сможете в любой момент перейти на страницу, на которой закончили чтение.
Интервал:
Закладка:
Learn App Switcher Basics
App Switcher in iOS 15 lets you easily switch from one app to another without closing the first one and returning to the Home screen. This is accomplished by previewing all open apps and jumping from one to another; you can completely quit an app by simply swiping it upward. To learn the ropes of App Switcher, follow these steps:
1 Open an app.
2 Press the Home button twice. Or for iPhone models without a Home button, drag up from the very bottom of the screen and pause a moment with your finger still on the screen. App Switcher appears and displays a list of open apps (see Figure 3-2). FIGURE 3-2
3 To locate another app that you want to switch to, flick to scroll to the left or right.
4 Tap an app to switch to it.
 To close App Switcher and return to the app you were working in, press the Home button once. If you have an iPhone without a Home button, tap an app in the list or swipe up from the bottom of the screen to exit the App Switcher.
Examine the iPhone Cameras
iPhones have front- and back-facing cameras. You can use the cameras to take still photos (covered in more detail in Chapter 19) or shoot videos (covered in Chapter 20).
For now, take a quick look at your camera by tapping the Camera app icon on the Home screen. The app opens, as shown in Figure 3-3.
You can use the controls on the screen to
Switch between the front and rear cameras.
Change from still camera to video camera operation by using the slider at the bottom of the screen.
Take a picture or start recording a video.
Choose a 3- or 10-second delay with the timer icon.
Change aspect ratios.
Turn HDR (high dynamic range for better contrast) on or off.
Tap the flash icon to set the flash to On, Off, or Auto.
Use color filters when taking photos or videos. FIGURE 3-3
Take a burst of photos by tapping and dragging left or down (depending on the phone’s orientation) on the camera’s button. A small photo count will display above the button to show how many photos you’ve taken.
Open previously captured images or videos.
When you view a photo or video, you can use an iPhone sharing feature to send the image by AirDrop (iPhone 5 and later), Message, Notes, Mail, and other options (depending on which apps you’ve installed). You can also share through iCloud Photo Sharing, a tweet, Facebook, Instagram, and other apps.
You can do even more things with images: Print them, create a slideshow, use a still photo as wallpaper (that is, as your Home or lock screen background image), assign a still photo to represent a contact. See Chapters 19and 20for more detail about using the iPhone cameras.
Take a Look at Face ID
Many newer iPhone models don’t have a Home button, so Touch ID (which uses fingerprints to authenticate a user) isn’t available. However, they do use a different — and very cool — method of authenticating a user: Face ID. Face ID uses your iPhone’s built-in cameras and scanners to scan your face and save a profile of it. It then remembers the information and compares it to whoever is facing the iPhone. If the face doesn’t match the profile, the person can’t access the iPhone (unless they know and use your passcode, which you have to set up to use Face ID). Face ID is so advanced that it can even work in total darkness.
To set up Face ID:
1 Go to Settings and tap Face ID & Passcode.
2 Tap Set Up Face ID.
3 Hold the iPhone in front of your face (in portrait mode, not landscape).
4 Tap the Get Started button and then follow the prompts to slowly move your head in a complete circle.If you have difficulty moving your head, tap the Accessibility Options button at the bottom of the screen and follow the prompts from there.
5 Tap Continue and follow the prompts to perform the circle step again.
6 Tap Done when finished.
The next time you want to use your iPhone, simply hold it up in front of you, and swipe up from the bottom of the screen when the lock icon unlocks (see Figure 3-4). You’ll jump right into the Home screen or whatever app you were last using.
For more information on using Face ID and its capabilities, visit https://support.apple.com/en-us/HT208109 .
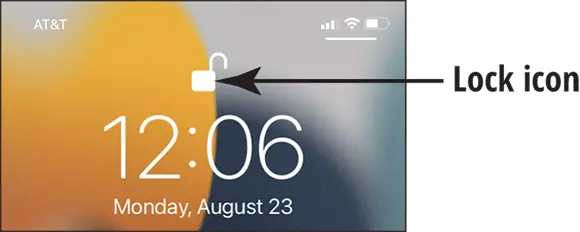
FIGURE 3-4
Discover Control Center
Control Center is a one-stop screen for common features and settings, such as connecting to a network, increasing screen brightness or volume, and even turning the built-in flashlight on or off. Here's how to use it:
1 To display Control, swipe up from the very bottom of the screen. If your iPhone doesn't have a Home button, swipe from the upper-right corner of the screen to the center.The Control Center screen appears, as shown in Figure 3-5.
2 In the Control Center screen, tap an icon to access and change a setting, or drag a slider to adjust a setting.
3 To hide Control Center, swipe down from the top of Control Center (iPhone with a Home button) or swipe up from the bottom of the screen (iPhone without a Home button).
Some options in Control Center are hidden from initial view but may be accessed by pressing and holding down on an icon in Control Center. For example, use press and hold down on any of the Communications icons (airplane mode, cellular data, Wi-Fi, and Bluetooth) to reveal two more options: AirDrop and Personal Hotspot (as shown in Figure 3-6).
Other press-and-hold-down options in Control Center include
Adjusting the Flashlight brightness level
Selecting a device for AirPlay
Setting a quick timer
Instantly recording a video or taking a selfie
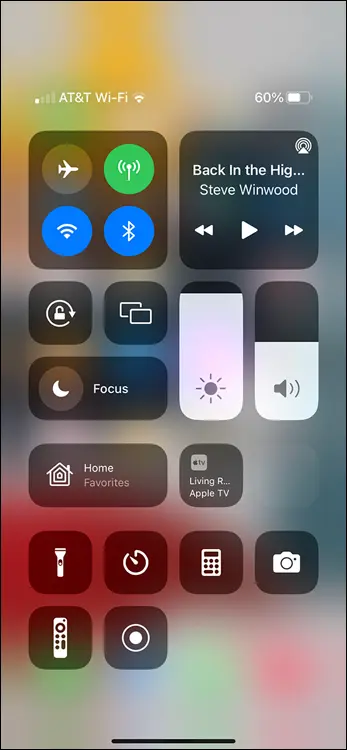
FIGURE 3-5
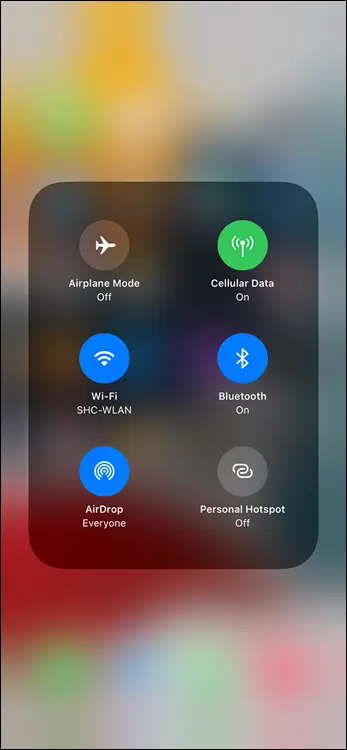
FIGURE 3-6
Try pressing and holding down on other icons in Control Center to see what other options are waiting for you to discover. If you hold down on an item and its icon pulses just once, no further options are available for the item.
Did you notice the empty space in Control Center when you opened it? That’s because iOS 15 allows you to customize Control Center (a feature I love). All that extra space is waiting to be filled by you:
1 Tap Settings.
2 Tap Control Center to open the Control Center settings, as shown in Figure 3-7. FIGURE 3-7
3 Add or remove items from Control Center:To add an item, tap the + in a green circle to the left of the item. You’ll see the item in Control Center the next time you visit it.To remove an item, tap the − in a red circle to the left of the item, and then tap the Remove button that appears to the right.
Remember to press and hold down on an item to see if the item has any extras. If the item just bounces when you press and hold down, no further options are available.
Интервал:
Закладка:
Похожие книги на «iPhone For Seniors For Dummies»
Представляем Вашему вниманию похожие книги на «iPhone For Seniors For Dummies» списком для выбора. Мы отобрали схожую по названию и смыслу литературу в надежде предоставить читателям больше вариантов отыскать новые, интересные, ещё непрочитанные произведения.


Обсуждение, отзывы о книге «iPhone For Seniors For Dummies» и просто собственные мнения читателей. Оставьте ваши комментарии, напишите, что Вы думаете о произведении, его смысле или главных героях. Укажите что конкретно понравилось, а что нет, и почему Вы так считаете.