Paul McFedries - Teach Yourself VISUALLY Microsoft 365
Здесь есть возможность читать онлайн «Paul McFedries - Teach Yourself VISUALLY Microsoft 365» — ознакомительный отрывок электронной книги совершенно бесплатно, а после прочтения отрывка купить полную версию. В некоторых случаях можно слушать аудио, скачать через торрент в формате fb2 и присутствует краткое содержание. Жанр: unrecognised, на английском языке. Описание произведения, (предисловие) а так же отзывы посетителей доступны на портале библиотеки ЛибКат.
- Название:Teach Yourself VISUALLY Microsoft 365
- Автор:
- Жанр:
- Год:неизвестен
- ISBN:нет данных
- Рейтинг книги:4 / 5. Голосов: 1
-
Избранное:Добавить в избранное
- Отзывы:
-
Ваша оценка:
Teach Yourself VISUALLY Microsoft 365: краткое содержание, описание и аннотация
Предлагаем к чтению аннотацию, описание, краткое содержание или предисловие (зависит от того, что написал сам автор книги «Teach Yourself VISUALLY Microsoft 365»). Если вы не нашли необходимую информацию о книге — напишите в комментариях, мы постараемся отыскать её.
show
tell
Teach Yourself VISUALLY
Microsoft 365
Teach Yourself VISUALLY Microsoft 365
Teach Yourself VISUALLY Microsoft 365 — читать онлайн ознакомительный отрывок
Ниже представлен текст книги, разбитый по страницам. Система сохранения места последней прочитанной страницы, позволяет с удобством читать онлайн бесплатно книгу «Teach Yourself VISUALLY Microsoft 365», без необходимости каждый раз заново искать на чём Вы остановились. Поставьте закладку, и сможете в любой момент перейти на страницу, на которой закончили чтение.
Интервал:
Закладка:
 If you chose the wrong place, you can search for the file by typing part of the filename or content here.
 Click in the folder list to navigate to the folder containing the document you want to open.
 Click the document you want to open.
 Click Open.
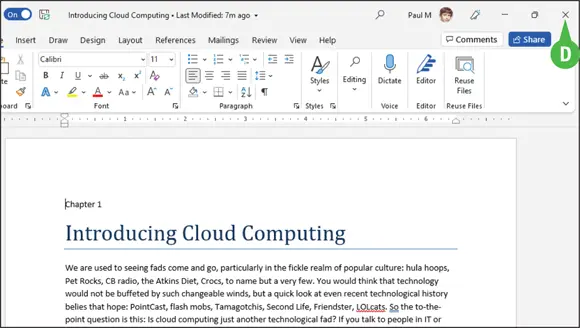
The file opens in the app window.
 To close a file, click the Closebutton (
  ) in the upper-right corner. If you have not saved the file, the app prompts you to save it.
TIP
Are there any tricks to searching for a file?
Yes. To search most effectively for a file, start by following steps 1 to 5 to locate and open the folder in which you believe the file was saved. Then, type all or part of the file’s name in the Search box and press  . Files containing the search term in either the filename or as part of the file’s content appear highlighted in the Open dialog box. Word also displays files containing a close match.
Print a File
If a printer is connected to your computer, you can print your Microsoft 365 files. For example, you might distribute printouts of a file as handouts in a meeting.
When you print a file, you have two options: You can send a file directly to the printer using the default settings, or you can open the Microsoft 365 app’s Print screen to change these settings. For example, you might opt to print just a portion of the file, print using a different printer, print multiple copies of a file, collate the printouts, and so on. (Printer settings vary slightly among Microsoft 365 apps.)
Print a File

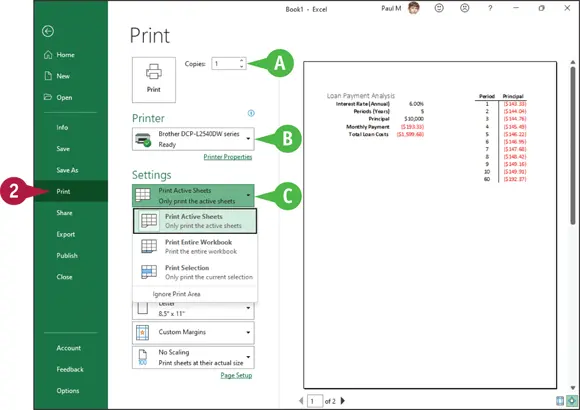
 Click the Filetab.
Backstage view appears.
 Click Print.
 You can specify the number of copies to print by clicking the Copies
  .
.
 You can choose a printer from the Printerdrop-down list.
You can choose to print a selection from the file or specific pages using the available settings in the Settings list.
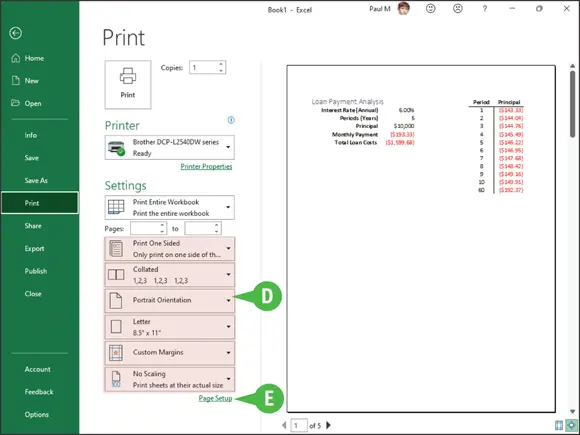
You can select additional print options under Settings. For example, you can choose from various paper sizes and to print in landscape or portrait orientation.
 If you do not see the setting you want to change, click Page Setupto view additional settings.
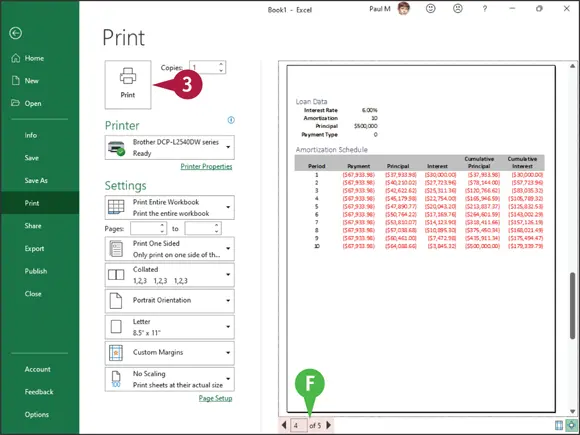
 You can page through a preview of your printed file by clicking the previous arrow (
  ) and the next arrow (
  ).
).
 Click Print.
The Microsoft 365 app sends the file to the printer.
TIP
How do I print using default settings?
If you do not need to change any of your default print settings, you can simply click the Quick Printbutton on the Quick Access Toolbar (QAT). If you do not see the QAT, see Chapter 1to learn how to display it.
If the Quick Print button does not appear on your QAT, you can add it. To do so, click the Morebutton (  ) on the QAT and then click Quick Printin the list of commands that appears. You can also add a Print Preview and Printbutton to the QAT; clicking that button opens the Print screen from Backstage view.
Select Data
You can select data in your file to perform different tasks, such as deleting it, changing its font or alignment, applying a border around it, or copying and pasting it. Selected data appears highlighted.
Depending on the app you are using, Microsoft 365 offers several different techniques for selecting data. For example, in Word, PowerPoint, Outlook, and Publisher, you can select a single character, a word, a sentence, a paragraph, or all the data in the file. In Excel and Access tables, you typically select cells. In OneNote, use the technique appropriate to the type of data you want to select.
Select Data
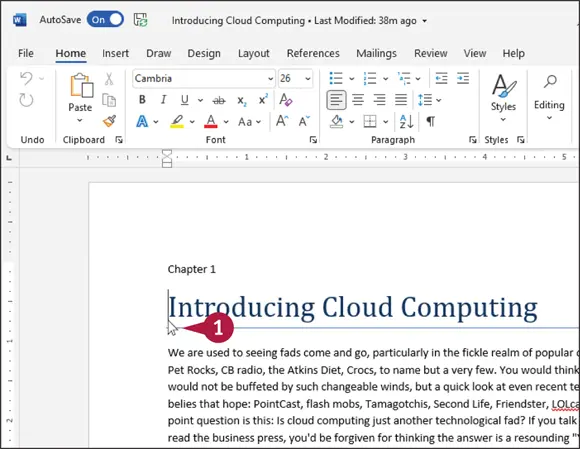
Select Data in Word, PowerPoint, or Publisher
Note: You can use this technique to select characters, words, sentences, and paragraphs.
Читать дальшеИнтервал:
Закладка:
Похожие книги на «Teach Yourself VISUALLY Microsoft 365»
Представляем Вашему вниманию похожие книги на «Teach Yourself VISUALLY Microsoft 365» списком для выбора. Мы отобрали схожую по названию и смыслу литературу в надежде предоставить читателям больше вариантов отыскать новые, интересные, ещё непрочитанные произведения.


Обсуждение, отзывы о книге «Teach Yourself VISUALLY Microsoft 365» и просто собственные мнения читателей. Оставьте ваши комментарии, напишите, что Вы думаете о произведении, его смысле или главных героях. Укажите что конкретно понравилось, а что нет, и почему Вы так считаете.