Mark Middlebrook - AutoCAD 2005 for Dummies
Здесь есть возможность читать онлайн «Mark Middlebrook - AutoCAD 2005 for Dummies» — ознакомительный отрывок электронной книги совершенно бесплатно, а после прочтения отрывка купить полную версию. В некоторых случаях можно слушать аудио, скачать через торрент в формате fb2 и присутствует краткое содержание. Город: Indianapolis, Год выпуска: 2004, ISBN: 2004, Издательство: Wiley Publishing, Inc, Жанр: Программы, на английском языке. Описание произведения, (предисловие) а так же отзывы посетителей доступны на портале библиотеки ЛибКат.

- Название:AutoCAD 2005 for Dummies
- Автор:
- Издательство:Wiley Publishing, Inc
- Жанр:
- Год:2004
- Город:Indianapolis
- ISBN:0-7645-7138-9
- Рейтинг книги:5 / 5. Голосов: 1
-
Избранное:Добавить в избранное
- Отзывы:
-
Ваша оценка:
AutoCAD 2005 for Dummies: краткое содержание, описание и аннотация
Предлагаем к чтению аннотацию, описание, краткое содержание или предисловие (зависит от того, что написал сам автор книги «AutoCAD 2005 for Dummies»). Если вы не нашли необходимую информацию о книге — напишите в комментариях, мы постараемся отыскать её.
AutoCAD is more than just another application program, it’s a complete environment for drafting and design. So if you’re new to AutoCAD, you need to know several things to get off to a good start — especially how to use the command line area and set up your drawing properly. These key techniques are described in this part of the book.
If you’ve used earlier versions of AutoCAD, you’ll be most interested in the high points of the new release, including some newer interface components. The lowdown on what’s new is here, too.
AutoCAD 2005 for Dummies — читать онлайн ознакомительный отрывок
Ниже представлен текст книги, разбитый по страницам. Система сохранения места последней прочитанной страницы, позволяет с удобством читать онлайн бесплатно книгу «AutoCAD 2005 for Dummies», без необходимости каждый раз заново искать на чём Вы остановились. Поставьте закладку, и сможете в любой момент перейти на страницу, на которой закончили чтение.
Интервал:
Закладка:
DesignCenter’s navigation pane displays a list of drawings that you currently have open in AutoCAD.
5. In the left pane of the DesignCenter palette, click the plus sign next to the name of the drawing that you opened in Step 1.
A list of copyable objects, including Dimstyles, appears.
6. Click and drag the desired dimension style from the right pane of the DesignCenter palette into the window containing the drawing that you opened in Step 2, as shown in Figure 10-4.
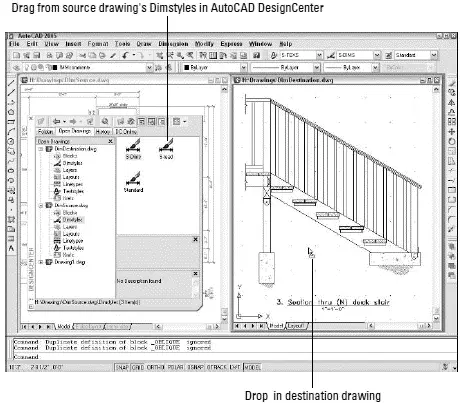
Figure 10-4:Copying a dimension style from one drawing to another.
 If the name of the dimension style that you copy duplicates the name of an existing dimension style in the destination drawing, AutoCAD refuses to overwrite the existing dimension style. In that case, you must first rename the existing dimension style in the destination drawing by using the information in the following section, “Creating and managing dimension styles.”
7. Change the Use Overall Scale Of factor on the Fit tab of the Modify Dimension Style dialog box so that it matches the drawing scale factor of the current drawing.
See Chapter 3 for detailed instructions.
 If you want a dimension style to be available in new drawings, copy the style to a template drawing and use that template to create your new drawings. See Chapter 3 for more information about template drawings.
If you do need to create your own dimension styles, or you want to tweak ones that you copied from another drawing, you use the Dimension Style Manager dialog box, shown in Figure 10-5.
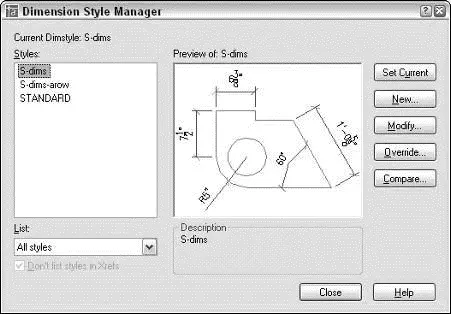
Figure 10-5:Yet another manager, this one for dimension styles.
Every drawing comes with a default dimension style named Standard (for nonmetric drawings) or ISO-25 (for metric drawings). Although you can use and modify the Standard or ISO-25 style, I suggest that you leave it as is and create your own dimension style(s) for the settings that are appropriate to your work. This approach ensures that you can use the default style as a reference. More important, it avoids a potential naming conflict that can change the way your dimensions look if the current drawing gets inserted into another drawing. (Chapter 13 describes this potential conflict.)
The following steps describe how to create your own dimension style(s):
1. Choose Format→ Dimension Style from the menu bar, or click the Dimension Style Manager button on the Styles toolbar.
The Dimension Style Manager dialog box appears.
2. In the Styles list, select the existing dimension style whose settings you want to use as the starting point for the settings of your new style.
For example, select the default dimension style named Standard or ISO-25.
3. Click the New button to create a new dimension style that’s a copy of the existing style.
The Create New Dimension Style dialog box appears.
4. Enter a New Style Name and click Continue.
The New Dimension Style dialog box appears, which is the same as the Modify Dimension Style dialog box shown in Figure 10-6.
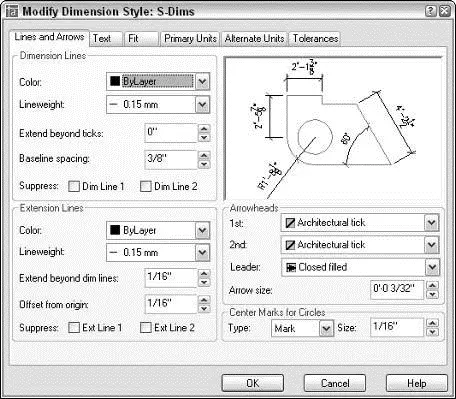
Figure 10-6:Modifying dimension settings.
5. Modify dimension settings on any of the six tabs in the New Dimension Style dialog box.
See the descriptions of these settings in the next section of this chapter. In particular, be sure to set the Use Overall Scale Of factor on the Fit tab to set the drawing scale factor.
6. Click OK to close the New Dimension Style dialog box.
The Dimension Style Manager dialog box reappears.
7. Select your new dimension style from the Styles list, and then click Set Current.
Your new dimension style becomes the current dimension style that AutoCAD uses for future dimensions in this drawing.
8. Click Close.
The Dimension Style Manager dialog box closes.
9. Draw some dimensions to test your new dimension style.
Avoid changing existing dimension styles that you didn’t create, unless you know for sure what they’re used for. When you change a dimension style setting, all dimensions that use that style change to reflect the revised setting. Thus, one small dimension variable setting change can affect a large number of existing dimensions! When in doubt, ask the dimension style’s creator what the dimension style is for and what the consequences of changing it are. If that’s not possible, instead of modifying an existing dimension style, create a new style by copying the existing one, and then modify the new one.
 A further variation on the already baroque dimension style picture is that you can create dimension secondary styles (also called substyles or style families ) — variations of a main style that affect only a particular type of dimension, such as radial or angular. You probably want to avoid this additional complication if you can, but if you open the Dimension Style Manager dialog box and see names of dimension types indented beneath the main dimension style names, be aware that you’re dealing with secondary styles. Look up “dimension styles, secondary styles” on the Index tab in the AutoCAD online help system for more information.
After you click New or Modify in the Dimension Style Manager dialog box, AutoCAD displays a tabbed New/Modify Dimension Style subdialog box with a mind-boggling — and potentially drawing-boggling, if you’re not careful — array of settings. Figure 10-6 shows the settings on the first tab, which I’ve modified from the AutoCAD defaults to conform to one office’s drafting standards.
Fortunately, the dimension preview that appears on all tabs — as well as on the main Dimension Style Manager dialog box — immediately shows the results of most setting changes. With the dimension preview and some trial-and-error changing of settings, you usually can home in on an acceptable group of settings. For more information, use the dialog box help: Click the question mark button on the title bar and then click the setting that you want to know more about.
Before you start messing with dimension style settings, it’s important to know what you want your dimensions to look like when they’re plotted. If you’re not sure how it’s done in your industry, ask others in your office or profession or look at a plotted drawing that someone in the know represents as being a good example.
Интервал:
Закладка:
Похожие книги на «AutoCAD 2005 for Dummies»
Представляем Вашему вниманию похожие книги на «AutoCAD 2005 for Dummies» списком для выбора. Мы отобрали схожую по названию и смыслу литературу в надежде предоставить читателям больше вариантов отыскать новые, интересные, ещё непрочитанные произведения.


Обсуждение, отзывы о книге «AutoCAD 2005 for Dummies» и просто собственные мнения читателей. Оставьте ваши комментарии, напишите, что Вы думаете о произведении, его смысле или главных героях. Укажите что конкретно понравилось, а что нет, и почему Вы так считаете.