Mark Middlebrook - AutoCAD 2005 for Dummies
Здесь есть возможность читать онлайн «Mark Middlebrook - AutoCAD 2005 for Dummies» — ознакомительный отрывок электронной книги совершенно бесплатно, а после прочтения отрывка купить полную версию. В некоторых случаях можно слушать аудио, скачать через торрент в формате fb2 и присутствует краткое содержание. Город: Indianapolis, Год выпуска: 2004, ISBN: 2004, Издательство: Wiley Publishing, Inc, Жанр: Программы, на английском языке. Описание произведения, (предисловие) а так же отзывы посетителей доступны на портале библиотеки ЛибКат.

- Название:AutoCAD 2005 for Dummies
- Автор:
- Издательство:Wiley Publishing, Inc
- Жанр:
- Год:2004
- Город:Indianapolis
- ISBN:0-7645-7138-9
- Рейтинг книги:5 / 5. Голосов: 1
-
Избранное:Добавить в избранное
- Отзывы:
-
Ваша оценка:
AutoCAD 2005 for Dummies: краткое содержание, описание и аннотация
Предлагаем к чтению аннотацию, описание, краткое содержание или предисловие (зависит от того, что написал сам автор книги «AutoCAD 2005 for Dummies»). Если вы не нашли необходимую информацию о книге — напишите в комментариях, мы постараемся отыскать её.
AutoCAD is more than just another application program, it’s a complete environment for drafting and design. So if you’re new to AutoCAD, you need to know several things to get off to a good start — especially how to use the command line area and set up your drawing properly. These key techniques are described in this part of the book.
If you’ve used earlier versions of AutoCAD, you’ll be most interested in the high points of the new release, including some newer interface components. The lowdown on what’s new is here, too.
AutoCAD 2005 for Dummies — читать онлайн ознакомительный отрывок
Ниже представлен текст книги, разбитый по страницам. Система сохранения места последней прочитанной страницы, позволяет с удобством читать онлайн бесплатно книгу «AutoCAD 2005 for Dummies», без необходимости каждый раз заново искать на чём Вы остановились. Поставьте закладку, и сможете в любой момент перейти на страницу, на которой закончили чтение.
Интервал:
Закладка:
 If you want to see multiline text at its final height as you type it, zoom to a reasonable resolution before you start the mText command. If the text would be very small (because you’re zoomed way out) or very large (because you’re zoomed way in), AutoCAD temporarily adjusts the size of the text in the frameless editor to show what you’re typing. When you finish entering the text (as in Step 11), AutoCAD places it in the drawing at the height that you specified.
8. Verify the text font and height.
The text font and height should be right if you correctly performed Steps 1, 4, and 5. If not, you can change these settings in the Font dropdown list and the Font Height edit box in the Text Formatting toolbar.
9. Type text into the text area of the dialog box.
AutoCAD word wraps multiline text automatically. If you want to force a line break at a particular location, press Enter.
10. If you want other formatting, select text, right-click, and select the appropriate option from the right-click menu (as in Figure 9-4).
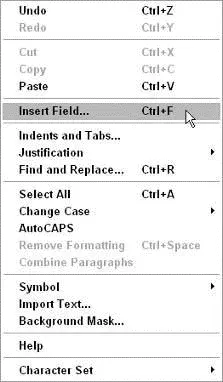
Figure 9-4:More multiline text formatting options in the right-click menu.
11. Click OK in the Text Formatting toolbar (or press Ctrl+Enter).
The Multiline Text Editor window closes, and AutoCAD adds your text to the drawing.
As you can tell by looking at the Text Formatting toolbar and multiline text right-click menu, the mText command gives you plenty of other options. The Text Formatting toolbar includes a Stack/Unstack button for fractions. The right-click menu includes access to the Indents and Tabs feature, a Find and Replace utility, tools for changing between lower-and uppercase, a special Symbol submenu (including some new symbols in AutoCAD 2005), and an Import Text option for importing text from a TXT (ASCII text) file or RTF (Rich Text Format) file. If you think you may have a use for these additional features, choose Contents→Command Reference→Commands→M Commands→MTEXT in AutoCAD’s online help.
 AutoCAD 2005 adds two more options to the multiline text right-click menu: Insert Field and Background Mask.
When you turn on background masking, AutoCAD hides the portions of any objects that lie underneath the text. Use these steps to turn on and control this feature:
1. Right-click in the Multiline Text Editor window and choose Background Mask from the context menu.
2. Click the Use Background Mask check box so that this option is turned on.
3. Either click Use Background (to make the mask the same color as the drawing area’s background color) or choose a color from the drop-down list (to make the text appear in a solid rectangle of the specified color).
4. Click OK to return to the Multiline Text Editor window.
If you’ve turned on background masking but it isn’t having the desired effect, use the DRaworder or TEXTTOFRONT command to move text “on top of” other objects.
Insert Field creates a text field that updates automatically every time you open, save, plot, or regenerate the drawing. These fields can contain data such as the date, filename, or author. Fields draw information from the operating system settings, Drawing Properties dialog box, sheet sets feature, and AutoCAD system variables (see Chapter 2). Use the following procedure to add a field while you’re creating mtext:
1. Right-click in the Multiline Text Editor window and choose Insert Field from the context menu.
2. Choose a Field Name in the left column.
3. Choose a Format in the right column, or, for date fields, type a format in the Date Format box.
4. Click OK.
AutoCAD adds the field to the mText object that you’re creating or editing.
If you see four dashes instead of a valid field value, you probably need to do one of the following things:
□ Regenerate the drawing (see Chapter 7).
□ Save the drawing.
□ Fill in Drawing Properties dialog box values (see Chapter 3) and then regenerate the drawing.
□ Configure sheet sets (see Chapter 14).
Figure 9-5 shows fields and background masking in action.
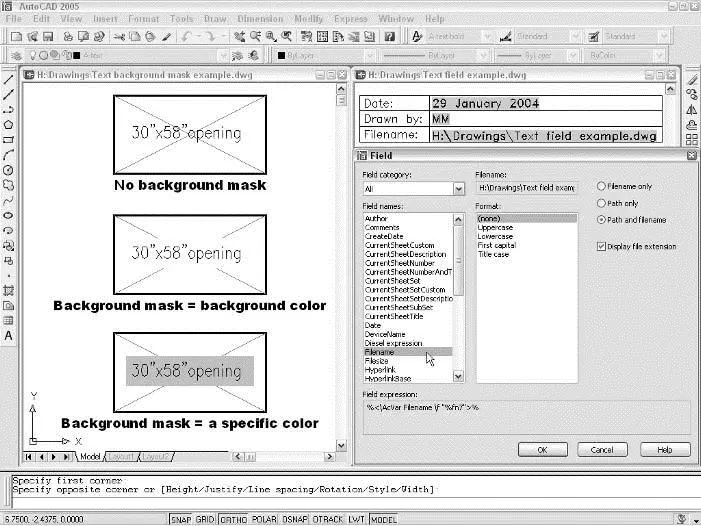
Figure 9-5:mText plays the field and dons a mask.
Another advantage of mText is that it supports tabs and indents. This feature is especially useful for creating hanging indents — the kind of indents that push an entire paragraph to the right of a number or bullet, as shown in Figure 9-5. (Before AutoCAD 2004, there was no straightforward way to perform this feat.) The procedure isn’t as straightforward as in most word processing programs, but at least you can create numbered and bulleted lists with hanging indents. Here’s how:
1. Follow Steps 1 through 8 in the preceding section, “Making it with mText.”
2. In the tab and indent ruler, drag the lower slider (the triangle pointing up) to the right a small distance.
The lower slider controls the indentation of the second and subsequent lines in each paragraph. (The upper slider controls the indentation of the first line in each paragraph.) An indent of two to four of the short, vertical tick marks usually works well.
3. Click in the ruler just above the lower slider.
A small L appears above the lower slider. The L shows the tab stop.
 Make sure that the corner of the L aligns horizontally with the point of the lower slider triangle. If not, click and drag the L until it aligns.
4. Type a number followed by a period or parenthesis (for example,1. ) or a character that represents a bullet (for example,* ).
5. Press the Tab key.
The cursor jumps to the tab stop that you added in Step 3.
6. Type the text corresponding to the current number or bullet.
As AutoCAD wraps the text, the second and subsequent lines align with the beginning of the text in the first line, as in Figure 9-6.
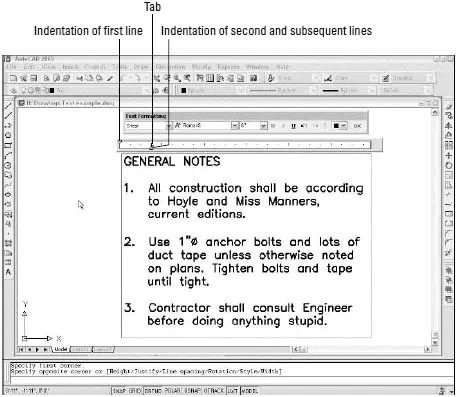
Figure 9-6:Tabs and indents set to create hanging indents.
Читать дальшеИнтервал:
Закладка:
Похожие книги на «AutoCAD 2005 for Dummies»
Представляем Вашему вниманию похожие книги на «AutoCAD 2005 for Dummies» списком для выбора. Мы отобрали схожую по названию и смыслу литературу в надежде предоставить читателям больше вариантов отыскать новые, интересные, ещё непрочитанные произведения.


Обсуждение, отзывы о книге «AutoCAD 2005 for Dummies» и просто собственные мнения читателей. Оставьте ваши комментарии, напишите, что Вы думаете о произведении, его смысле или главных героях. Укажите что конкретно понравилось, а что нет, и почему Вы так считаете.