Mark Middlebrook - AutoCAD 2005 for Dummies
Здесь есть возможность читать онлайн «Mark Middlebrook - AutoCAD 2005 for Dummies» — ознакомительный отрывок электронной книги совершенно бесплатно, а после прочтения отрывка купить полную версию. В некоторых случаях можно слушать аудио, скачать через торрент в формате fb2 и присутствует краткое содержание. Город: Indianapolis, Год выпуска: 2004, ISBN: 2004, Издательство: Wiley Publishing, Inc, Жанр: Программы, на английском языке. Описание произведения, (предисловие) а так же отзывы посетителей доступны на портале библиотеки ЛибКат.

- Название:AutoCAD 2005 for Dummies
- Автор:
- Издательство:Wiley Publishing, Inc
- Жанр:
- Год:2004
- Город:Indianapolis
- ISBN:0-7645-7138-9
- Рейтинг книги:5 / 5. Голосов: 1
-
Избранное:Добавить в избранное
- Отзывы:
-
Ваша оценка:
AutoCAD 2005 for Dummies: краткое содержание, описание и аннотация
Предлагаем к чтению аннотацию, описание, краткое содержание или предисловие (зависит от того, что написал сам автор книги «AutoCAD 2005 for Dummies»). Если вы не нашли необходимую информацию о книге — напишите в комментариях, мы постараемся отыскать её.
AutoCAD is more than just another application program, it’s a complete environment for drafting and design. So if you’re new to AutoCAD, you need to know several things to get off to a good start — especially how to use the command line area and set up your drawing properly. These key techniques are described in this part of the book.
If you’ve used earlier versions of AutoCAD, you’ll be most interested in the high points of the new release, including some newer interface components. The lowdown on what’s new is here, too.
AutoCAD 2005 for Dummies — читать онлайн ознакомительный отрывок
Ниже представлен текст книги, разбитый по страницам. Система сохранения места последней прочитанной страницы, позволяет с удобством читать онлайн бесплатно книгу «AutoCAD 2005 for Dummies», без необходимости каждый раз заново искать на чём Вы остановились. Поставьте закладку, и сможете в любой момент перейти на страницу, на которой закончили чтение.
Интервал:
Закладка:
Constructing solid primitives is pretty simple and immediately gratifying. For example, you can quickly put together a virtual cityscape by populating your drawing with boxes, cylinders, cones, and wedges representing buildings. For additional gratification, you’ll want to shade or render them (see the “Ending with Rendering” section, later in this chapter). If you have any questions about any of the 3D solid primitive commands, choose Contents→User’s Guide→Create and Modify Objects→Draw Geometric Objects→Create 3D Objects→Create 3D Solids in the AutoCAD online help.
After the solid primitives, the next pair of commands on the Draw→Solids submenu is Extrude and Revolve:
□ Extruding is similar to adding thickness (see “Extruding from 2D to 3D,” earlier in this chapter) except that it creates true solids rather than “2½D” objects. In addition, you can specify tapers with the EXTrude command.
□ Use the REVolve command to create a solid by rotating a closed object around an axis.
 The commands described in this section are the building blocks of solid modeling. Developing useful 3D models takes a lot more than just knowing the basics. You can model simple objects by using solid primitives, extrusion and revolution, and the editing techniques discussed in the next section. But for most real-world solid modeling work, you’ll want additional software and learning resources.
When you’re ready to modify wireframes or surfaces, you can use most of the editing commands described in Chapter 6. Grip editing also works well on most wireframe and surface objects.
As with 3D drawing, you need to be a more careful when editing in 3D to make sure that the editing transformations you apply occur correctly in all three spatial dimensions. Display your model in multiple viewports from different viewpoints so that you can see what’s going on and catch mistakes right away.
Modifying 3D solids is trickier. Simple editing commands like Move, CoPy, and ROtate work fine, but most of the commands that alter an object’s shape (for example, Stretch, Trim, and Break) don’t work on solids. You can use grips to move and copy solids, but not to stretch them.
Instead, AutoCAD provides a set of specialized commands on the Modify→Solids Editing menu, shown in Figure 8-11. The first three choices — Union, Subtract, and Intersect — perform the so-called Boolean operations, which create new 3D solids by combining and removing parts of existing ones. Look up “composite 3D solids” in the AutoCAD online help system for more information about these commands. Also see Contents→User’s Guide→Create and Modify Objects→Change Existing Objects→Modify 3D Solids for a description of the other options on the Modify→Solids Editing menu.
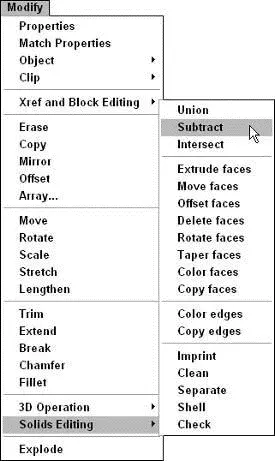
Figure 8-11:Specialized solids editing commands.
Ending with Rendering
To my mother, who grew up on a farm in Iowa, rendering was what you did to fat to make it into lard. But in CAD, rendering is the process of illuminating a set of 3D objects with one or more imaginary lights and then creating a more-or-less realistic picture of the results. (No, computer programmers didn’t have lard on their minds when they borrowed the word rendering . Hand-drawn pictures of building facades were called renderings long before computers got into the act.)
A single example of this technique is called a still rendering. Multiple frames strung together produce computer animation. The objects that you see in movies such as Toy Story or A Bug’s Life are first created as 3D models and then rendered frame by frame — a process that can take immense amounts of time even on ultrafast graphics workstations — to produce the beautifully, well-rendered images you see.
 AutoCAD creates still renderings only. If you want to create animations, you need to use other software programs such as Discreet’s 3DS Max. Even if you use animation programs, AutoCAD can be useful for developing the initial 3D models.
Rendering has steadily improved in speed and usability as PCs have become faster, and programmers have improved their rendering algorithms. Rendering of simple scenes is now practical on a mainstream PC, and a fast personal computer can create some impressive images in a reasonable amount of time. Rendered images are useful for previewing how your models will work in real life and also can be powerful tools for sales and marketing communications for your company. A (rendered) picture can be worth quite a bit more than a thousand words.
To see how rendering works with the default options in AutoCAD, use the steps that follow. When you’re ready to get fancy, choose User’s Guide→Create Realistic Images and Graphics→Render 3D Objects for Realism in the AutoCAD online help system.
1. Create one or more 3D objects.
Use the steps in the previous section or use one of the sample 3D drawings in \Program Files\AutoCAD 2005\Sample.
Unless you want a monochromatic rendering, create the objects on several different layers that you’ve assigned different colors.
2. Choose View→ Render→ Render.
The Render dialog box appears, as shown in Figure 8-12.
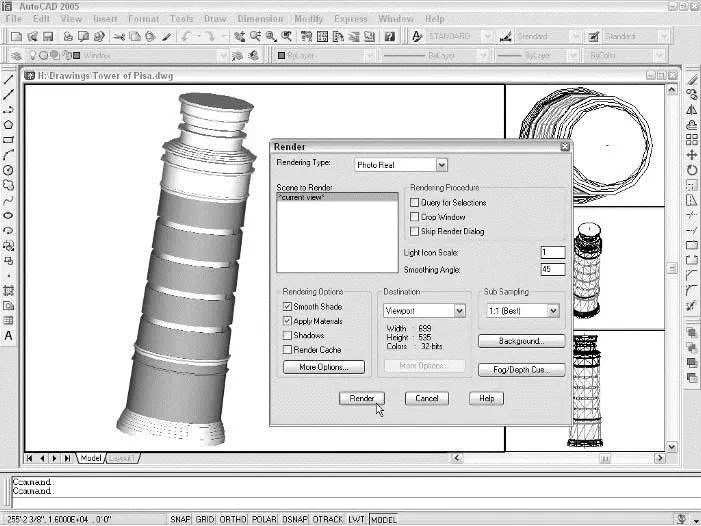
Figure 8-12:The Render dialog box and a rendered object.
3. Ignore all the options and click the Render button.
You can get okay results without changing the options. When you click Render, AutoCAD renders the 3D objects. See Figure 8-12 for an example.
To make rendered images look less cartoonish, you need to apply materials to 3D objects and define different light sources. For more information, navigate to the Render 3D Objects for Realism help page mentioned just before the preceding steps and then look at Create Rendered Images→Use Materials in Rendering and Create Rendered Images→Use Lights in Rendering.
The SHADE command offers a simpler alternative to the RENDER command, without all the lighting, surface materials, and other options. To experiment with shading, choose any of the options on the View→Shade menu. (To return to an unshaded view, choose View→Shade→2D Wireframe.) As I mention earlier in this chapter, the 3DOrbit command’s right-click menu includes shaded modes that you can see even while navigating around your model in real time.
 In addition to viewing rendered and shaded views on the screen, you can plot them, whether they’re in a paper space layout or in model space. Use the Shaded Viewport Options area of the expanded Plot dialog box to control this feature. Chapter 12 contains more information about plotting.
Интервал:
Закладка:
Похожие книги на «AutoCAD 2005 for Dummies»
Представляем Вашему вниманию похожие книги на «AutoCAD 2005 for Dummies» списком для выбора. Мы отобрали схожую по названию и смыслу литературу в надежде предоставить читателям больше вариантов отыскать новые, интересные, ещё непрочитанные произведения.


Обсуждение, отзывы о книге «AutoCAD 2005 for Dummies» и просто собственные мнения читателей. Оставьте ваши комментарии, напишите, что Вы думаете о произведении, его смысле или главных героях. Укажите что конкретно понравилось, а что нет, и почему Вы так считаете.