Mark Middlebrook - AutoCAD 2005 for Dummies
Здесь есть возможность читать онлайн «Mark Middlebrook - AutoCAD 2005 for Dummies» — ознакомительный отрывок электронной книги совершенно бесплатно, а после прочтения отрывка купить полную версию. В некоторых случаях можно слушать аудио, скачать через торрент в формате fb2 и присутствует краткое содержание. Город: Indianapolis, Год выпуска: 2004, ISBN: 2004, Издательство: Wiley Publishing, Inc, Жанр: Программы, на английском языке. Описание произведения, (предисловие) а так же отзывы посетителей доступны на портале библиотеки ЛибКат.

- Название:AutoCAD 2005 for Dummies
- Автор:
- Издательство:Wiley Publishing, Inc
- Жанр:
- Год:2004
- Город:Indianapolis
- ISBN:0-7645-7138-9
- Рейтинг книги:5 / 5. Голосов: 1
-
Избранное:Добавить в избранное
- Отзывы:
-
Ваша оценка:
AutoCAD 2005 for Dummies: краткое содержание, описание и аннотация
Предлагаем к чтению аннотацию, описание, краткое содержание или предисловие (зависит от того, что написал сам автор книги «AutoCAD 2005 for Dummies»). Если вы не нашли необходимую информацию о книге — напишите в комментариях, мы постараемся отыскать её.
AutoCAD is more than just another application program, it’s a complete environment for drafting and design. So if you’re new to AutoCAD, you need to know several things to get off to a good start — especially how to use the command line area and set up your drawing properly. These key techniques are described in this part of the book.
If you’ve used earlier versions of AutoCAD, you’ll be most interested in the high points of the new release, including some newer interface components. The lowdown on what’s new is here, too.
AutoCAD 2005 for Dummies — читать онлайн ознакомительный отрывок
Ниже представлен текст книги, разбитый по страницам. Система сохранения места последней прочитанной страницы, позволяет с удобством читать онлайн бесплатно книгу «AutoCAD 2005 for Dummies», без необходимости каждый раз заново искать на чём Вы остановились. Поставьте закладку, и сможете в любой момент перейти на страницу, на которой закончили чтение.
Интервал:
Закладка:
□ With viewpoints, you can change the point in 3D space from which you look at the model. By setting a different viewpoint in each viewport, you can look at several sides of your model at the same time. It’s like looking at one of Picasso’s cubist paintings, only more orderly.
 If you want to experiment with viewports and viewpoints in an existing 3D drawing, try one of the AutoCAD2005 samples, such as
 \Program Files\AutoCAD 2005\Sample\Welding Fixture Model.dwg. To remove shading and make the model faster to work with, choose View→Shade→2D Wireframe.
Chapter 3 discusses viewports in paper space, which are useful for creating layouts for use in plots and presentations in both 2D and 3D. Model space viewports, cousins of paper viewports, are less powerful but simpler and are intended to help you construct 3D models.
Model space viewports divide the screen into separate rectangles with no gaps between them. Unlike with paper space viewports, you can’t move, stretch, or overlap them. You can’t plot multiple model space viewports; that’s what paper space is for. And, unlike in layouts, a layer that’s visible in one model space viewport always is visible in all of them.
 You may hear or read references to tiled viewports, which is just another name for model space viewports. Tiled refers to the way in which model space viewports always fill the drawing area, with no gaps and no overlapping allowed. Conversely, paper space viewports are sometimes called floating viewports because you can move them around, leave gaps between them, and overlap them.
Model space viewports enable you to see several views of your model at one time, each from a different viewpoint. For this reason, model space viewports are especially useful when you’re creating and editing objects in 3D. As you draw and edit, the different views help ensure that you’re picking points that are located correctly in 3D space.
To set up model space viewports, use the Viewports dialog box:
1. Choose View→ Viewports→ New Viewports.
The Viewports dialog box appears.
2. Choose one of the Standard Viewport arrangements and choose 3D in the Setup drop-down list.
3. Click OK.
Figure 8-2 shows the dialog box and the model space result of choosing the Four Right Standard Viewport arrangement and the 3D Setup. This arrangement, along with the Four Equal, and Four Left standard viewport arrangements, works well for creating viewports that show top, front, right, and isometric views of a 3D model.
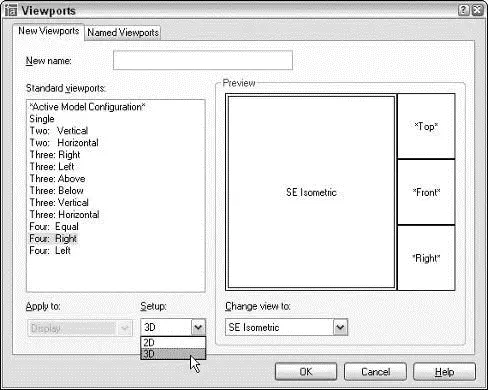
Figure 8-2:The Viewport dialog box makes setting up model space viewports and different viewpoints easy.
To return to a single viewport later, click in the one whose view you want to use, then open the Viewports dialog box and choose Single in the Standard Viewports list.
When you choose 3D in the Viewports dialog box’s Setup drop-down list, you direct AutoCAD to change the viewpoint in each viewport. The default viewpoints when you choose a four viewport arrangement are top, front, right, and isometric. These viewpoints work well for viewing and constructing simple models, but eventually, you’ll probably want to specify your own, custom viewpoint in a particular viewport.
The easiest way to change viewpoints is to use the View→3D Views submenu (shown in Figure 8-3) to switch to one of the standard orthographic 3D views or an isometric view:
□ The six standard orthographic (straight-on) views are Top, Bottom, Left, Right, Front, Back.
□ The four standard isometric views are SW (left-front), SE (right-front), NE (right-back), and NW (left-back). An isometric view is one in which you see the object from above, but not too high above — as though you were hovering in a low-flying helicopter.
These ten views are called standard because they’re often used in manual drafting and rendering work. They work well for showing 3D models of common objects such as mechanical components and buildings. (You can also change to plan view, which is a top-down view of either the world coordinate system or a user coordinate system. I describe coordinate systems in “A Cartesian Orientation,” later in this chapter.)
You can specify nonstandard viewpoints by choosing View→3D Views→Viewpoint Presets. In the Viewpoint Presets dialog box that appears, specify the following settings:
□ A viewing angle in the XY plane (imagine moving a camera on a dolly around an object, while keeping the camera at the same elevation)
□ An angle from the XY plane (imagine using a boom to swoop the camera up to a different height so that you’re looking at the object from increasingly steep angles)
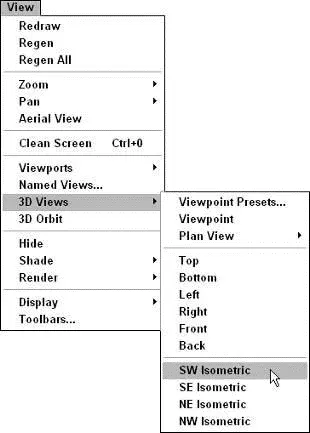
Figure 8-3:The 3D Views submenu.
By default, AutoCAD shows 3D models in 2D wireframe mode, even if you’ve created surface or solid objects. If you want to better visualize which objects are in front of which other objects, especially in an isometric or other nonorthogonal view, you have a couple of options:
□ Choose View→Shade and then choose Hidden or any of the Shaded options.
□ Render the model, as described later in this chapter.
Standard views and the Viewpoint Presets dialog box are fine for many 3D construction tasks, but if you really want to have fun with a model, 3DOrbit is your ticket to it.
 AutoCAD LT doesn’t include the 3DOrbit command. In LT, you can use the DDVPOINT and DView commands to look at a model from different points of view.
The 3DOrbit command displays an arcball on the screen — a circle representing a sphere around your object. You click various places inside, outside, and on the arcball and then drag to change the 3D view. The idea is that you’re spinning the imaginary sphere containing your model. As you drag the cursor, AutoCAD updates the screen dynamically.
3DOrbit provides many other options through its right-click shortcut menu. You can change the shading mode and projection type, and you can turn on several visual aids that help you understand where you are in 3D space. Additional shortcut menu options enable you to pan, zoom, and restore standard or named views. The following steps show some of the things that you can do with 3DOrbit:
1. If you’ve divided model space into two or more viewports, click in the viewport in which you want to change the viewpoint.
2. Choose View→ 3D Orbit.
The 3DOrbit arcball appears, as shown in Figure 8-4.
Читать дальшеИнтервал:
Закладка:
Похожие книги на «AutoCAD 2005 for Dummies»
Представляем Вашему вниманию похожие книги на «AutoCAD 2005 for Dummies» списком для выбора. Мы отобрали схожую по названию и смыслу литературу в надежде предоставить читателям больше вариантов отыскать новые, интересные, ещё непрочитанные произведения.


Обсуждение, отзывы о книге «AutoCAD 2005 for Dummies» и просто собственные мнения читателей. Оставьте ваши комментарии, напишите, что Вы думаете о произведении, его смысле или главных героях. Укажите что конкретно понравилось, а что нет, и почему Вы так считаете.