Mark Middlebrook - AutoCAD 2005 for Dummies
Здесь есть возможность читать онлайн «Mark Middlebrook - AutoCAD 2005 for Dummies» — ознакомительный отрывок электронной книги совершенно бесплатно, а после прочтения отрывка купить полную версию. В некоторых случаях можно слушать аудио, скачать через торрент в формате fb2 и присутствует краткое содержание. Город: Indianapolis, Год выпуска: 2004, ISBN: 2004, Издательство: Wiley Publishing, Inc, Жанр: Программы, на английском языке. Описание произведения, (предисловие) а так же отзывы посетителей доступны на портале библиотеки ЛибКат.

- Название:AutoCAD 2005 for Dummies
- Автор:
- Издательство:Wiley Publishing, Inc
- Жанр:
- Год:2004
- Город:Indianapolis
- ISBN:0-7645-7138-9
- Рейтинг книги:5 / 5. Голосов: 1
-
Избранное:Добавить в избранное
- Отзывы:
-
Ваша оценка:
AutoCAD 2005 for Dummies: краткое содержание, описание и аннотация
Предлагаем к чтению аннотацию, описание, краткое содержание или предисловие (зависит от того, что написал сам автор книги «AutoCAD 2005 for Dummies»). Если вы не нашли необходимую информацию о книге — напишите в комментариях, мы постараемся отыскать её.
AutoCAD is more than just another application program, it’s a complete environment for drafting and design. So if you’re new to AutoCAD, you need to know several things to get off to a good start — especially how to use the command line area and set up your drawing properly. These key techniques are described in this part of the book.
If you’ve used earlier versions of AutoCAD, you’ll be most interested in the high points of the new release, including some newer interface components. The lowdown on what’s new is here, too.
AutoCAD 2005 for Dummies — читать онлайн ознакомительный отрывок
Ниже представлен текст книги, разбитый по страницам. Система сохранения места последней прочитанной страницы, позволяет с удобством читать онлайн бесплатно книгу «AutoCAD 2005 for Dummies», без необходимости каждый раз заново искать на чём Вы остановились. Поставьте закладку, и сможете в любой момент перейти на страницу, на которой закончили чтение.
Интервал:
Закладка:
9. Click OK.
The View dialog box disappears.
To restore a named view, choose View→Named Views or enter View at the command line to display the View dialog box. Click the name of the view that you want to restore, click the Set Current button, and then click OK to close the dialog box.
 With the new Update Layers and Edit Boundaries buttons in the main View dialog box, you can change the layer visibility settings that AutoCAD associates with an existing view and revise the view’s boundary.
 You also can plot the area defined by a named view. See Chapter 12 for instructions on plotting views.
Looking Around in Layout Land
All the zoom, pan, and view operations I describe in this chapter apply to paper space layouts as well as to model space. (Chapter 3 describes the difference between model space and paper space and how to navigate between the two.) One little complication exists, though: In a paper space layout — that is, any drawing area tab except for the Model tab — it’s possible for the cursor to be either in paper space or in model space inside a viewport. Zooming and panning have a different effect depending on which space your cursor is in at the moment. Experiment with the different effects by following these steps:
1. Open a drawing that contains at least one paper space layout with a title block and one or more viewports.
If you don’t have any such drawings handy, try using the AutoCAD sample drawing \Program Files\AutoCAD 2005\Sample\Wilhome.dwg.
2. Click one of the layout tabs — that is, any tab other than the Model tab.
AutoCAD displays the paper space layout for that tab, including any title block and viewports.
3. Click the PAPER/MODEL button on the status bar until it says PAPER.
Alternatively, you can double-click in the gray part of the drawing area outside of the layout.
The cursor is now in paper space, so zooming and panning changes the display of all the objects in the layout, including the title block.
4. Choose View→ Zoom→ All.
AutoCAD displays the entire layout, as shown in Figure 7-3.
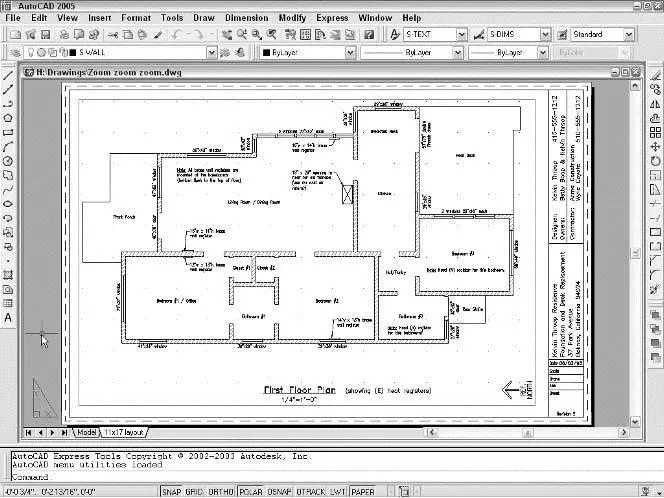
Figure 7-3:The full layout.
5. Zoom and pan by using any of the techniques described in this chapter.
Zooming and panning change the appearance of the title block, as shown in Figure 7-4. The effect is similar to moving a plotted sheet in and out and all around in front of your face.
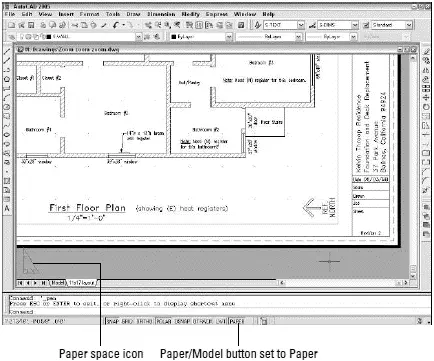
Figure 7-4:Zooming in paper space.
6. Choose View→ Zoom→ All.
AutoCAD displays the entire layout again.
7. Click the PAPER/MODEL button on the status bar until it says MODEL.
Alternatively, you can double-click with the cursor over a viewport. The cursor is now in model space, inside the viewport, so zooming and panning change only the display of the objects that are visible in the viewport. The display of the title block doesn’t change.
8. Zoom and pan by using any of the techniques described in this chapter.
Zooming and panning don’t change the appearance of the title block, as shown in Figure 7-5. The result looks as if you’re moving a picture of the model space geometry in and out and all around behind a frame.
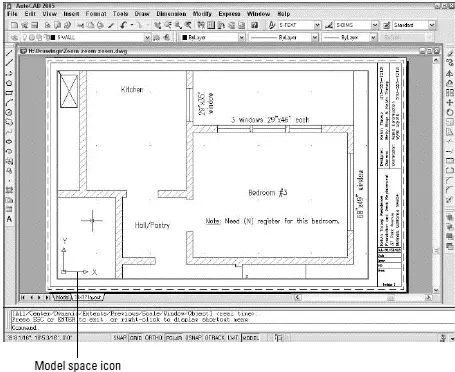
Figure 7-5:Zooming in a model space viewport.
 In real drawings, you usually shouldn’t zoom and pan inside viewports after they’ve been set up (see Chapter 3). Doing so changes the scale of the viewport, which messes up plotting. I’m asking you to do it here to illustrate the difference between zooming in paper space and zooming in a model space viewport.
 If the title block is changing when you zoom and pan, someone has locked the viewport to prevent the kind of mischief that I warn against in the previous paragraph. (You also see the command line prompt
 Viewport is view-locked. Switching to Paper space.) See “viewports, floating, locking” in the AutoCAD online help system if you need to lock — or unlock — viewports.
9. Choose View→ Zoom→ Previous one or more times until you’ve restored the original view.
10. Click the PAPER/MODEL button on the status bar until is says PAPER.
Always leave the cursor in paper space when you’re finished.
11. Choose File→ Close and click the No button to close the drawing without saving changes.
In this example, I have you close the drawing without saving changes, just in case you did mess up the viewport zoom scale.
In most cases, you set up a paper space layout once, as described in Chapter 3, and then just return to it to plot. You shouldn’t be spending a lot of time zooming and panning in paper space layouts. You zoom and pan to get a better view of what you’re drawing and editing, and that’s what the Model tab is for. But if you do want to zoom in paper space — to get a better look at part of your title block, for example — make sure that you’re doing it with the PAPER/MODEL button set to PAPER.
AutoCAD 2005 includes new VPMAX and VPMIN commands for maximizing and minimizing a viewport in the current layout. These commands provide an alternative to switching between the Model and Layout tabs without the potential problems of zooming inside of paper space viewports. The easiest way to run VPMAX or VPMIN is to click the new Maximize Viewport/Minimize Viewport button located on the status bar, just to the right of the PAPER button.
Degenerating and Regenerating
As you zoom and pan around your drawing, you may wonder how the image that you see on the screen is related to the DWG file that AutoCAD saves on the hard disk. Well, maybe you don’t wonder about that, but I’m going to tell you anyway!
When you draw and edit objects, AutoCAD stores all their geometrical properties (that is, location and size) in a highly precise form — technically, double floating-point precision . The program always maintains that precision when you save the DWG file. For computer performance reasons, however, AutoCAD does not use that high-precision form of the data to display your drawing on the screen. Instead, AutoCAD converts the highly precise numbers in the DWG file into slightly less precise integers in order to create the view that you see on the screen.
Читать дальшеИнтервал:
Закладка:
Похожие книги на «AutoCAD 2005 for Dummies»
Представляем Вашему вниманию похожие книги на «AutoCAD 2005 for Dummies» списком для выбора. Мы отобрали схожую по названию и смыслу литературу в надежде предоставить читателям больше вариантов отыскать новые, интересные, ещё непрочитанные произведения.


Обсуждение, отзывы о книге «AutoCAD 2005 for Dummies» и просто собственные мнения читателей. Оставьте ваши комментарии, напишите, что Вы думаете о произведении, его смысле или главных героях. Укажите что конкретно понравилось, а что нет, и почему Вы так считаете.