Mark Middlebrook - AutoCAD 2005 for Dummies
Здесь есть возможность читать онлайн «Mark Middlebrook - AutoCAD 2005 for Dummies» — ознакомительный отрывок электронной книги совершенно бесплатно, а после прочтения отрывка купить полную версию. В некоторых случаях можно слушать аудио, скачать через торрент в формате fb2 и присутствует краткое содержание. Город: Indianapolis, Год выпуска: 2004, ISBN: 2004, Издательство: Wiley Publishing, Inc, Жанр: Программы, на английском языке. Описание произведения, (предисловие) а так же отзывы посетителей доступны на портале библиотеки ЛибКат.

- Название:AutoCAD 2005 for Dummies
- Автор:
- Издательство:Wiley Publishing, Inc
- Жанр:
- Год:2004
- Город:Indianapolis
- ISBN:0-7645-7138-9
- Рейтинг книги:5 / 5. Голосов: 1
-
Избранное:Добавить в избранное
- Отзывы:
-
Ваша оценка:
AutoCAD 2005 for Dummies: краткое содержание, описание и аннотация
Предлагаем к чтению аннотацию, описание, краткое содержание или предисловие (зависит от того, что написал сам автор книги «AutoCAD 2005 for Dummies»). Если вы не нашли необходимую информацию о книге — напишите в комментариях, мы постараемся отыскать её.
AutoCAD is more than just another application program, it’s a complete environment for drafting and design. So if you’re new to AutoCAD, you need to know several things to get off to a good start — especially how to use the command line area and set up your drawing properly. These key techniques are described in this part of the book.
If you’ve used earlier versions of AutoCAD, you’ll be most interested in the high points of the new release, including some newer interface components. The lowdown on what’s new is here, too.
AutoCAD 2005 for Dummies — читать онлайн ознакомительный отрывок
Ниже представлен текст книги, разбитый по страницам. Система сохранения места последней прочитанной страницы, позволяет с удобством читать онлайн бесплатно книгу «AutoCAD 2005 for Dummies», без необходимости каждый раз заново искать на чём Вы остановились. Поставьте закладку, и сможете в любой момент перейти на страницу, на которой закончили чтение.
Интервал:
Закладка:
11. Turn on ortho mode by clicking the ORTHO button on the status bar until the button appears to be pushed in and the words Ortho on appear on the command line. Repeat Steps 2 through 10 to see the effect of ortho mode on stretching.
 For most real-world editing situations, you’ll want to turn on ortho or polar tracking mode before stretching. Ortho mode is good for all kinds of drawing and editing tasks because it enforces a nice, rectilinear orderliness on your drawing. Chapter 4 describes how to use ortho mode to draw orthogonal lines.
When you think of editing objects, you probably think first about editing their geometry: moving, stretching, making new copies, and so on. That’s the kind of editing I cover in this chapter.
Another kind of editing is changing objects’ properties. As I describe in Chapter 4, every object in an AutoCAD drawing has a set of non-geometrical properties, including layer, color, linetype, and lineweight. Sometimes, you need to edit those properties — when you accidentally draw something on the wrong layer, for example. Three common ways of editing objects properties in AutoCAD are
□ The Properties palette:This is the most flexible way to edit properties. Select any object (or objects), right-click in the drawing area, and choose Properties from the cursor menu. The Properties palette displays a tabular grid that lists the names and values of all properties. Click in the value cell to change a particular property.
□ Layers and Properties toolbars:Another way to change properties is to select objects and then choose from the drop-down lists (Layer,Color, and so on) on the Layers and the Properties toolbars. See Chapter 4 for more information.
□ Match Properties:You can use the Match Properties button on the Standard toolbar — the button with the paintbrush on it — to paint properties from one object to another. Match Properties works similarly to the Format Painter button in Microsoft applications. Match Properties works even when the objects reside in different drawings.
Chapter 7
A Zoom with a View
• Zooming and panning
• Naming and restoring views
• Zooming and panning in paper space layouts
• Regenerating the display
One of the advantages of CAD over manual drawing is its capability of giving you different ways to view your drawing. You can zoom in close, zoom out to a great distance, and pan around. In fact, not only can you zoom and pan in your drawing, but in most kinds of drawings, you must do it frequently to be able to draw, edit, and view effectively.
Technical drawings are jampacked with lines, text, and dimensions. Zooming and panning frequently enables you to see the details better, draw more confidently (because you can see what you’re doing), and edit more quickly (because object selection is easier when there aren’t a zillion objects on the screen). This chapter covers AutoCAD’s most useful display control features.
Zoom and Pan with Glass and Hand
Moving your viewpoint in to get a closer view of your drawing data is called zooming in; moving your viewpoint back to get a more expansive view is called zooming out .
Zooming in and out of your drawing is one of the big advantages that AutoCAD offers over manual drawing. You can do detailed work on tiny objects and then zoom out and move around rooms, houses, or neighborhoods from an Olympian perspective.
Panning is closely related to zooming. If you zoom in enough that some of your drawing no longer shows up on-screen, you’re going to want to pan around — move left, right, up, and down in your drawing — without zooming in and out. AutoCAD makes panning easy with scroll bars and real-time panning.
Both panning and zooming change what is known as the view . The view is the current location and magnification of the AutoCAD depiction of your drawing. Each time you zoom or pan, you establish a new view. You can give a name to a specific view to make returning to that view easy, as I demonstrate later in this chapter.
Fortunately, zooming and panning in AutoCAD is as simple as it is necessary. The following steps describe how to use AutoCAD’s Zoom and Pan Realtime feature, which is easy to operate and provides a lot of flexibility:
1. Click the Zoom Realtime button (the one that looks a magnifying glass with a plus/minus sign next to it) on the Standard toolbar.
The Realtime option of the Zoom command starts. The cursor changes to a magnifying glass, and AutoCAD prompts you at the command line:
Press ESC or ENTER to exit, or right-click to display shortcut menu.
2. Move the cursor near the middle of the screen, press and hold down the left mouse button, and drag the cursor up and down until the table almost fills the screen.
Dragging up increases the zoom magnification and dragging down decreases it.
3. Right-click in the drawing area to display the Zoom/Pan Realtime cursor menu, shown in Figure 7-1, and choose Pan from the menu that appears.
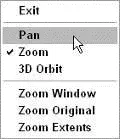
Figure 7-1:The Zoom/Pan Realtime cursor menu.
The cursor changes to a hand.
4. Click and drag to pan the drawing in any direction.
You can use the right-click menu to toggle back and forth between Zoom and Pan as many times as you like. If you get lost, choose Zoom Original or Zoom Extents to return to a recognizable view.
5. Right-click in the drawing area and choose Exit.
The cursor returns to the normal AutoCAD crosshairs.
In the preceding example, you started with zooming and ended with panning. You also have the option of doing the reverse: Click the Pan Realtime button (the one showing a hand), and after you’ve panned, use the right-click menu to switch to zooming. However you start it, the important thing to realize is that Zoom and Pan Realtime is a single AutoCAD function. At any time, you can switch between panning and zooming (or switch to a related function, such as Zoom Window) by using the right-click menu.
You also can pan and zoom by using your mouse’s scroll wheel (if it has one) or the middle button of a three-button mouse:
□ To zoom in and out, roll the scroll wheel forward (in) or backward (out).
□ To zoom to the extents of your drawing, double-click the scroll wheel or the middle button.
□ To pan, hold down the scroll wheel or the middle button as you move the mouse.
 The scroll wheel or middle mouse button zoom and pan operations described in the preceding paragraph depend on an obscure AutoCAD system variable named MBUTTONPAN. (See Chapter 2 for a description of what system variables are and how to change them.) When MBUTTONPAN is set to 1 — the default value — you can use the middle button to pan and zoom, as I describe in the preceding tip. If you change MBUTTONPAN to 0, clicking the middle mouse button displays a cursor object snap menu, as it did in older AutoCAD versions. If you’re not able to zoom or pan with your middle mouse button, set MBUTTONPAN back to 1. (With MBUTTONPAN set to 1, you use Shift+rightclick to display the cursor object snap menu.)
Интервал:
Закладка:
Похожие книги на «AutoCAD 2005 for Dummies»
Представляем Вашему вниманию похожие книги на «AutoCAD 2005 for Dummies» списком для выбора. Мы отобрали схожую по названию и смыслу литературу в надежде предоставить читателям больше вариантов отыскать новые, интересные, ещё непрочитанные произведения.


Обсуждение, отзывы о книге «AutoCAD 2005 for Dummies» и просто собственные мнения читателей. Оставьте ваши комментарии, напишите, что Вы думаете о произведении, его смысле или главных героях. Укажите что конкретно понравилось, а что нет, и почему Вы так считаете.