Mark Middlebrook - AutoCAD 2005 for Dummies
Здесь есть возможность читать онлайн «Mark Middlebrook - AutoCAD 2005 for Dummies» — ознакомительный отрывок электронной книги совершенно бесплатно, а после прочтения отрывка купить полную версию. В некоторых случаях можно слушать аудио, скачать через торрент в формате fb2 и присутствует краткое содержание. Город: Indianapolis, Год выпуска: 2004, ISBN: 2004, Издательство: Wiley Publishing, Inc, Жанр: Программы, на английском языке. Описание произведения, (предисловие) а так же отзывы посетителей доступны на портале библиотеки ЛибКат.

- Название:AutoCAD 2005 for Dummies
- Автор:
- Издательство:Wiley Publishing, Inc
- Жанр:
- Год:2004
- Город:Indianapolis
- ISBN:0-7645-7138-9
- Рейтинг книги:5 / 5. Голосов: 1
-
Избранное:Добавить в избранное
- Отзывы:
-
Ваша оценка:
AutoCAD 2005 for Dummies: краткое содержание, описание и аннотация
Предлагаем к чтению аннотацию, описание, краткое содержание или предисловие (зависит от того, что написал сам автор книги «AutoCAD 2005 for Dummies»). Если вы не нашли необходимую информацию о книге — напишите в комментариях, мы постараемся отыскать её.
AutoCAD is more than just another application program, it’s a complete environment for drafting and design. So if you’re new to AutoCAD, you need to know several things to get off to a good start — especially how to use the command line area and set up your drawing properly. These key techniques are described in this part of the book.
If you’ve used earlier versions of AutoCAD, you’ll be most interested in the high points of the new release, including some newer interface components. The lowdown on what’s new is here, too.
AutoCAD 2005 for Dummies — читать онлайн ознакомительный отрывок
Ниже представлен текст книги, разбитый по страницам. Система сохранения места последней прочитанной страницы, позволяет с удобством читать онлайн бесплатно книгу «AutoCAD 2005 for Dummies», без необходимости каждый раз заново искать на чём Вы остановились. Поставьте закладку, и сможете в любой момент перейти на страницу, на которой закончили чтение.
Интервал:
Закладка:
AutoCAD prompts you to specify the fillet radius that it uses for future fillet operations:
Specify fillet radius <0.0000>:
3. Type a fillet radius and press Enter.
The number you type will be the radius of the arc that joins the two lines.
Select first object or [Polyline/Radius/Trim/mUltiple]:
4. Select the first line of the pair that you want to fillet.
AutoCAD prompts you to select the second object for filleting:
Select second object:
5. Select the second line of the pair that you want to fillet.
AutoCAD fillets the two objects, drawing an arc of the radius that you specified in Step 3.
 You can fillet two lines and specify a radius of zero to make them meet at a point. If you have lots of lines to fillet, whether with a zero or nonzero radius, use the Fillet command’s mUtliple option to speed the process.
The CHamfer command works similarly except that, instead of specifying a fillet distance, you specify either two chamfer distances or a chamfer length and angle.
Get a Grip
Although command-first editing is the most flexible and widespread editing style in AutoCAD, it’s not the only way. Grip editing is a useful adjunct to command-first editing, especially when you want to modify just one or two objects. You may have encountered grip editing when using other kinds of graphics programs. Even if you’re an experienced user of other graphics programs, you’ve never seen grips used in quite the way that AutoCAD uses them.
Anything that you can do with grip editing can be done with command-first editing as well. In some situations, grip editing is a little more efficient or convenient than command-first editing, but command-first editing always gets the job done. If you master only one style of editing, make it command-first style. In other words, feel free to skip this section — at least until you’re comfortable with command-first editing.
Grips are little square handles that appear on an object after you select it.
In their simplest guise, AutoCAD grips work similar to the little squares on graphical objects in other Windows programs. But in AutoCAD, instead of clicking and dragging a grip, you must click, release the mouse button, move the cursor, and click again at the new location. (By separating the selection of beginning and ending points into two different operations, AutoCAD allows you to use different techniques — such as different object snap modes — to select each point.)
AutoCAD grips are, for sophisticated users, better than the grips found in most other programs, because you can do so much more with them. You can, for example, use AutoCAD grips to move, stretch, or copy an object. You also can use them to rotate an object, scale it to a different size, or mirror an object — that is, create one or more backwards copies. Grips also act as visible object snaps, or little magnets that draw the cursor to themselves.
The following sections cover in detail the five grip-editing modes — Stretch, Move, Rotate, Scale, and Mirror. Follow these steps to explore the grip-editing modes:
1. Press Esc to make sure that no command is active and no objects are selected.
AutoCAD displays the naked command prompt — that is, no command is currently active:
Command:
2. Click an object on-screen to select it and display its grips.
Grips — solid blue squares on the selected object — appear at various points on the object. Note that the AutoCAD command prompt remains naked; you haven’t started a command or grip-editing operation yet.
3. Click another object.
Both the newly selected object and the object that you selected previously display grips.
4. Click one of the grips on either object.
The blue square turns to a red square. This grip is now hot, or ready for a grip-editing operation.
Grip-editing options now appear on the command line. The first option to appear is STRETCH.
5. Press the spacebar repeatedly to cycle through the five grip-editing options on the command line:
** STRETCH **
Specify stretch point or [Base point/Copy/Undo/eXit]:
** MOVE **
Specify move point or [Base point/Copy/Undo/eXit]:
** ROTATE **
Specify rotation angle or [Base point/Copy/Undo/Reference/eXit]:
** SCALE **
Specify scale factor or [Base point/Copy/Undo/Reference/eXit]:
** MIRROR **
Specify second point or [Base point/Copy/Undo/eXit]:
The grip-editing option displayed on the command line changes as you press the spacebar. If you move the cursor (without picking) in between each press of the spacebar, the appearance of your selected object changes as you display each option. As you can see, each of the grip-editing operations resembles the ordinary AutoCAD command of the same name. Choosing STRETCH, for example, causes a stretched version of the object to appear on-screen.
Pressing the spacebar a bunch of times is a good way to become familiar with the grip-editing modes, but there’s a more direct way to choose a particular mode. After you click a grip to make it hot, right-click to display the grip-editing menu. That menu contains all the grip-editing options plus some other choices, as shown in Figure 6-14.
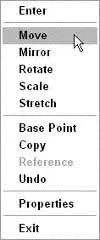
Figure 6-14:The gripediting cursor menu.
6. Press the spacebar until STRETCH (or the option you want) reappears as the grip-editing option.
7. Move the hot grip in the direction in which you want to stretch (or otherwise manipulate) your object.
AutoCAD dynamically updates the image of the object to show you what the modified object will look like before you click the final location.
8. Click again to finish the grip-editing operation.
The selected object with the hot grip updates. The object with the cold grips doesn’t change.
9. Click the same grip that you chose in Step 4 (now in a different location) to make it hot.
10. This time, move the cursor near one of the grips on the other object. When you feel the magnetic pull of the grip on the other object, click again to connect the hot grip with the other grip.
The object point represented by the hot grip now coincides exactly with the grip on the other object.
11. Press Esc to deselect all objects and remove all grips.
Figure 6-15 shows a hot (red) endpoint grip of a line being connected to the cold (blue) endpoint grip of another line. The ghosted line shows the original position of the line being edited, and the continuous line shows the new position. Using a grip in this way as a visible object snap offers the same advantage as using single point object snaps, as described in Chapter 4: It ensures precision by making sure that objects meet exactly.
Читать дальшеИнтервал:
Закладка:
Похожие книги на «AutoCAD 2005 for Dummies»
Представляем Вашему вниманию похожие книги на «AutoCAD 2005 for Dummies» списком для выбора. Мы отобрали схожую по названию и смыслу литературу в надежде предоставить читателям больше вариантов отыскать новые, интересные, ещё непрочитанные произведения.


Обсуждение, отзывы о книге «AutoCAD 2005 for Dummies» и просто собственные мнения читателей. Оставьте ваши комментарии, напишите, что Вы думаете о произведении, его смысле или главных героях. Укажите что конкретно понравилось, а что нет, и почему Вы так считаете.