Mark Middlebrook - AutoCAD 2005 for Dummies
Здесь есть возможность читать онлайн «Mark Middlebrook - AutoCAD 2005 for Dummies» — ознакомительный отрывок электронной книги совершенно бесплатно, а после прочтения отрывка купить полную версию. В некоторых случаях можно слушать аудио, скачать через торрент в формате fb2 и присутствует краткое содержание. Город: Indianapolis, Год выпуска: 2004, ISBN: 2004, Издательство: Wiley Publishing, Inc, Жанр: Программы, на английском языке. Описание произведения, (предисловие) а так же отзывы посетителей доступны на портале библиотеки ЛибКат.

- Название:AutoCAD 2005 for Dummies
- Автор:
- Издательство:Wiley Publishing, Inc
- Жанр:
- Год:2004
- Город:Indianapolis
- ISBN:0-7645-7138-9
- Рейтинг книги:5 / 5. Голосов: 1
-
Избранное:Добавить в избранное
- Отзывы:
-
Ваша оценка:
AutoCAD 2005 for Dummies: краткое содержание, описание и аннотация
Предлагаем к чтению аннотацию, описание, краткое содержание или предисловие (зависит от того, что написал сам автор книги «AutoCAD 2005 for Dummies»). Если вы не нашли необходимую информацию о книге — напишите в комментариях, мы постараемся отыскать её.
AutoCAD is more than just another application program, it’s a complete environment for drafting and design. So if you’re new to AutoCAD, you need to know several things to get off to a good start — especially how to use the command line area and set up your drawing properly. These key techniques are described in this part of the book.
If you’ve used earlier versions of AutoCAD, you’ll be most interested in the high points of the new release, including some newer interface components. The lowdown on what’s new is here, too.
AutoCAD 2005 for Dummies — читать онлайн ознакомительный отрывок
Ниже представлен текст книги, разбитый по страницам. Система сохранения места последней прочитанной страницы, позволяет с удобством читать онлайн бесплатно книгу «AutoCAD 2005 for Dummies», без необходимости каждый раз заново искать на чём Вы остановились. Поставьте закладку, и сможете в любой момент перейти на страницу, на которой закончили чтение.
Интервал:
Закладка:
Realtime zooming and panning is the easiest, most interactive way to get around in your drawings. In some situations, though, this method is less efficient or precise than the old-fashioned methods, the most important of which are described in the next section.
Another way to pan in AutoCAD should be familiar from other Windows programs — the scroll bars in the drawing area. Scrolling is the same in AutoCAD as in any other Windows program; click the arrows in the right and bottom borders of the drawing window to scroll, or pan, a step at a time; or click and drag the little square “thumbs” in those borders to pan as little or as much as you want to.
 Believe it or not, the realtime and scrollbar panning methods are relatively recent enhancements in AutoCAD’s long history. These methods have pretty much replaced the less-intuitive two-point method of panning in older versions of AutoCAD. If you want to see how Grandpa used to pan, enter –Pan(with the leading dash) at the command line and then follow the prompts. This older method remains useful in special situations where you need to pan orthogonally by a specific distance — that is, move the display precisely horizontally without wavering up and down or precisely vertically without wavering side to side. This situation sometimes occurs in advanced paper space viewport setup, which I don’t cover in this book.
Because zooming is such a frequent necessity in AutoCAD, it’s worth knowing some alternative ways of doing it.
The Zoom command has different options, the most important of which are the following:
□ All and Extents:Zoom Extents zooms out just far enough to show all the objects in the current drawing. Zoom All does the same thing, unless the drawings limits are larger than the extents, in which case Zoom All zooms to show the entire rectangular area defined by the limits. If you’ve defined your limits properly (see Chapter 3), Zoom All is a good way to see your whole drawing area. These two options are especially useful when you zoom in too small or pan off into empty space and want to see your entire drawing again.
 It’s a good idea to Zoom All or Zoom Extents and then save before you close a drawing. By performing these steps, you ensure the following:
• The next person who opens the drawing — whether it’s you or someone else — can see the full drawing from the very beginning.
• The drawing preview that displays in the Select File dialog box displays the full drawing, instead of just a tiny, unidentifiable corner of it.
□ Window:This option is great for zooming in quickly and precisely. It zooms to a section of your drawing that you specify by clicking two points. The two points define the diagonal of a window around the area you want to look at. (Note that the Zoom command’s Window option is not a click-and-drag operation — unlike in some other Windows programs and, confusingly, unlike in the Zoom/Pan realtime Zoom Window option. With the Zoom command’s Window option, you click one corner, release the mouse button, and then click the other corner.)
□ Scale (X/XP):The X option zooms by a percentage of the current display; values less than 1 cause you to zoom in, values greater than 1 cause you to zoom out. You can also think of the value as a scaling factor: 0.5X causes the screen image to shrink to half its apparent size, and 2X causes the screen image to double its apparent size. (The XP option after a number is for zooming model space objects in a viewport relative to paper space; see Chapter 3 for information about paper space.)
□ Realtime:Realtime zooming, the technique described previously, enables you to zoom in and out by starting a realtime zoom and then moving the cursor up to zoom in or down to zoom out.
□ Previous: This option undoes the last zoom and/or pan sequence. It’s like going back in time but without the funny costumes!
Some of the zoom options take some getting used to. I recommend that you use realtime zoom and pan for most of your zooming and panning. Supplement it with Zoom Window to move quickly into a precise area, Zoom Previous to back up in zoom/pan time, and Zoom All or Zoom Extents to view your whole drawing.
A View by Any Other Name…
If you find yourself repeatedly zooming and panning to the same area, you probably can get there faster with a named view. A named view is a name that you assign to a particular region of your drawing. After you create a named view, you can return to that region quickly by restoring the view. You use the View command, which displays the View dialog box, to create and restore named views. Follow these steps to create a named view:
1. Zoom and pan until you find the view that you want to assign a name to.
2. Choose View→Named Views.
The View dialog box appears.
3. Click the New button.
The New View dialog box appears, as shown in Figure 7-2.
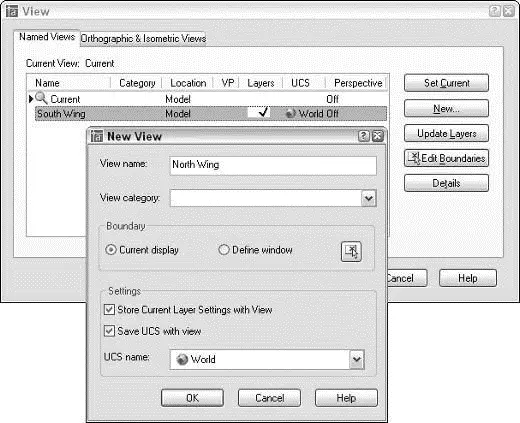
Figure 7-2:Create a new view for you.
4. Type a name in the View Name text box.
5. (Optional) Type a new category in the View Category box, or select an existing one from the drop-down list.
 View Category is a new view property in AutoCAD 2005. You use it to organize views and certain display characteristics of views in sheet sets, as described in Chapter 14. Until you use the sheet sets feature, you can leave this box blank.
6. Select the Current Display radio button, if it’s not selected already.
If you want to name a region other than the currently displayed view, select the Define Window radio button instead, click the Define View Window button to the right of it, and pick two corners of the region’s rectangle (as though you were zooming windows).
7. Confirm or change the choices in the Settings area.
The Store Current Layer Settings with View option is new in AutoCAD 2005. If you leave this setting turned on, then when you later restore the view, AutoCAD also will restore the layer visibility settings (on/off and freeze/thaw) that were in effect when you created the view. (Chapter 4 describes the layer visibility settings.) The two UCS-related settings are primarily for 3D drawings (see Chapter 8). If you’re creating 2D drawings, you can ignore the UCS settings.
8. Click OK.
The New View dialog box disappears, and you see your new named view in the list in the View dialog box.
Читать дальшеИнтервал:
Закладка:
Похожие книги на «AutoCAD 2005 for Dummies»
Представляем Вашему вниманию похожие книги на «AutoCAD 2005 for Dummies» списком для выбора. Мы отобрали схожую по названию и смыслу литературу в надежде предоставить читателям больше вариантов отыскать новые, интересные, ещё непрочитанные произведения.


Обсуждение, отзывы о книге «AutoCAD 2005 for Dummies» и просто собственные мнения читателей. Оставьте ваши комментарии, напишите, что Вы думаете о произведении, его смысле или главных героях. Укажите что конкретно понравилось, а что нет, и почему Вы так считаете.