Bruce Barnbaum - The Art of Photography - An Approach to Personal Expression
Здесь есть возможность читать онлайн «Bruce Barnbaum - The Art of Photography - An Approach to Personal Expression» весь текст электронной книги совершенно бесплатно (целиком полную версию без сокращений). В некоторых случаях можно слушать аудио, скачать через торрент в формате fb2 и присутствует краткое содержание. Жанр: Старинная литература, на английском языке. Описание произведения, (предисловие) а так же отзывы посетителей доступны на портале библиотеки ЛибКат.

- Название:The Art of Photography: An Approach to Personal Expression
- Автор:
- Жанр:
- Год:неизвестен
- ISBN:нет данных
- Рейтинг книги:5 / 5. Голосов: 1
-
Избранное:Добавить в избранное
- Отзывы:
-
Ваша оценка:
The Art of Photography: An Approach to Personal Expression: краткое содержание, описание и аннотация
Предлагаем к чтению аннотацию, описание, краткое содержание или предисловие (зависит от того, что написал сам автор книги «The Art of Photography: An Approach to Personal Expression»). Если вы не нашли необходимую информацию о книге — напишите в комментариях, мы постараемся отыскать её.
The Art of Photography: An Approach to Personal Expression — читать онлайн бесплатно полную книгу (весь текст) целиком
Ниже представлен текст книги, разбитый по страницам. Система сохранения места последней прочитанной страницы, позволяет с удобством читать онлайн бесплатно книгу «The Art of Photography: An Approach to Personal Expression», без необходимости каждый раз заново искать на чём Вы остановились. Поставьте закладку, и сможете в любой момент перейти на страницу, на которой закончили чтение.
Интервал:
Закладка:
Since the camera can’t see the way you see, you must learn to see the way the camera sees. You must learn when the brightness range is excessive, when it’s just right, and when it’s too low.
First, you have to expose the negative to get ample density and tonal detail in all areas where you want detail in your final print. With film, the zone system (especially the extended zone system—see Chapter 9 and Myth #3 below) is extremely good at yielding the proper exposure to get everything on the negative with usable densities. If you’re shooting digital and the range of light exceeds the sensor’s capability, follow the histogram and make several exposures at various settings, which can later be merged into a single image with an extended dynamic range. Let’s assume you’ve exposed the negative correctly to obtain ample negative density and/or tonal detail throughout. If the brightness range is excessive (i.e., if it’s greater than you want it to be for the print you wish to make), cut back on your negative development to reduce the inherent contrast from that of the scene to that which you want to have on your negative. This is known as “minus development”. If the brightness range is approximately what you want it to be in your final print, give the negative “normal development”, which preserves the brightness (or contrast) range of the scene. If the brightness range is less than you want it to be, give the negative “plus development” to expand the contrast range of the scene. The amount of minus or plus development varies depending on how excessively contrasty or excessively flat the scene is compared to your vision of the final print. These are artistic decisions, not decisions based on replicating the scene.
I have consistently stated that it’s necessary to develop the negative for the contrast range you want to have compared to the inherent contrast range of the scene. If a scene is high in contrast and you want even more contrast for your interpretive purposes, give the negative plus development. If a scene is relatively low in contrast and you want to soften it further, give the negative minus development. You’re allowed to do it. It’s legal! It’s even artistically acceptable.
On the other hand, if you always give normal development to a negative when the range of the scene is about 5 zones, if you always give plus development when the range is lower than 5 zones, or if you always give minus development if the range is greater than 5 zones, you’re doing “formula photography” and you’ll always end up with predictable, boring images. You’ll rarely express yourself in a meaningful way. Your prints may be technically perfect with good blacks and good whites and all sorts of tones in between (see Myth #7), but they’ll generally fall flat emotionally. You’ll produce technical gems that say nothing.
Even if you’ve done everything right with your negative exposure and development, how often does light fall on every part of the scene exactly the way you want it to appear in the final image? Answer: very rarely! Most of the time, some shadows are too dark and some highlight areas are too bright, or vice versa. In a portrait, light may be glaring on one side of the face or on a shiny forehead, and the hair on the opposite side may be too dark. In a landscape, one hill among others may be too brightly lit with sunlight, while the others are under dark clouds, yet it is still within the tonal range of a fine straight print. All of the trees in a scene may be exactly the same brightness, yet it might look more interesting if some were lighter and some darker. For expressive purposes you want visual interest, not literal accuracy. Even in straight documentary photography, you may need some manipulations to smooth out ragged aspects of uncontrolled light.
In order to solve these problems, you’ll need to dodge the areas you want lighter and burn the areas you want darker. The zone system can’t make the light hit everything in amounts that always coincide with your wishes. The zone system is a powerful system, but it doesn’t control the light in a scene!
Coupling that fact with the fact that the camera doesn’t see the scene the way your eyes see it, it is obvious that the zone system can’t be expected to yield a straight print without manipulation. In my lifetime, I’ve produced between 300 and 400 photographs that I would be proud to exhibit. Of those, only two are straight prints with no burning, dodging, or bleaching. Those two prints make me nervous. The next time I print either one of them, I’ll dodge the upper right corner, then burn it back, just so I feel like I’m doing something useful in the darkroom!
I approach every print with the thought that manipulation is required. Most of the darkroom manipulation I perform is not to alter the print away from the scene I encountered, but to bring it back to the way I saw it. When I first peruse the scene, my eye/brain combination does much of the burning and dodging for me by adjusting the light intake (i.e., its aperture). This occurs automatically and extremely smoothly. I expect to be doing in the darkroom what my eyes already do for me at the scene (and perhaps a little bit more). The zone system can’t do that for me, but it can give me a negative with solid densities and ample density separations so that I can perform those darkroom manipulations and create an emotionally charged image.
Note
Most of the darkroom manipulation I perform is not to alter the print away from the scene I encountered, but to bring it back to the way I saw it
However, there are times when my manipulations are not intended to re-create the way my eyes saw the scene, but rather to alter it—and sometimes alter it greatly. This requires a vision in the field beyond the scene that I encounter. It requires me not only to recognize a good scene, but also to recognize a scene that has the potential for personal interpretation and creativity. There is no requirement in fine art to be true to the scene—only to be true to your artistic instincts and desires. The zone system can be used to make radical departures from reality. If I want to make a deep, dark forest scene glow in a dreamlike manner with high key tones (i.e., light gray and white tones throughout the image), I can use the zone system as a creative tool and expose the scene higher up on the zone scale than would be realistic. In a situation like this, the zone system is used specifically for an effect that is decidedly unrealistic, but one that may be extremely evocative and expressive. The zone system is a tool for creative expression just as much as it is for making straight prints.
I use the zone system for every one of my exposures, but I never expect a straight print to result from its use. That’s where the darkroom comes in. The darkroom (or Lightroom or Photoshop) is a tool used to mold light passing through the negative, much as a sculptor molds clay, to form the image you want. If you expect to make a straight print, why have a darkroom (or computer)? Just send it to a lab and let them do it. They’re just as good as you at making straight prints; they’ll never be as good as you at molding the light to make the statement you want to make. If your desired statement is exactly what you saw, but the camera simply can’t see it the way you saw it, you may have to manipulate it back to the way you saw it!
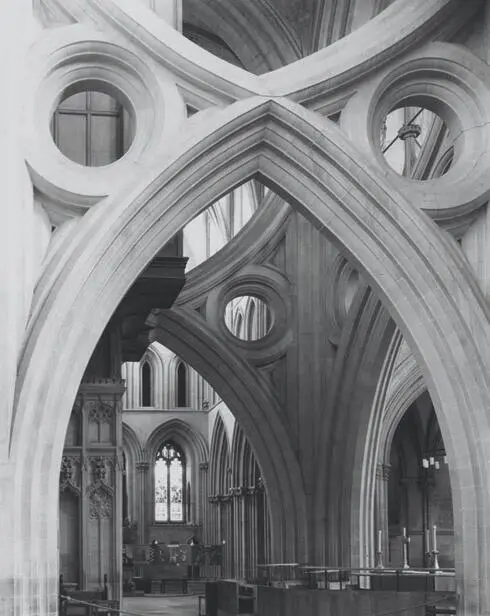
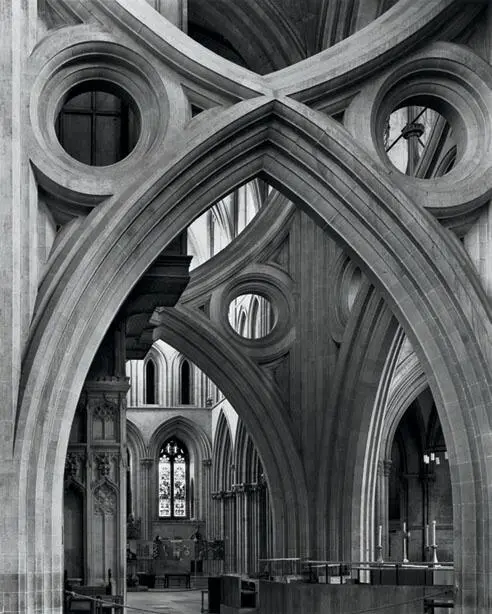
When I encountered the Central Arches in Wells Cathedral in 1980, I was so overwhelmed that my project of photographing English cathedrals began instantly. Known variously as the “inverted arches” or “scissors arches”, this structure was created between 1335 and 1338 as a retrofit to prevent the cathedral’s central tower from collapsing. It has stood since then .
Читать дальшеИнтервал:
Закладка:
Похожие книги на «The Art of Photography: An Approach to Personal Expression»
Представляем Вашему вниманию похожие книги на «The Art of Photography: An Approach to Personal Expression» списком для выбора. Мы отобрали схожую по названию и смыслу литературу в надежде предоставить читателям больше вариантов отыскать новые, интересные, ещё непрочитанные произведения.


Обсуждение, отзывы о книге «The Art of Photography: An Approach to Personal Expression» и просто собственные мнения читателей. Оставьте ваши комментарии, напишите, что Вы думаете о произведении, его смысле или главных героях. Укажите что конкретно понравилось, а что нет, и почему Вы так считаете.