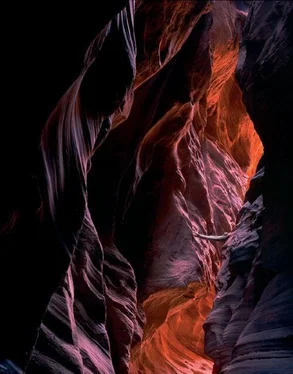
Bruce Barnbaum - The Art of Photography - An Approach to Personal Expression
Здесь есть возможность читать онлайн «Bruce Barnbaum - The Art of Photography - An Approach to Personal Expression» весь текст электронной книги совершенно бесплатно (целиком полную версию без сокращений). В некоторых случаях можно слушать аудио, скачать через торрент в формате fb2 и присутствует краткое содержание. Жанр: Старинная литература, на английском языке. Описание произведения, (предисловие) а так же отзывы посетителей доступны на портале библиотеки ЛибКат.
- Название:The Art of Photography: An Approach to Personal Expression
- Автор:
- Жанр:
- Год:неизвестен
- ISBN:нет данных
- Рейтинг книги:5 / 5. Голосов: 1
-
Избранное:Добавить в избранное
- Отзывы:
-
Ваша оценка:
- 100
- 1
- 2
- 3
- 4
- 5
The Art of Photography: An Approach to Personal Expression: краткое содержание, описание и аннотация
Предлагаем к чтению аннотацию, описание, краткое содержание или предисловие (зависит от того, что написал сам автор книги «The Art of Photography: An Approach to Personal Expression»). Если вы не нашли необходимую информацию о книге — напишите в комментариях, мы постараемся отыскать её.
The Art of Photography: An Approach to Personal Expression — читать онлайн бесплатно полную книгу (весь текст) целиком
Ниже представлен текст книги, разбитый по страницам. Система сохранения места последней прочитанной страницы, позволяет с удобством читать онлайн бесплатно книгу «The Art of Photography: An Approach to Personal Expression», без необходимости каждый раз заново искать на чём Вы остановились. Поставьте закладку, и сможете в любой момент перейти на страницу, на которой закончили чтение.
Интервал:
Закладка:
The print is now positioned for tacking. While holding the print in place (with the top edge firmly against the guide), I lift each lower corner of the print and tack it to the mount board with a short stroke of the tacking iron toward the corner. The first print to use the new guide for positioning is now ready for mounting, but to complete the guide, I make marks on it at the edges of the positioned print. Those two points are equidistant from the edge of the guide. I label those two points as the “0 point” (zero point) and mark off  -inch intervals on both sides of those points. Each subsequent print is then placed against the guide, positioned equally from the 0 point, and immediately tacked. Positioning is a matter of seconds (Figure 12-2).
Prior to inserting the print into the mount press, inspect the surface for any grit, dust, dirt, or hair that may have fallen on the surface during the positioning process and remove it. To mount the print, place the board and its tacked print into the press and follow the instructions that come with the tissue. I use four-ply mount board as a cover sheet between the print and the upper heat platen of the press. If the pressure of your dry mount press is uniform and sufficient, and if your temperature is uniform over the surface, you should get a perfect mount within 90 seconds to two minutes.
Spotting, Etching, and Correction of Defects
The mounted print must be devoid of any surface defects, including scratches, abrasions, creases, bumps (generally caused by grit particles embedded between the print and the mount board), or small craters on the surface (caused by grit particles pressed into the emulsion when the print was placed in the mount press). Such defects are extremely distracting on the otherwise smooth, flat surface. Galleries and collectors will balk at accepting prints with such defects, but more important, they should be unacceptable to you, the photographer.
If you work digitally, all spots on the print can and should be removed prior to printing. The most commonly used tool is the Photoshop clone-stamp tool, which allows you to place a nearby section of the print on top of any defect—e.g., a defect caused by dust on the camera sensor—thus removing it cleanly and completely. This is a photographic godsend that has no equal in traditional photography. But be careful: unless the replaced area is truly identical in color and/or tone to the area with the defect, it can be disturbingly apparent. The final print should be devoid of any distracting defects.
Sometimes the problems of bumps and craters can be corrected. For bumps, I have found that the gently rounded cap of a Bic ballpoint pen can be used to gently tap or press the grit particle down and into the mount board. I stress the word gently because if you push too hard, you’ll create a wide crater that will never come out. Also, this procedure will rarely work if the embedded particle is between the print and the dry mount tissue, though it may work well if the particle is between the dry mount tissue and the mount board.
For craters, first place a drop of water (with a touch of Photo-Flo in it to break surface tension) on and around the crater, and let it fully absorb into the emulsion. Spread the droplet to a size of ¼ inch in diameter or more. This will swell the emulsion. Then, as the emulsion begins to dry and contract, repeatedly dab a tiny droplet of water only on the crater. This will keep it swollen as the emulsion around it contracts. Finally, let the original crater dry and contract. Unless the crater is too large or too deep, this may pull the emulsion flat and eliminate the crater. Several applications of the entire procedure may be needed if the crater is large, but it will eliminate all but the largest craters and greatly reduce the size of the largest ones as well.
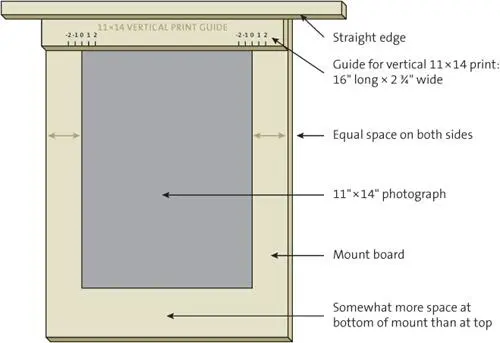
Figure 12-2. Positioning guide for mounting photographs
There is no cure for creases in the print except to inspect the print carefully before mounting. If it’s creased, tear it up, throw it away, and mount another one. Remember, you are your only quality control supervisor, and if you are satisfied showing defective prints, it’s your choice!
Spotting is the method of removing white specks or spots on the print caused either by scratches on the negative or by dust and dirt during enlargement. I use Spotone as a basic spotting dye, diluted slightly with water to control its depth of tone. Spotone may be available at some photography stores, though it’s now out of business; Marshall also has spotting dyes that I’m sure are just as good.
By carefully mixing several colors, you can obtain a color very close to that of your print. Use an eyedropper to measure the amounts of each color, and make notes of the good combinations for future reference. The mix of colors depends on the paper you use and the way you tone your print, so no formula can be given. To mix the proper color, choose an unmounted print with a white border and attempt to extend a middle gray tonal area at the edge of the print into the border area. I generally start with a #3 gray, then add other colors as necessary to achieve the exact color of my print. I always mix and apply spotting dye under tungsten light rather than florescent because florescent has a discontinuous spectrum which yields incorrect color much of the time. If I can’t get an exact color mix, I edge the color over to the desired color with a drop or two from another color spotting kit.
When I achieve the proper color, I apply the spotting dye with a No. 0 brush, a relatively narrow brush that comes to a very fine point. There are narrower brushes, but they don’t hold enough liquid to apply for very long. Wider brushes are unsuitable for intricate work. Depending on the size of the spot, I either brush on the spotting dye gently or stipple it lightly by dabbing it onto the print with the tip of the brush. I gradually build up density to the adjacent densities surrounding the spot.
The instructions warn you not to use Spotone in conjunction with Photo-Flo. I recommend the opposite. I always put a drop or two of water with a small amount of Photo-Flo into the mixture to break surface tension and allow the liquid to absorb into the emulsion more thoroughly. If the liquid doesn’t absorb into the emulsion, it dries on the surface and leaves a spot of excess sheen, which can be removed by light swabbing with a moistened Q-tip. This may remove some of the spotting dye, and an additional application may be needed.
Until recently, I did spotting or etching after the print was mounted so that I could work on a print that was stabilized and immovable. A print that is not mounted has a tendency to flex and pop as moisture changes, and even just breathing on the emulsion is sufficient to flex it. Inevitably, just when I hunch over the print to apply some spotting color, I exhale and the print jumps up  inch! This can easily create a black mark on the print.
However my method of applying spotting dye changed significantly in 2005 when I started printing extra-large mural prints. Of course, the size of any spot is enlarged along with the print size, and spotting large areas can be tedious and time-consuming. I found that I can very easily and successfully apply spotting dye when the print is fully washed, just before putting it on the drying screen. If the surface water is squeegeed off first, the wet print absorbs the dye remarkably well. I quickly learned that the brush must contain less spotting dye than usual or a dark mark occurs, since the wet print absorbs the dye so readily. If this happens, the print can be reimmersed in water and most of the dye will dissolve away after a few minutes. However, this method does not work well when you need narrow lines of spotting; the dye tends to spread into the adjacent area, causing a dark halo around the spot. For such spots, it’s better to wait until the print is dried and mounted.
Читать дальшеИнтервал:
Закладка:
Похожие книги на «The Art of Photography: An Approach to Personal Expression»
Представляем Вашему вниманию похожие книги на «The Art of Photography: An Approach to Personal Expression» списком для выбора. Мы отобрали схожую по названию и смыслу литературу в надежде предоставить читателям больше вариантов отыскать новые, интересные, ещё непрочитанные произведения.
Обсуждение, отзывы о книге «The Art of Photography: An Approach to Personal Expression» и просто собственные мнения читателей. Оставьте ваши комментарии, напишите, что Вы думаете о произведении, его смысле или главных героях. Укажите что конкретно понравилось, а что нет, и почему Вы так считаете.
