Bruce Barnbaum - The Art of Photography - An Approach to Personal Expression
Здесь есть возможность читать онлайн «Bruce Barnbaum - The Art of Photography - An Approach to Personal Expression» весь текст электронной книги совершенно бесплатно (целиком полную версию без сокращений). В некоторых случаях можно слушать аудио, скачать через торрент в формате fb2 и присутствует краткое содержание. Жанр: Старинная литература, на английском языке. Описание произведения, (предисловие) а так же отзывы посетителей доступны на портале библиотеки ЛибКат.

- Название:The Art of Photography: An Approach to Personal Expression
- Автор:
- Жанр:
- Год:неизвестен
- ISBN:нет данных
- Рейтинг книги:5 / 5. Голосов: 1
-
Избранное:Добавить в избранное
- Отзывы:
-
Ваша оценка:
The Art of Photography: An Approach to Personal Expression: краткое содержание, описание и аннотация
Предлагаем к чтению аннотацию, описание, краткое содержание или предисловие (зависит от того, что написал сам автор книги «The Art of Photography: An Approach to Personal Expression»). Если вы не нашли необходимую информацию о книге — напишите в комментариях, мы постараемся отыскать её.
The Art of Photography: An Approach to Personal Expression — читать онлайн бесплатно полную книгу (весь текст) целиком
Ниже представлен текст книги, разбитый по страницам. Система сохранения места последней прочитанной страницы, позволяет с удобством читать онлайн бесплатно книгу «The Art of Photography: An Approach to Personal Expression», без необходимости каждый раз заново искать на чём Вы остановились. Поставьте закладку, и сможете в любой момент перейти на страницу, на которой закончили чтение.
Интервал:
Закладка:
2. Using Two Captures and a Luminosity Selection In Photoshop
In many situations, the entire brightness range of an HDR scene can be recorded in two captures taken two or three stops apart. If the histograms of two captures fully contain detail throughout the entire brightness range (fully contained on the left; no clipping on the right), let the computer make a selection in proportion to luminosity and use the selection to paint on a layer mask. When you give the command to make a luminosity selection, Photoshop will select pixels in proportion to luminosity with white being 100 % selected, perceived middle gray being 50 % selected, and black not selected.
Prepare the two images in the RAW converter: refine the good highlight exposure to properly render the lighter values, and save it with a name that includes the term “Highlights” (Figure 11-21). Refine the darker values of the other capture and save it with a file name that includes the term “Shadows” (Figure 11-22).
Open the two images in Photoshop and arrange the two images so that both are visible, and be sure the Layers Palette is visible (if not, press F7). Next, make a copy of the Background in each of the images; do so by activating one of the two images and in the Layer Menu select Duplicate Layer, and then repeat the process for the other image. Now, rename the new Background Copy layers with the names “Highlights” and “Shadows”, respectively.
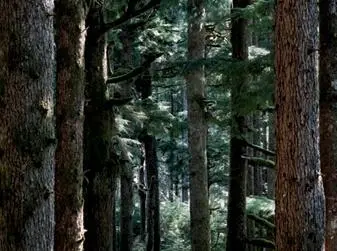
Figure 11-21. A highlight exposure of a Pacific northwest conifer forest on a sunny day. Made from a plateau in my own backyard, the highlight exposure retains the brightest highlight detail at the expense of dark shadow detail.
It’s time to move the Highlights layer to the Shadows image. To do so, select the Move Tool (v), activate the Highlights image, using the Move Tool shift-drag the Highlights image over the Shadow image, and release. The Highlights image will appear as the top layer in the Shadow image. If for some reason the Shadow appears above the Highlights layer, drag the Shadow layer down in the Layers Palette. Now that we have the two images as layers in the same photograph, save the composite as a new file with a file name that includes the word “Composite” in the title and close the Shadow file. If the captures were hand held, auto-align the layers, select all of the layers by doing a shift-click on every layer, and then from the Edit Menu select Auto-Align Layers. Photoshop will move the layers into alignment.
Now that you have both images in a single Photoshop file, the objective is to create a composite image containing shadow information from the Shadow layer and highlight information from the Highlight layer. In the steps set out in the next paragraph, you will make a luminosity selection of the Shadow layer (that is, select the brightest, and therefore overexposed, portions of the Shadow layer) and use the selection to create a mask on the Highlight layer. The luminosity mask will mask the darker (underexposed) portions of the Highlight layer, thereby allowing the good shadow detail from the Shadow layer to contribute to the composite. If this sounds confusing, try the steps below on a few images and the logic will become apparent.
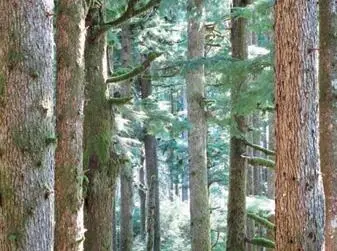
Figure 11-22. The shadow exposure of the same scene, with all highlight detail clipped, but obtaining full detail in the shadows.
Here are the steps. In the Layers Palette make the Highlights layer not visible by toggling off the eye symbol. Next, make the Shadows layer active and visible, and do a luminosity selection by pressing Command-Option-2(Mac)/Control-Alt-2(PC). Photoshop will select pixels of the Shadows layer in proportion to their luminosity; that is, Photoshop will select the overexposed and brighter portions of the Shadow layer. The marching ants on the display will outline the areas of the Shadows layer having a luminosity of 50 % or more. The last step is to make the layer mask for the Highlight layer, which reveals the luminosity selection, that is, reveals the brighter portions of the Highlight layer and masks its darker portions. To make the layer mask, activate the Highlight layer and make it visible; in the Layer Menu select Layer Mask and choose Reveal Selection. Photoshop will build a layer mask that reveals the lighter portions of the Highlight layer and conceals the remainder of the layer.
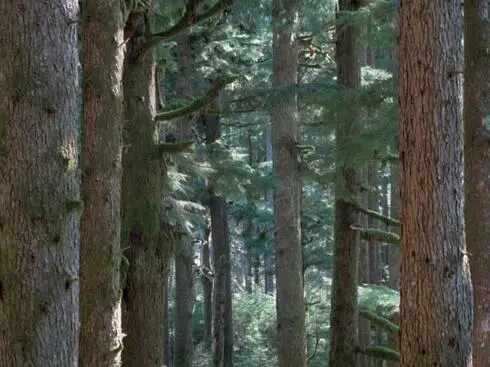
Figure 11-23. The color composite, using the methods outlined in choice #2, contains all the detail captured in the two exposures. A little further tweaking in Photoshop adjusted the relationships between highlights and shadows, with minor adjustments in color balance and saturation. The image is a pattern of tree trunks and foliage, with neither the tops nor the base of the trees showing anywhere.
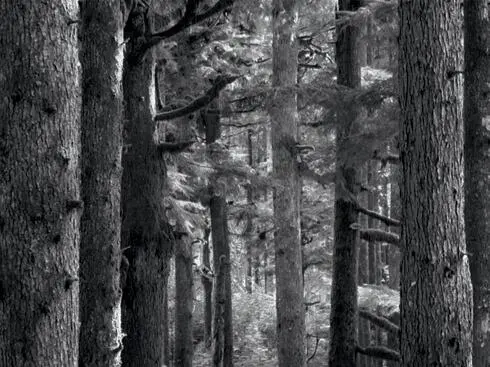
Figure 11-24. Color struck me as immaterial for this image, so I converted it to black-and-white by using a Black & White adjustment layer and adjusting the sliders. The tonalities now take over, making it a stronger image, in my opinion. Your eye is carried past the three tree trunks on the left to the bright foliage and distant trees, giving a strong sense of depth, while exhibiting detail everywhere.
The result is a composite of two layers with the visibility allocated in proportion to the luminosity. You can fine-tune the relationship between the layers by reducing the opacity of the Highlights layer in the Layers Palette, and you can paint directly on the Highlight mask to modify the selection, as explained in choice #3 below. The luminosity mask is but one example of using a mask to restrict the effect of an adjustment in Photoshop to a particular portion of an image. Save the image and edit as you would any other image (figures 11–15c and 11–15d).
In the previous example we used the computer to make a selection based on luminosity. In the following section, we will discuss painting on layer masks to make and refine selections on each of several layers.
3. Using Layers In Photoshop
With this technique you will move the different exposures into a single, multi-layered Photoshop image, create opaque (black) layer masks, and by painting with white on the layer masks, select the portions of each exposure you wish to be visible in the composite image. There are a number of ways to make a composite in Photoshop; this is but one. After you do a few composites, you will understand the procedure of combining images and you can thereafter automate the process of moving the several captures into a single multi-layered composite using the Load Files into Photoshop Layers tool found in Adobe Bridge, included in Photoshop. As with most aspects of Photoshop, you can readily make modifications to the technique to serve you best. Because we will be working with layers, be sure the Layers Palette is visible throughout the process. If you do not see it, press F7 (or in the Window Menu select Layers).
Start by opening each of the TIFF or PSD files you wish to combine. As you open each image, the Layers Palette for that image will show a single layer named Background. When all of your files are open, arrange them so all are fully visible; in the Window Menu, select Arrange, choose Tile, and use your mouse to drag the images so that all are fully visible. The screen size of the images is not important. Pick the image that you think may contribute the largest area to the composite and for that image from the File Menu select Save As and save the file with a name that includes the word “Composite”. We will refer to this file as the Composite. Each of the other images will be referred to as a contributing image.
Читать дальшеИнтервал:
Закладка:
Похожие книги на «The Art of Photography: An Approach to Personal Expression»
Представляем Вашему вниманию похожие книги на «The Art of Photography: An Approach to Personal Expression» списком для выбора. Мы отобрали схожую по названию и смыслу литературу в надежде предоставить читателям больше вариантов отыскать новые, интересные, ещё непрочитанные произведения.


Обсуждение, отзывы о книге «The Art of Photography: An Approach to Personal Expression» и просто собственные мнения читателей. Оставьте ваши комментарии, напишите, что Вы думаете о произведении, его смысле или главных героях. Укажите что конкретно понравилось, а что нет, и почему Вы так считаете.