Bruce Barnbaum - The Art of Photography - An Approach to Personal Expression
Здесь есть возможность читать онлайн «Bruce Barnbaum - The Art of Photography - An Approach to Personal Expression» весь текст электронной книги совершенно бесплатно (целиком полную версию без сокращений). В некоторых случаях можно слушать аудио, скачать через торрент в формате fb2 и присутствует краткое содержание. Жанр: Старинная литература, на английском языке. Описание произведения, (предисловие) а так же отзывы посетителей доступны на портале библиотеки ЛибКат.

- Название:The Art of Photography: An Approach to Personal Expression
- Автор:
- Жанр:
- Год:неизвестен
- ISBN:нет данных
- Рейтинг книги:5 / 5. Голосов: 1
-
Избранное:Добавить в избранное
- Отзывы:
-
Ваша оценка:
The Art of Photography: An Approach to Personal Expression: краткое содержание, описание и аннотация
Предлагаем к чтению аннотацию, описание, краткое содержание или предисловие (зависит от того, что написал сам автор книги «The Art of Photography: An Approach to Personal Expression»). Если вы не нашли необходимую информацию о книге — напишите в комментариях, мы постараемся отыскать её.
The Art of Photography: An Approach to Personal Expression — читать онлайн бесплатно полную книгу (весь текст) целиком
Ниже представлен текст книги, разбитый по страницам. Система сохранения места последней прочитанной страницы, позволяет с удобством читать онлайн бесплатно книгу «The Art of Photography: An Approach to Personal Expression», без необходимости каждый раз заново искать на чём Вы остановились. Поставьте закладку, и сможете в любой момент перейти на страницу, на которой закончили чтение.
Интервал:
Закладка:
Now that you have recorded the full dynamic range, you’ll combine the captures to make a final image encompassing the entire brightness range of the scene. You may not need all of the images, as there is will be significant overlap. Perhaps just two will suffice. Maybe three. Possibly more, though unlikely, and in most cases, unnecessary. There are a number of ways to combine several captures into a single image, and combining additional or different exposures will produce a different result, so if you are not satisfied with a particular combination, try different combinations.
Below, I describe four different approaches to merging multiple exposures. For approaches #1 and #2, you should work directly from your RAW files. For approaches #3 and #4, you will need to start with TIFF or PSD files. If you plan to use any of the approaches other than the first two and have not done so, convert your RAW images into TIFF or PSD format using the converter’s default settings. Save the files using names that include appropriate descriptions such as “Forest_Shadows” for the file with good shadow detail, “Forest_Midtones” for the file with the good midtones, and “Forest_Highlights” for the file with the good highlight detail. The techniques discussed below require that all of the images be of the same pixel dimensions, so work with uncropped images.
Now that the files are ready, we will look at four methods in which several captures can be combined. The choices include:
Using the Merge to High Dynamic Range Function in Photoshop
Using Two Captures and a Luminosity Selection in Photoshop
Using Layers in Photoshop
Third Party Software
1. Using the Merge to High Dynamic Range Function In Photoshop
I will first discuss Photoshop CS4 and then discuss HDR Pro found in CS5 at the end of this section. In Photoshop CS4, a high dynamic range (HDR) image is rendered in a two step process. In the first step, two or more exposures are combined into a single 32 bits/channel document using the Merge to HDR function. In the second step, the resulting 32 bits/channel file is downsampled to a 16 bits/channel and saved. The 16 bits/channel file can then be further edited in Photoshop. CS5 introduces a new feature, HDR Pro, that offers additional controls and integrates the combining of information into a 32 bits/channel file and the downsampling to 16 bits/channel into single procedure.
In CS4, you first combine any number of RAW captures into a single 32-bit/channel HDR image, which is so enormous that it provides a nearly open-ended numerical scale having the capacity to represent the dynamic range of any scene. In the second step, you direct Photoshop to convert the 32-bit/channel file into an editable 16-bit/channel file using one of four methods offered by Photoshop.
To accomplish the first step, merge the files; in the File Menu, select Automate and choose Merge to HDR, which will open the Merge to HDR dialogue box. In the Merge to HDR dialogue box, use Browse, select the RAW captures you wish to combine, and, if the captures were handheld, check the Attempt to Automatically Align Source Images box, and then click OK. Photoshop will load the files, perform some processing, and open another Merge to HDR dialogue box. Be sure the bit depth in the dialogue box is set to 32 Bit/Channel. The display will show an approximation of the file; don’t be discouraged if the HDR approximation looks too bright and the colors appear distorted; downsampling will refine the tonalities and you will have ample data with which to make adjustments later on. Click OK and Photoshop will combine all of the data from the selected files into an HDR, 32-bit/channel file.
The 32-bit/channel file can be saved if you like, but must first be downsampled to a 16-bit/channel file in order to use most of the Photoshop tools. To downsample the 32-bit/channel file into a fully editable 16-bit/channel file, from the Image Menu select Mode and choose 16 Bits/Channel. An HDR Conversion dialogue box will open and allow you to choose one of four methods to convert to a 16-bit/channel file. Most often, the default method, Exposure and Gamma, works best, but you should experiment with the other three methods. In the Exposure and Gamma method, make changes to the Exposure and Gamma sliders; in the Local Adaptation method make changes in the Radius and Threshold sliders. Observe the display as you change methods and settings; use the result you prefer. Click OK and Photoshop will downsample to 16 bits/channel. Save the resulting 16-bit file and then edit it as you would any other image.
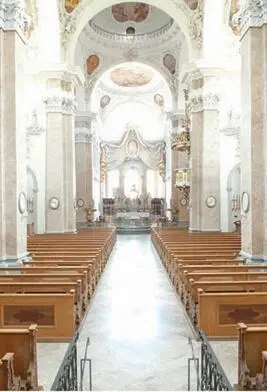
Figure 11-17. Church interior, Reutte, Austria, exposed to record shadow detail. Note the loss of tonality in the windows and all bright architectural details.
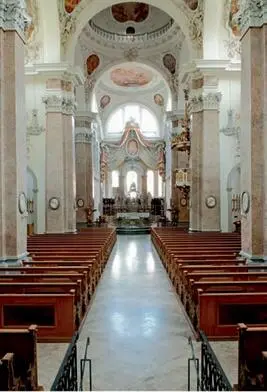
Figure 11-18. Church interior, exposed to record midtone values. Note the loss of tonality on the windows and on the darkest interior areas.
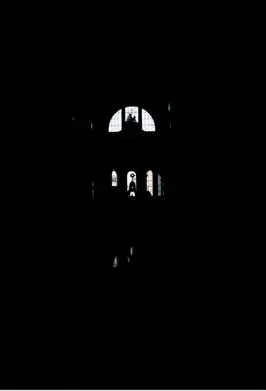
Figure 11-19. Church interior, exposed to record detail in the extreme highlights. Only the clear bubbled glass windows, and their muntin separators, are visible.
To illustrate this approach, and demonstrate the ability of multiple exposures to capture high dynamic range scenes, the three captures shown in Figure 11-17, Figure 11-18, and Figure 11-19 were merged into the final HDR composite shown in Figure 11-20. The brightness range of the church interior was approximately 15 stops; far greater than the dynamic range of the sensor. Therefore, it was not possible to record shadow, midtone, and highlight information in a single capture. The capture in Figure 11-17 was exposed to record substantial shadow detail, particularly the marquetry on the back of pews; the capture in Figure 11-18 was exposed to record the predominate midtone values in the church; and the capture in Figure 11-19. was exposed to record information in the extreme highlights, including the lead muntins in the otherwise plain glass windows. The resulting HDR composite image is shown in Figure 11-20.
In Photoshop CS5, the integration of multiple exposures into a HDR 16-bit file is accomplished with the new Merge to HDR Pro function. In the File Menu, select Automate and choose Merge to HDR Pro. In the dialogue box, you can select one of four modes, selectable from the drop-down menu located at the top of the panel. The parameters applicable to the selected mode will appear in the panel. Local Adaptation offers the most control settings the greatest number of options and therefore is most likely to give you the desired rendering. But you should try each of the modes and select the one that gives you the result you prefer. In Local Adaptation mode, you can adjust overall contrast and set the black and white points by selecting the Curves tab located in the lower right corner of the dialogue box and then working with the curve.
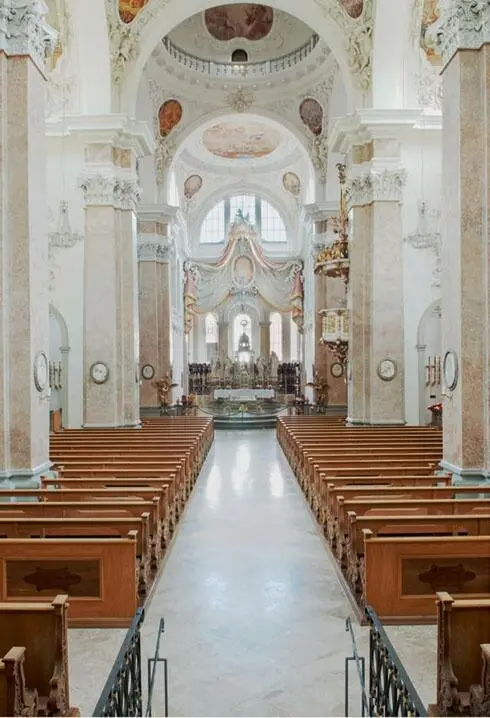
Figure 11-20. Church interior—high dynamic range composite. Combining the three exposures as described yields an image containing all desired detail, and projecting the magical brilliance of the ornate interior.
Be aware of the fact that there are no rules here; the correct settings are those that give you the image you want. Don’t expect those settings to be the same for each image. Each one must be determined based on its own merits, which should be no surprise to you. Finally, a couple of technical points: If your capture was hand held, select the Remove Ghosts check box to compensate from any possible camera motion, and set the Mode to 16 bits to get a 16 bits/Channel file.
Читать дальшеИнтервал:
Закладка:
Похожие книги на «The Art of Photography: An Approach to Personal Expression»
Представляем Вашему вниманию похожие книги на «The Art of Photography: An Approach to Personal Expression» списком для выбора. Мы отобрали схожую по названию и смыслу литературу в надежде предоставить читателям больше вариантов отыскать новые, интересные, ещё непрочитанные произведения.


Обсуждение, отзывы о книге «The Art of Photography: An Approach to Personal Expression» и просто собственные мнения читателей. Оставьте ваши комментарии, напишите, что Вы думаете о произведении, его смысле или главных героях. Укажите что конкретно понравилось, а что нет, и почему Вы так считаете.