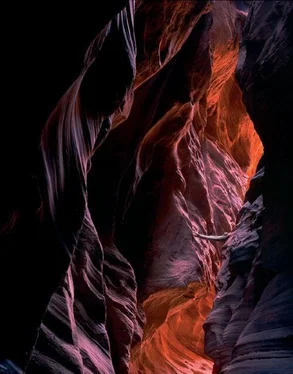
Bruce Barnbaum - The Art of Photography - An Approach to Personal Expression
Здесь есть возможность читать онлайн «Bruce Barnbaum - The Art of Photography - An Approach to Personal Expression» весь текст электронной книги совершенно бесплатно (целиком полную версию без сокращений). В некоторых случаях можно слушать аудио, скачать через торрент в формате fb2 и присутствует краткое содержание. Жанр: Старинная литература, на английском языке. Описание произведения, (предисловие) а так же отзывы посетителей доступны на портале библиотеки ЛибКат.
- Название:The Art of Photography: An Approach to Personal Expression
- Автор:
- Жанр:
- Год:неизвестен
- ISBN:нет данных
- Рейтинг книги:5 / 5. Голосов: 1
-
Избранное:Добавить в избранное
- Отзывы:
-
Ваша оценка:
- 100
- 1
- 2
- 3
- 4
- 5
The Art of Photography: An Approach to Personal Expression: краткое содержание, описание и аннотация
Предлагаем к чтению аннотацию, описание, краткое содержание или предисловие (зависит от того, что написал сам автор книги «The Art of Photography: An Approach to Personal Expression»). Если вы не нашли необходимую информацию о книге — напишите в комментариях, мы постараемся отыскать её.
The Art of Photography: An Approach to Personal Expression — читать онлайн бесплатно полную книгу (весь текст) целиком
Ниже представлен текст книги, разбитый по страницам. Система сохранения места последней прочитанной страницы, позволяет с удобством читать онлайн бесплатно книгу «The Art of Photography: An Approach to Personal Expression», без необходимости каждый раз заново искать на чём Вы остановились. Поставьте закладку, и сможете в любой момент перейти на страницу, на которой закончили чтение.
Интервал:
Закладка:
The second stage of sharpening, output sharpening, should not be done until the image has been fully edited, saved as a separate file, resampled to final print size, and any layers you may have created in Photoshop have been flattened. The settings for the output sharpening depend on a number of factors including print size, image content (whether the image is made up of fine detail or broad areas of smooth tonalities), viewing distance, and the output medium (whether printed on glossy or matte paper).
Converting the Image to Black-and-White
In traditional (or classical) photography, you can use various contrast filters to cause black-and-white film to alter tonalities in the negative. Digitally, there are a number of approaches for converting the full color capture to grayscale. For example, in ACR, go to the HSL/Grayscale tab and check the Convert to Grayscale checkbox. On the image window, use the Target Adjustment Tool (use the v key as a shortcut) and drag the cursor over portions of the image. ACR will increase or decrease the percentage contribution of the color you dragged over. Alternatively, you can move the color sliders and observe the changes in the resulting grayscale image. Keep in mind that the resulting image will be saved as a grayscale image that you can convert to a three channel RGB image in Photoshop if you wish. In Lightroom you can use the On-Image adjustment tool to adjust the conversion of specific areas of the image. Using Lightroom, in the HSL-Color-Grayscale box in the Develop module, click on the double arrow symbol to the left of the palette, place the cursor over any part of the image, press the mouse key, and move the cursor up or down. Moving up will lighten the value of the color beneath the cursor; moving down will darken the value. Make changes over other parts of the image and watch the grayscale image change.
As an alternative to converting in ACR or Lightroom, you can save the file as an RGB color file and do the conversion with a Black and White adjustment layer in Photoshop. In Photoshop, in the Layers Menu select New Adjustment Layer and choose Black and White. An Adjustment palette will open. Click on the On-Image adjustment tool (indicated by a pointing hand and a double arrow) in the upper left of the palette, go to the image, click on an area, and move the cursor left and right. Moving to the right will lighten the grayscale rendering of the color information under the cursor, moving to the left will darken it. Move to different areas and repeat until you get the rendering you want. Alternatively, or in addition to using the On-Image tool, you can work the color sliders in the Adjustment palette and observe the results. One of the features of the Black and White layer is that the layer is nondestructive; you can always revise the Black and White layer settings after you have made other adjustments. You can also make more than one Black and White adjustment layer, compare the results, and use layer masks to reveal different portions of different Black and White conversion layers. I discuss more about masking below.
Output Formats and Bit Depth
Output from the RAW converter should be saved using a file format that preserves all of your hard-earned data. The two most commonly used formats are TIFF and PSD. Although there are technical differences between the two, both will preserve all of your photographic information as long as you set the output to be saved in 16 bits/channel with the color space set to ProPhoto RGB. In ACR, the output settings are located at the bottom center of the image window.
Batch Processing
To save time, RAW converters permit the batch processing of selected captures and will run in the background while you edit a different image. This means that you can apply the settings for a particular subject and lighting condition to any number of captures. To batch process in ACR, select the RAW captures you want to batch process using Command-Click (Mac)/Control-Click (PC) in Photoshop Bridge. Press Command-R (Mac)/Control-R (PC) to open ACR, click on one of the images listed on the left-hand side of the window, and fine-tune the selected capture using curves, color balance, or any of the other adjustments. When you are satisfied with the settings, press the Select All button in the upper left-hand corner of the window, then press the Synchronize button immediately below. The Synchronize panel will prompt you for a list of the adjustments you wish to apply to the other captures; the default is to apply all of the settings other than Crop, Spot Removal, and Local Adjustments. Because you selected captures of similar subjects under similar lighting conditions, you can go with the defaults unless you have a specific reason not to apply a particular setting to a capture. Press Save Images located at the bottom left. ACR will present the Save Options panel; complete the panel and click on Save. ACR will apply your settings, convert the captures, name, and save the converted files to the designated file folder.
High Dynamic Range Images—The Extended Zone System for Digital Photography
Suppose the brightness range of a scene exceeds the dynamic range of the sensor. The histogram will touch each edge as shown in Figure 11-16. This is where high dynamic range imaging comes into play.

Figure 11-16. Another histogram where the brightness of the scene exceeds the dynamic range of the camera
While the brightness range of the subject cannot be recorded in a single exposure, the entire range can be recorded, with full detail, in a series of captures that are later integrated into a single image. This is what is known an high dynamic range imaging (HDRI). The procedure is to first make a series of captures at various shutter speeds that, when combined, record the entire brightness range of the scene. You later combine two or more of these captures into a single photograph that has full shadow, midtone, and highlight detail.
Here’s a good way to find a starting point for optimum results. Use a tripod, either a remote/cable release or the camera’s self-timer, and mirror lock-up, if available, to eliminate vibration and to record all of the captures in registration. Focus any way you like (on a stationary subject) and then set the camera to manual focus to assure the camera does not change focus with successive captures. Set your camera to manual exposure mode (you don’t want to change depth of field), select an aperture based on your desired depth of field, and make a test capture. Review the histogram of the test exposure and adjust the shutter speed (but don’t change the aperture or refocus as changes will affect the depth of field or image magnification) so that the highlight (right) side of the histogram falls approximately one-quarter of the way from the right edge of the display. Now make your first exposure of the series.
Increase the exposure by a full stop and expose again. (Note: Generally, full stop bracketed increments are fine, though you may prefer greater or lesser steps.) Review the histogram—it will have moved to the right. Again, increase the exposure by a stop and expose again. Review the histogram again—it will have moved farther to the right. Repeat while incrementally increasing the exposure and reviewing the histogram until the shadow (left) side of the histogram enters into the display and falls approximately one-quarter of the way from the left edge of the histogram. That’s it! You’ve now recorded the entire brightness range of the scene.
Even if you don’t have a tripod, it is worth trying continuous drive and auto bracketing (where the camera automatically captures a series of shots with differing exposures). Hold the camera steady, lock your elbows in, hold your breath, and squeeze off your multiple exposures. Shorter focal length lenses and higher ISO settings will help. Pixels are free, so give it a try.
Читать дальшеИнтервал:
Закладка:
Похожие книги на «The Art of Photography: An Approach to Personal Expression»
Представляем Вашему вниманию похожие книги на «The Art of Photography: An Approach to Personal Expression» списком для выбора. Мы отобрали схожую по названию и смыслу литературу в надежде предоставить читателям больше вариантов отыскать новые, интересные, ещё непрочитанные произведения.
Обсуждение, отзывы о книге «The Art of Photography: An Approach to Personal Expression» и просто собственные мнения читателей. Оставьте ваши комментарии, напишите, что Вы думаете о произведении, его смысле или главных героях. Укажите что конкретно понравилось, а что нет, и почему Вы так считаете.


