Bruce Barnbaum - The Art of Photography - An Approach to Personal Expression
Здесь есть возможность читать онлайн «Bruce Barnbaum - The Art of Photography - An Approach to Personal Expression» весь текст электронной книги совершенно бесплатно (целиком полную версию без сокращений). В некоторых случаях можно слушать аудио, скачать через торрент в формате fb2 и присутствует краткое содержание. Жанр: Старинная литература, на английском языке. Описание произведения, (предисловие) а так же отзывы посетителей доступны на портале библиотеки ЛибКат.

- Название:The Art of Photography: An Approach to Personal Expression
- Автор:
- Жанр:
- Год:неизвестен
- ISBN:нет данных
- Рейтинг книги:5 / 5. Голосов: 1
-
Избранное:Добавить в избранное
- Отзывы:
-
Ваша оценка:
The Art of Photography: An Approach to Personal Expression: краткое содержание, описание и аннотация
Предлагаем к чтению аннотацию, описание, краткое содержание или предисловие (зависит от того, что написал сам автор книги «The Art of Photography: An Approach to Personal Expression»). Если вы не нашли необходимую информацию о книге — напишите в комментариях, мы постараемся отыскать её.
The Art of Photography: An Approach to Personal Expression — читать онлайн бесплатно полную книгу (весь текст) целиком
Ниже представлен текст книги, разбитый по страницам. Система сохранения места последней прочитанной страницы, позволяет с удобством читать онлайн бесплатно книгу «The Art of Photography: An Approach to Personal Expression», без необходимости каждый раз заново искать на чём Вы остановились. Поставьте закладку, и сможете в любой момент перейти на страницу, на которой закончили чтение.
Интервал:
Закладка:
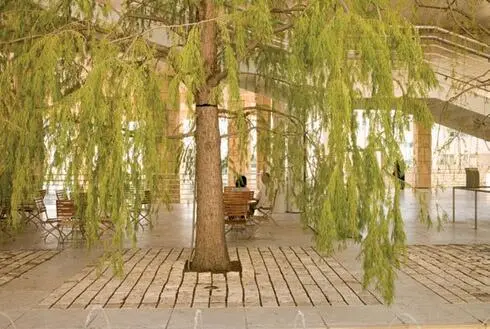
Figure 11-11. This shows the same capture rendered using the Shade white balance setting
The task of maintaining color consistency across physical devices is the function of the color management system. Needless to say, the subject of color management is highly technical, and beyond the scope of the chapter. However, there is one part of color management that you should be aware of as you convert your RAW captures and that is the subject of camera profiles. Camera profiles are data tables used by the RAW conversion and image editing software to cause the computer display to render color as it appeared at the time of the capture.
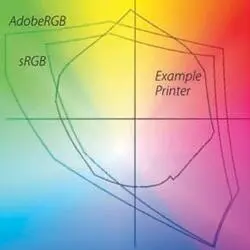
(Graphic created by Stephen Laskevitch.)
Figure 11-12. Graph of gamuts for human vision, Adobe RGB, sRGB, and a typical inkjet printer
Camera manufactures and software vendors include profiles in their proprietary RAW converters, thereby insuring consistent color rendition across its family of cameras. ACR offers a default profile for almost all cameras and, for the ultimate in color control, allows the photographer to apply a custom profile for any specific camera and lens combination. If you are working with ACR, you can access any custom profile you may have under the Camera Calibration tab. As you work with camera profiles and white balance, keep in mind that color rendering is subjective and is therefore fair game for the exercise of artistic judgment. There are no absolutes; there are no rules. Always keep your options and goals in mind, for they’re the heart of expressive photography (and, in fact, of all art).
Adjusting the Black Point, White Point, and Contrast
The response of the camera’s sensor is linear, meaning that a change in brightness produces a proportional change in electrical response. Because the linear response of the sensor, without modification, produces a low-contrast, dull photograph, the RAW converter must modify the contrast to render an acceptable image. In addition, the RAW converter must set the black and white points, that is, the brightness levels which will be rendered pure black and pure white. In ACR, the settings that control what levels are to be rendered pure black, pure white and contrast are found under the Basic tab. It is generally useful to modify the settings in the order in which the sliders appear in the user interface. Here is where you can take the washed-out image that you see on your camera display and change it to get the full tonal range you want in the final print. On the Basic panel start by adjusting the Exposure, capture important highlight values using the Recovery slider thereby setting the white point, use Fill Light to lighten shadows, and Blacks to set the black point. Then proceed to the Clarity, Vibrance, and Saturation sliders for fine-tuning. Although editing the washed-out RAW capture can be postponed until you edit in Photoshop, it is generally best to get as close to the final image as early in the process as possible, and make your refinements later on.
In ACR, the Exposure and Recovery sliders set the white point; the Blacks slider sets the black point. Together, the three sliders provide the pure black and pure white endpoint references from which the other tonalities are measured, however, the settings do not compel you to include pure black or pure white in your photograph. If you want to produce a high key image, increase the Exposure and Recovery settings to render the darkest portions as midtones or light tones. Don’t confuse the setting of the black point with having a black in the image. ACR will set a black point, or you may well set a black point, but a high key image may still have nothing darker than a midtone gray. In other words, the black point is a reference from which other tonalities are measured, but you do not have to have any black in your image. So, setting a black point doesn’t force you into having a black if you don’t want one. Nor, of course, does setting a white point force you to have a white when none is desired. (See Figure 3-4 and Figure 3-5, respectively, as examples of images lacking a black or a white). Figure 11-13 shows a RAW capture and histogram converted using the ACR default settings.
The image looks too dark in Figure 11-13. Therefore, I lightened the overall appearance of the image by increasing the Exposure; the image is rendered lighter in value and the histogram will reflect the lighter rendering by moving to the right. As the histogram is driven to the right, pixels near the right edge reach the edge indicating that the brightest pixels will be rendered pure white. Conversely, decreasing the Exposure setting will darken the image and shift the histogram to the left.
While the Exposure slider shifts the entire histogram to the right, the Recovery slider controls the extreme highlights by allowing you to dial back the highest values. To fine tune the rendering of the extreme highlight values, move the Exposure slider to the right to increase overall exposure and then move the Recovery slider to the right to restore highlight details. Depending on the amount of exposure the highlights received, you may be able to recover detail in some or all of the highlights that appear in the camera’s histogram display to be blocked. By working the Exposure and Recovery sliders, you can adjust the appearance of the image and, if the capture is not too badly overexposed, control which, if any, pixels will be rendered pure white.
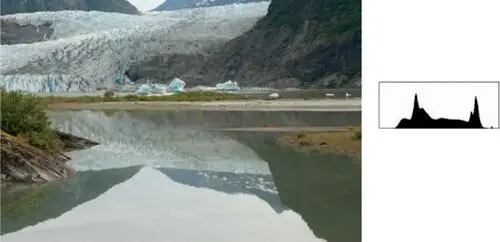
Figure 11-13. RAW capture converted with ACR default settings together with the histogram
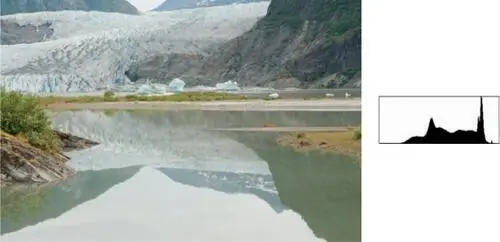
Figure 11-14. RAW capture with Exposure (+0.9) and Recovery (67) adjustments together with the histogram

Figure 11-15. RAW capture with adjustments to Exposure (+0.9), Recovery (67), and Blacks (20) settings together with the histogram
As an aid in setting the white point, hold the Option/Alt key while moving the Exposure or the Recovery slider. The screen will appear black except for those areas that will be rendered pure white. As you move the Exposure slider to the right, more of the image will be rendered pure white and will appear on the screen. As you move the Recovery slider to the right, more of the highlights will disappear into the black screen indicating they will not be rendered pure white. Release the Option/Alt key to view the image. Again, be mindful that just because you have the control to render portions of the image as blank white, you are not required to do so and in most instances you will want only small areas of the image to be rendered pure white. Your artistic judgment should guide you in deciding which areas, if any, should be rendered pure white.
Figure 11-14 shows the result of increasing the Exposure value from the default setting of 0 to 0.9 and increasing the Recovery value from the default setting of 0 to 67 to preserve detail in the extreme highlights.
Thus far, we have addressed the lighter portions of the image; we now turn to the darker areas by setting the black point. This time move the Blacks slider to the right to render the darker portions of the image as pure black. To observe the areas that will be rendered pure black as you move the Blacks slider, hold the Option/Alt key while moving the Blacks slider. The screen will appear white except for those areas that will be rendered as pure black. Again, there is no requirement that you render large portions, or any portion, of your image pure black; use your judgment.
Читать дальшеИнтервал:
Закладка:
Похожие книги на «The Art of Photography: An Approach to Personal Expression»
Представляем Вашему вниманию похожие книги на «The Art of Photography: An Approach to Personal Expression» списком для выбора. Мы отобрали схожую по названию и смыслу литературу в надежде предоставить читателям больше вариантов отыскать новые, интересные, ещё непрочитанные произведения.


Обсуждение, отзывы о книге «The Art of Photography: An Approach to Personal Expression» и просто собственные мнения читателей. Оставьте ваши комментарии, напишите, что Вы думаете о произведении, его смысле или главных героях. Укажите что конкретно понравилось, а что нет, и почему Вы так считаете.