Bruce Barnbaum - The Art of Photography - An Approach to Personal Expression
Здесь есть возможность читать онлайн «Bruce Barnbaum - The Art of Photography - An Approach to Personal Expression» весь текст электронной книги совершенно бесплатно (целиком полную версию без сокращений). В некоторых случаях можно слушать аудио, скачать через торрент в формате fb2 и присутствует краткое содержание. Жанр: Старинная литература, на английском языке. Описание произведения, (предисловие) а так же отзывы посетителей доступны на портале библиотеки ЛибКат.

- Название:The Art of Photography: An Approach to Personal Expression
- Автор:
- Жанр:
- Год:неизвестен
- ISBN:нет данных
- Рейтинг книги:5 / 5. Голосов: 1
-
Избранное:Добавить в избранное
- Отзывы:
-
Ваша оценка:
The Art of Photography: An Approach to Personal Expression: краткое содержание, описание и аннотация
Предлагаем к чтению аннотацию, описание, краткое содержание или предисловие (зависит от того, что написал сам автор книги «The Art of Photography: An Approach to Personal Expression»). Если вы не нашли необходимую информацию о книге — напишите в комментариях, мы постараемся отыскать её.
The Art of Photography: An Approach to Personal Expression — читать онлайн бесплатно полную книгу (весь текст) целиком
Ниже представлен текст книги, разбитый по страницам. Система сохранения места последней прочитанной страницы, позволяет с удобством читать онлайн бесплатно книгу «The Art of Photography: An Approach to Personal Expression», без необходимости каждый раз заново искать на чём Вы остановились. Поставьте закладку, и сможете в любой момент перейти на страницу, на которой закончили чтение.
Интервал:
Закладка:
If the brightness range of the scene is less than the camera’s dynamic range (the histogram does not extend the full width of the display), it’s best to increase your exposure and thereby force the histogram closer to the right edge (rather than the left edge) to take advantage of the increased amounts of information that comes with more exposure (short of clipping it at the right edge, of course).
To see the histogram in action, set your camera to manual exposure. Using an aperture and shutter speed that will underexpose the scene by at least 5 stops, make a capture; increase the exposure by 1 stop and make another capture. Repeat the process 10 times and then scroll through the captures and corresponding histograms. If your first capture was sufficiently underexposed, the image display will appear black and there will be a thin trace along the left edge of the histogram. With each increase in exposure above the sensor threshold, the right edge of the histogram will move to the right. As you scroll through the captures, you will come to the point where the deepest shadows are sufficiently overexposed to be beyond the dynamic range of the sensor, the display will appear blank white, and there will be a thin trace on the right edge of the histogram.
Figure 11-3 shows the histogram for a properly exposed capture with the highlight values approaching, but not quite touching, the right edge. This particular histogram also shows that there will be good shadow detail, as the exposure is sufficient to record information in the shadows. Note that if the scene contains specular highlights (such as sunlight glinting off of a curved chrome piece on a car), the histogram from a proper exposure will show some pixels at the right edge. Here is when the flashing overexposure/underexposure display (discussed below) is helpful in interpreting the histogram. Don’t worry about those areas, since you’ll want such specular reflections to be blank white. But if other highlight areas that demand detail show up as being overexposed, reduce the exposure and make another capture.
Figure 11-4 shows the histogram of a good exposure, and Figure 11-5 shows the histogram of the same scene with one stop less exposure. While not optimum, the exposure depicted here will likely produce an acceptable result, although the lower values can be expected to show less separation and possibly some noise.
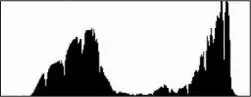
Figure 11-4. Histogram of another good exposure
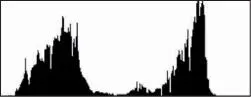
Figure 11-5. Histogram for capture underexposed by one f-stop
Figure 11-6 shows the histogram of the same scene with 2 stops less exposure. The increased gap at the right edge and the bunching at the left edge indicate that the capture is now seriously underexposed. The concentration at and near the left edge tells us that the image will have blank and noisy shadows. Although a RAW converter may be able to pull out acceptable midtone and highlight values, there will be significant areas of empty black shadows and the overall image quality will be less than optimal. If the capture were made as a JPEG, and therefore as an 8-bit file, the print may show posterization. If your initial exposure shows a histogram with the right edge falling as far to the left as the one in Figure 11-6, give at least one stop more exposure and check again. You may need another half-stop... and maybe even more. Keep giving more exposure until you get the histogram as close to the right edge as possible.
Now, what happens when the brightness range exceeds the dynamic range of the sensor? Figure 11-7 shows a histogram for such a scene. The histogram shows significant concentrations at and near both edges, which tells you that you cannot capture the entire brightness range of the scene in a single capture. Here, it would seem that you have a limited set of unpleasant choices: #1) Expose for good shadow detail by giving sufficient exposure to move the histogram away from the left edge and thereby cause additional higher values to be clipped; #2) Expose for good highlight detail by reducing exposure enough to move the histogram away from the right edge and thereby cause additional lower values to be rendered pure black; or #3) Expose for the midtones and live with empty shadows and blocked highlights.
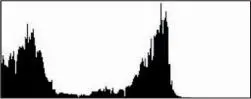
Figure 11-6. Histogram for capture underexposed by 2 f-stops
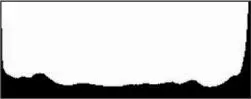
Figure 11-7. Histogram where the brightness of the scene exceeds the dynamic range of the camera
Fortunately, these aren’t the only choices. In the section below under the heading High Dynamic Range Images—The Extended Zone System for Digital Photography, we’ll see how to overcome those limitations and extend the range of the sensor by making multiple exposures at various settings and then, in the computer, integrating those several exposures into a single image. Not surprisingly, the decision of how to proceed depends on your desired interpretation of the scene. While the histogram cannot make the artistic decision, it provides you with the information with which to set the exposure to favor the shadows, the highlights, the midtones, or to make a series of captures that will record the entire brightness range of the scene.
Now that you understand the histogram, it’s time to get a feel for how the histogram on your camera’s display responds to changes in exposure, and in particular, increases in exposure as you approach overexposure. This time, let’s capture a sequence of exposures with the camera on a tripod or placed on a tabletop. Choose as your subject an evenly lit, uniform surface such as an evenly illuminated interior wall. Place the camera a foot or so from the wall, turn off autofocus, use maximum focal length if you are using a zoom lens, and focus at infinity. The idea is to have as uniformly lit a target as possible. Take a series of captures from grossly underexposed (histogram bunched at the left edge of the display) to grossly overexposed (histogram bunched at the right edge of the display) using one-half or one-third stop increments.
Scroll through the captures with the histogram display visible and you will quickly get a feel for your camera’s dynamic range, and the amount by which the right edge of the histogram moves with each increase in exposure. The dynamic range can be estimated by counting the number of exposures (how many one-third or one-half stop exposures) it takes to have the majority of pixels move from the left edge to the right edge. Note the sensitivity of the histogram to increases in exposure as the right edge of the histogram approaches clipping. Your understanding of the relationship between changes in exposure and the response of the histogram will serve you well in quickly setting exposures in the field. So far, we have been working with the luminosity histogram, which displays the perceived brightness of the scene with color information being weighted to take into account human color perception. The luminosity histogram is usually sufficient if the final output is to be black-and-white, generally referred to as “grayscale”. For more precise control, which is especially useful for high fidelity color output, you can view histograms for each of the red, green, and blue channels.
Most cameras allow the user to display the histogram for the three channels in one of a couple of formats: #1) In a three-channel composite similar to the one shown in Figure 11-8 or #2) in three distinct color channels similar to the one shown in Figure 11-9.
Читать дальшеИнтервал:
Закладка:
Похожие книги на «The Art of Photography: An Approach to Personal Expression»
Представляем Вашему вниманию похожие книги на «The Art of Photography: An Approach to Personal Expression» списком для выбора. Мы отобрали схожую по названию и смыслу литературу в надежде предоставить читателям больше вариантов отыскать новые, интересные, ещё непрочитанные произведения.


Обсуждение, отзывы о книге «The Art of Photography: An Approach to Personal Expression» и просто собственные мнения читателей. Оставьте ваши комментарии, напишите, что Вы думаете о произведении, его смысле или главных героях. Укажите что конкретно понравилось, а что нет, и почему Вы так считаете.