Paul McFedries - G Suite For Dummies
Здесь есть возможность читать онлайн «Paul McFedries - G Suite For Dummies» — ознакомительный отрывок электронной книги совершенно бесплатно, а после прочтения отрывка купить полную версию. В некоторых случаях можно слушать аудио, скачать через торрент в формате fb2 и присутствует краткое содержание. Жанр: unrecognised, на английском языке. Описание произведения, (предисловие) а так же отзывы посетителей доступны на портале библиотеки ЛибКат.

- Название:G Suite For Dummies
- Автор:
- Жанр:
- Год:неизвестен
- ISBN:нет данных
- Рейтинг книги:3 / 5. Голосов: 1
-
Избранное:Добавить в избранное
- Отзывы:
-
Ваша оценка:
G Suite For Dummies: краткое содержание, описание и аннотация
Предлагаем к чтению аннотацию, описание, краткое содержание или предисловие (зависит от того, что написал сам автор книги «G Suite For Dummies»). Если вы не нашли необходимую информацию о книге — напишите в комментариях, мы постараемся отыскать её.
our G Suite questions with this friendly resource
G Suite
For Dummies
For Dummies
G Suite For Dummies
Google Docs for word processing Gmail for email Google Calendar for scheduling and day planning Google Sheets for spreadsheet functionality Google Drive for data storage Google Hangouts and Google Meet for videoconferencing and calling capability The book helps navigate the G Suite payment plans and subscription options as well as settings that ensure your own privacy and security while operating in the cloud. Perfect for anyone hoping to get things done with this tool,
belongs on the bookshelf of every G Suite user who needs help from time to time.
G Suite For Dummies — читать онлайн ознакомительный отрывок
Ниже представлен текст книги, разбитый по страницам. Система сохранения места последней прочитанной страницы, позволяет с удобством читать онлайн бесплатно книгу «G Suite For Dummies», без необходимости каждый раз заново искать на чём Вы остановились. Поставьте закладку, и сможете в любой момент перейти на страницу, на которой закончили чтение.
Интервал:
Закладка:
Main menu toggle: Click this icon to narrow the main menu to show only icons. This gives you a bit more horizontal space for Gmail. Click the icon again to expand the main menu.
Select: You can select some or all of the messages in the current label.
Refresh: Click to check for new messages.
Search mail: Enter text here to locate messages.
Google apps: Clicking the grid icon displays the icons for all Google apps.
Google account: Get access to your Google account.
Side panel: This sidebar, which is on the right, consists of the following elements: Calendar: Opens a pane for quick access to Google Calendar. Keep: Enables you to write a quick note to store in the Keep app. Tasks: Enables you to create a quick task to store in the Tasks app.
Hide side panel: Click this arrow to collapse the side panel and gain a little extra horizontal legroom. Click the arrow again to redisplay the side panel.
Figure 2-1 points out the features listed above.
Touring the Gmail Inbox
Now I want to zoom in a bit and focus on just the inbox portion of the Gmail screen. I talk about many of the inbox features later in this chapter, so I'll just hit a few highlights here (check out Figure 2-2, which offers handy pointers to the features in the following list):
Message actions: These icons represent actions you can take on the selected message, such as moving the message to another label or deleting the message.
More: Click this icon to see even more message actions.
Message navigation: If you have more than one screenful of messages in the current label, you can click these arrows to navigate the messages one screenful at a time.
Settings menu: Gain access to all the Gmail settings.
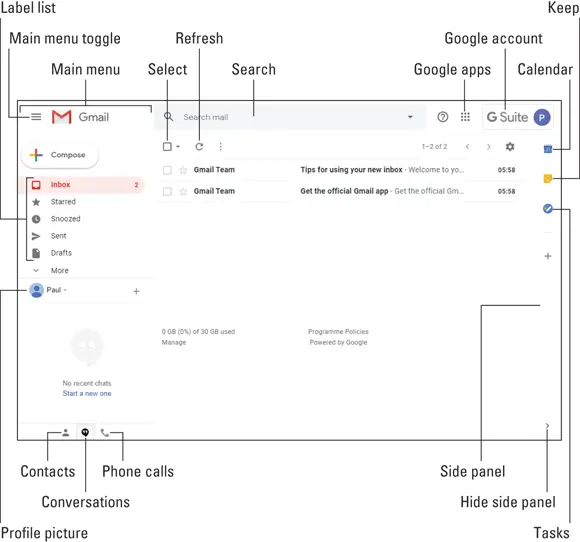
FIGURE 2-1:Gmail, your G Suite email home.
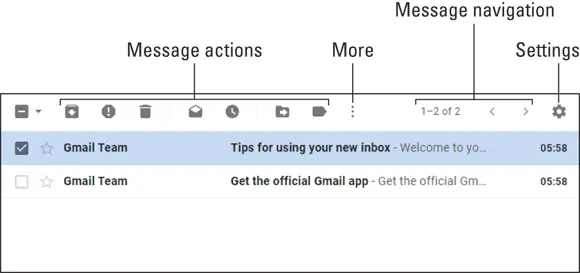
FIGURE 2-2:The Gmail inbox.
Showing your good side: Adding a profile photo
When you send an email to another Gmail user, participate in a chat or a meeting, collaborate on a document or spreadsheet, or do any number of other G Suite activities, your presence in those activities is indicated by your G Suite profile photo. For a new G Suite account, that photo is a generic silhouette of a perfectly round head floating above the top third or so of what appears to be a perfectly round torso. (Refer to Figure 2-1.) It’s perfectly bland, in other words. Believe me, you do not want “circle person” to represent you to your colleagues, friends, and family.
Fortunately, the road to a flattering profile photo consists of just the following steps:
1 On the Gmail main menu, click the default profile picture (pointed out earlier, in Figure 2-1).The Select Profile Photo window appears.
2 Make sure the Upload Photos tab is selected.If you've previously uploaded photos to use as your profile, they show up on the Your Photos tab, so feel free to click that tab if you want to reuse a previous photo.If you want to take a fresh photo using your PC's camera, click the Web Camera tab. When you display the Web Camera tab, chances are you'll see an error message that says, “Adobe Flash Player is blocked.” Bummer. If you really want to use the camera, open your web browser's settings and find the option that enables Flash. (In Chrome, click Settings, See all settings, click Privacy and Security, click Site Settings, click Flash, and then click the Block Sites from Running Flash switch.) Follow Steps 1 and 2 and, when your browser asks whether it can run Flash, click Allow.
3 Select the photo you want to use for your profile.Perhaps the easiest way to do this is to locate the photo in File Explorer (Windows) or Finder (Mac), click and drag the photo, and then drop it on the “Drag a profile photo here” message.Otherwise, click Select a Photo from Your Computer, choose the image you want to use, and then click Open.
4 Click Set as Profile Photo.Gmail uploads the image and uses it as your profile pic across all the G Suite apps. Looking good!
The Outbox: Sending an Email Message
Okay, enough lollygagging. It's time to get to work and learn how to foist your e-prose on unsuspecting colleagues, friends, family, and former “Brady Bunch” cast members. This section shows you the basic technique to use and then gets a bit fancier in discussing the contacts list, attachments, and other snippets of Gmail sending lore.
The basics: Composing and sending a message
Without further ado (not that there's been much ado to this point, mind you), here are the basic steps to follow to fire off an email message to some lucky recipient:
1 On Gmail's main menu, click Compose.You end up with the New Message window onscreen, as shown in Figure 2-3. FIGURE 2-3:You cobble together an email message in the New Message window.
2 In the To text box, type the email address of the recipient.It's perfectly acceptable to enter multiple addresses in this text box. After each address, press Enter. (For variety, you can also press Tab or type a semicolon [;] or a comma [,].)What if you make a mistake in the address? Don't sweat it: Double-click the address to open it for editing, fix the error, and then press Enter.What if you want to remove an address? Again, easy money: Click the X that appears to the right of the address.
3 The address you put in the To box is the main recipient of the message. However, it's common to shoot off a copy of the message to a secondary recipient. To do that, click Cc (short for c ourtesy c opy) and then enter the email address in the Cc text box that shows up. (Again, you can enter multiple addresses, if you're so inclined.)You might also want to send the message to someone as a b lind c ourtesy c opy (Bcc), which does in fact send a copy of the message to that person but also ensures that none of the other recipients sees that person's address anywhere. Click BCC and type the address in the Bcc text box. It seems awfully stealthy to send a Bcc to someone, so when would you ever do such a thing? The most common reason is that you want that person to see the contents of your message, but you don't want to burden that person with the subsequent conversation. That is, if one of your To or Cc recipients clicks Reply All (which I talk about later in this chapter), that reply doesn’t go to anyone in the Bcc field.
4 Use the Subject line to enter a subject for the message.Now, don't rush things here. The subject acts as a kind of title for your message. It's the first thing the recipient sees, so it should accurately reflect the content of your message, but it shouldn't be too long. Think pithy.
5 Use the large, empty area below the Subject line to type the message text (also known in Nerdsville as the message body ).
6 Click the Formatting Options icon to display the impressive collection of commands shown in Figure 2-4.Use these icons and commands to change the font, the type size, and the type style. You can also click More Formatting Options to format paragraphs, add a bulleted or numbered list, and more. Check your spelling before sending your message to the recipient. It just takes a sec, and if the spell checker finds an error or two, you'll save yourself a bit of embarrassment. To run the spell checker, click More Options (pointed out earlier, in Figure 2-3) and then click Check Spelling.
Читать дальшеИнтервал:
Закладка:
Похожие книги на «G Suite For Dummies»
Представляем Вашему вниманию похожие книги на «G Suite For Dummies» списком для выбора. Мы отобрали схожую по названию и смыслу литературу в надежде предоставить читателям больше вариантов отыскать новые, интересные, ещё непрочитанные произведения.


Обсуждение, отзывы о книге «G Suite For Dummies» и просто собственные мнения читателей. Оставьте ваши комментарии, напишите, что Вы думаете о произведении, его смысле или главных героях. Укажите что конкретно понравилось, а что нет, и почему Вы так считаете.