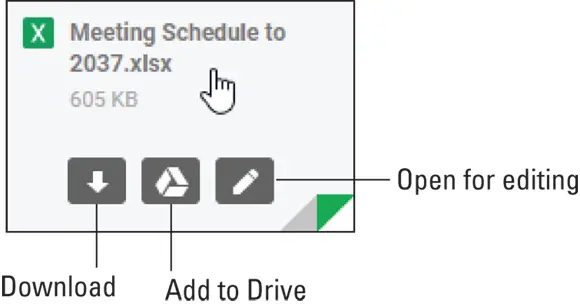
FIGURE 2-12:You see a toolbar similar to this one when you view an attached file.

FIGURE 2-13:Hover the mouse pointer over the thumbnail to see the icons shown here.
If you receive a message that asks a question, solicits an opinion, or otherwise requires feedback from you, you can send a response. Open the message and then run one of the following commands:
Reply: Click this command (refer to Figure 2-11) to send a response back to the sender of the message. Mail automatically addresses the message to the sender, includes the original subject line preceded by Re: ( re garding), and adds the original message’s text. Gmail also usually displays several so-called Smart Replies below the message. For example, if you receive an attached file, you might see a Smart Reply such as “Received — thank you” or “Got it.” Click a Smart Reply button to create a reply that includes the Smart Reply text. To turn off Smart Replies, click Settings, See all settings, click the Smart Reply Off radio button, and then click Save Changes.
Reply All: If the note was foisted on several people, choose this command to send your response to everyone who received the original (except anyone who was included in the Bcc field). Mail automatically addresses the message to the sender and all recipients of the original message, includes the original subject line preceded by Re: , and adds the original message’s text. When I say “all recipients,” I mean all recipients, so be extra careful when running the Reply All command. Why? Because the “all” you're dealing with could be your team, your department, or even your entire organization, so a complaint about the “jerks over in Marketing” that gets sent accidentally to all recipients might result in tears later on.
Forward: Choose this command to have someone else take a gander at the message you received. Mail automatically includes the original subject line preceded by Fwd: and adds the original message’s text. Note that you need to supply the recipient’s address.
 A forwarded message contains the original message text, which is preceded by an “Original Message” header and some of the message particulars (who sent it, when they sent it, and so on). If you want your recipient to see the message exactly as you received it, close the original message (if it's open), select the message (by selecting its check box), click More (the three-vertical-dots thing that appears just above the message list), and then click Forward as Attachment.
Add your own text to the message and then click Send to fire off the response.
Creating a task from a message
Many email messages (and, on bad days, way too many email messages) require you to perform some action. It could be making a phone call, completing a report, sending a file, or donating to yet another coworker's walkathon for Insert Name of Obscure Disease Here . You could leave such messages in your Inbox and hope you get around to them one day, or you can be more proactive and create a task from each message. That way, you can use the Tasks app to keep track of what you need to get done.
Here are the steps to tackle to create a task from a Gmail message:
1 Open or select the message you want to work with.
2 Click the Add to Tasks icon, pointed out earlier in Figure 2-11.Gmail opens the Tasks pane and adds a new task that includes a link to the email message.
Setting up a vacation responder
Remember the days when you'd leave on vacation for a couple of weeks and leave your work behind? No, I don't either! These days, we live in a cruel world where people send you a message and expect an instant reply. And it's a sure sign of pending cultural collapse that you're expected to reply even when you're on vacation. Boo!
Okay, fine. Maybe you do have to reply while you're out of the office, but there's no rule (yet) that says you have to reply immediately. Unfortunately, your correspondents might not know you're away, so to forestall an angry “Why didn't you answer my message in less than ten seconds?” follow-up, set up a vacation responder. A vacation responder — also known in the G Suite world as an out-of-office autoreply — is an automatic reply that gets fired off to everyone who has the temerity to send you a message while you're trying to have a relaxing vacation with your family.
 “Wait a minute,” I hear you say. “What if someone doesn't get the hint and keeps sending me messages? Will they end up with dozens of these automatic replies?” Nope. Gmail is smart enough to recognize when someone sends multiple messages your way and only ships out an autoreply every four days.
Here are the steps to plow through to create a vacation responder:
1 Choose Settings ⇒ See all settings.Gmail opens the Settings page with the General tab displayed.
2 Scroll down until you come to the Out-of-Office AutoReply setting, which is near the bottom of the page.
3 Click the Out of Office AutoReply On radio button.
4 Use the First Day date picker to select the day you want to start sending the automatic replies.
5 (Optional) Select the Last Day check box and use the date picker to select the day you want to stop sending the automatic replies.If you don't choose the Last Day option, you'll need to remember to turn off the automatic replies manually by clicking the Out of Office AutoReply Off radio button.
6 Use the Subject text box to enter a Subject line for your automatic replies.
7 Use the large text box to compose the reply.Figure 2-14 shows an example.Feel free to spruce up your reply text with any of the formatting options that loom just above the text box. FIGURE 2-14:Use the Out-of-Office AutoReply setting to create a vacation responder.
8 If you want Gmail to respond only to messages from folks in your contacts list, select the Only Send a Response to People in My Contacts check box.
9 If you want Gmail to respond only to messages from folks in your company, select the Only Send a Response to People in Company check box (where Company is the name of the place where you work).
10 Click Save Changes.
When you want to work with one or more messages in Gmail, you begin by selecting the message or messages you want to work with. Here are the techniques to use:
To select a single message, select the check box that appears to the left of the message.
To select multiple messages, select the check box beside each message.
To select all messages, select the Select check box (pointed out way back in Figure 2-1) or pull down the Select list and click All.
To select none of the messages, clear the Select check box or pull down the Select list and click None.
To select those messages that you have read, pull down the Select list and click Read.
To select those messages that you haven't read yet, pull down the Select list and click Unread.
Читать дальше


 A forwarded message contains the original message text, which is preceded by an “Original Message” header and some of the message particulars (who sent it, when they sent it, and so on). If you want your recipient to see the message exactly as you received it, close the original message (if it's open), select the message (by selecting its check box), click More (the three-vertical-dots thing that appears just above the message list), and then click Forward as Attachment.
 “Wait a minute,” I hear you say. “What if someone doesn't get the hint and keeps sending me messages? Will they end up with dozens of these automatic replies?” Nope. Gmail is smart enough to recognize when someone sends multiple messages your way and only ships out an autoreply every four days.


