Paul McFedries - G Suite For Dummies
Здесь есть возможность читать онлайн «Paul McFedries - G Suite For Dummies» — ознакомительный отрывок электронной книги совершенно бесплатно, а после прочтения отрывка купить полную версию. В некоторых случаях можно слушать аудио, скачать через торрент в формате fb2 и присутствует краткое содержание. Жанр: unrecognised, на английском языке. Описание произведения, (предисловие) а так же отзывы посетителей доступны на портале библиотеки ЛибКат.

- Название:G Suite For Dummies
- Автор:
- Жанр:
- Год:неизвестен
- ISBN:нет данных
- Рейтинг книги:3 / 5. Голосов: 1
-
Избранное:Добавить в избранное
- Отзывы:
-
Ваша оценка:
G Suite For Dummies: краткое содержание, описание и аннотация
Предлагаем к чтению аннотацию, описание, краткое содержание или предисловие (зависит от того, что написал сам автор книги «G Suite For Dummies»). Если вы не нашли необходимую информацию о книге — напишите в комментариях, мы постараемся отыскать её.
our G Suite questions with this friendly resource
G Suite
For Dummies
For Dummies
G Suite For Dummies
Google Docs for word processing Gmail for email Google Calendar for scheduling and day planning Google Sheets for spreadsheet functionality Google Drive for data storage Google Hangouts and Google Meet for videoconferencing and calling capability The book helps navigate the G Suite payment plans and subscription options as well as settings that ensure your own privacy and security while operating in the cloud. Perfect for anyone hoping to get things done with this tool,
belongs on the bookshelf of every G Suite user who needs help from time to time.
G Suite For Dummies — читать онлайн ознакомительный отрывок
Ниже представлен текст книги, разбитый по страницам. Система сохранения места последней прочитанной страницы, позволяет с удобством читать онлайн бесплатно книгу «G Suite For Dummies», без необходимости каждый раз заново искать на чём Вы остановились. Поставьте закладку, и сможете в любой момент перейти на страницу, на которой закончили чтение.
Интервал:
Закладка:
The Gmail programmers must have experienced that regret a time or two themselves because they did something about it: They created the Undo command. After you click Send, Gmail displays the Message Sent pop-up, shown in Figure 2-8, for a few seconds. Crucially for those of us with overly sensitive Send trigger fingers, that pop-up also includes an Undo command. Click Undo and Gmail plucks your message out of the outbox and opens it again so that you can make whatever changes you need (or toss the message in the trash). Whew!

FIGURE 2-8:Right after you send a message, you can change your mind by clicking Undo.
By default, Gmail displays the Message Sent pop-up (and therefore the Undo command) for only five seconds. If you'd like a bit more time, follow these steps:
1 Choose Settings ⇒ See all settings.Gmail opens the Settings page with the General tab displayed.
2 For the Undo Send setting, use the Send Cancellation Period: X Seconds drop-down list to set the number of seconds you want.You can choose 5, 10, 20, or 30 seconds.
3 Scroll down to the bottom of the Settings page and click Save Changes.
The Inbox: Handling Incoming Messages
Some people like to think of email as a return to the days of belles lettres and billets-doux. (These people tend to be a bit pretentious.) Yes, it's true that email has people writing again, but this isn't like the letter-writing of old. The major difference is that the turnaround time for email is usually much quicker. Rather than wait weeks or even months to receive a return letter, a return email might take as little as a few minutes or a few hours. So, if you send a message with a question or comment, chances are that you’ll receive a reply before too long. This section shows you what to do with those messages after they arrive.
Refreshing your messages
One of Gmail's handiest features is that whenever it receives a message, it automatically adds it to your inbox. Nice! However, Gmail sometimes doesn't add a new message to the inbox immediately. It will get there soon enough, but if you're waiting impatiently for a particular message to arrive, you can often speed things up a bit by clicking the Refresh icon (pointed out earlier, in Figure 2-1).
Reading your messages
Figure 2-9 shows the Inbox label with a few messages. The first thing to notice is that Gmail uses a bold font for all messages you haven't read yet. For each message, you also see the name of the sender, the Subject line and the first few words of the body (separated by a dash), and the delivery time (if it was delivered today) or date (if it was delivered before today).

FIGURE 2-9:The inbox with a few messages received.
To read a message, click it. Gmail opens the message and displays its text, as shown in Figure 2-10. To navigate your messages, use the following techniques (all shown in Figure 2-10):
To display the next oldest message, click Older.
To display the next newer message, click Newer.
To return to the inbox, click Back to Inbox.
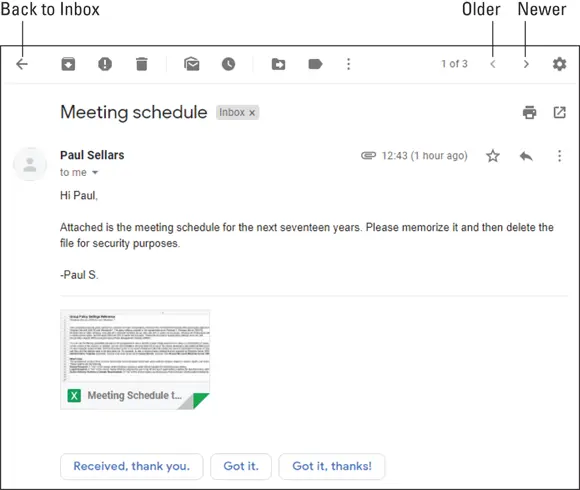
FIGURE 2-10:Click a message to open it and see what it says.
Easier reading with the Reading pane
Reading messages isn't hard, but it does involve a few more clicks than you might like. To fix that, you can sit Gmail down and ask it to display the reading pane, which is a separate area displayed alongside the inbox. When you select a message, Gmail displays the message text in the reading pane. One-click reading!
You have two choices when it comes to the position of the reading pane:
To the right of the inbox: This option splits the inbox area vertically so that you end up with the inbox on the left and the reading pane on the right. This gives you the most vertical reading space, so it's best if you tend to get long messages.
Below the inbox: This option splits the inbox area horizontally so that you end up with the inbox on the top and the reading pane on the bottom. This gives you the most horizontal inbox space, which makes it easier to navigate your messages.
Follow these steps to start using the reading pane:
1 Choose Settings ⇒ See all settings.Gmail opens the Settings page with the General tab displayed.
2 Click the Inbox tab.
3 For the Reading Pane setting, select the Enable Reading Pane check box.
4 For the Reading Pane Position setting, click the radio button you prefer: Right of Inbox or Below Inbox.You also see a third option here: No Split. This tells Gmail to go ahead and activate the reading pane, but not to show it right away. You can then display the reading pane whenever you need it by using the Toggle Split Pane Mode list, pointed out in Figure 2-11.
5 Scroll to the bottom of the inbox page and click Save Changes.

FIGURE 2-11:The reading pane, positioned below the inbox message list.
Figure 2-11 shows the inbox with the reading pane lurking below the message list, dutifully displaying the text of the selected message. Note, too, the new Toggle Split Pane Mode list, which you can use to adjust the reading pane position to the right of the inbox (Vertical Split), below the inbox (Horizontal Split), or hidden (No Split).
Attending to attachments
If you receive a message that has one or more files tied to it, when you open that message (either directly or in the reading pane), you see a thumbnail version of each attached file. Gmail gives you quite a few ways to handle any attachments in the current message:
View the file. If you just want to see what's in the file, you can open the file for viewing by clicking the file thumbnail. Gmail opens the file and displays a toolbar similar to the one shown in Figure 2-12. With this toolbar, you can open the file in a compatible G Suite app (such as Sheets), add the file to My Drive, print the file, or download the file.
Download the file. Hover the mouse pointer over the file thumbnail and then click Download. (See Figure 2-13.) Alternatively, click the thumbnail to open the file for viewing and then click Download. (Refer to Figure 2-12.) Although Gmail makes it easy to deal with attachments, you should never just blithely open an attached file that you've downloaded, because you might end up infecting your computer with a virus or another type of malware. Be sure to use your security software (such as Windows Defender) to scan the file for malware before opening it.
Save the file to your Google Drive. Hover the mouse pointer over the file thumbnail and then click Add to Drive. (Refer to Figure 2-13). Alternatively, click the thumbnail to open the file for viewing and then click Add to My Drive. (Refer to Figure 2-12.).
Open the file for editing. Hover the mouse pointer over the file thumbnail and then click Edit with App (refer to Figure 2-13), where App is a compatible G Suite app. Alternatively, click the thumbnail to open the file for viewing and then click Open with App. (Refer to Figure 2-12.)
Читать дальшеИнтервал:
Закладка:
Похожие книги на «G Suite For Dummies»
Представляем Вашему вниманию похожие книги на «G Suite For Dummies» списком для выбора. Мы отобрали схожую по названию и смыслу литературу в надежде предоставить читателям больше вариантов отыскать новые, интересные, ещё непрочитанные произведения.


Обсуждение, отзывы о книге «G Suite For Dummies» и просто собственные мнения читателей. Оставьте ваши комментарии, напишите, что Вы думаете о произведении, его смысле или главных героях. Укажите что конкретно понравилось, а что нет, и почему Вы так считаете.