Mark Harrison - SketchUp For Dummies
Здесь есть возможность читать онлайн «Mark Harrison - SketchUp For Dummies» — ознакомительный отрывок электронной книги совершенно бесплатно, а после прочтения отрывка купить полную версию. В некоторых случаях можно слушать аудио, скачать через торрент в формате fb2 и присутствует краткое содержание. Жанр: unrecognised, на английском языке. Описание произведения, (предисловие) а так же отзывы посетителей доступны на портале библиотеки ЛибКат.
- Название:SketchUp For Dummies
- Автор:
- Жанр:
- Год:неизвестен
- ISBN:нет данных
- Рейтинг книги:5 / 5. Голосов: 1
-
Избранное:Добавить в избранное
- Отзывы:
-
Ваша оценка:
SketchUp For Dummies: краткое содержание, описание и аннотация
Предлагаем к чтению аннотацию, описание, краткое содержание или предисловие (зависит от того, что написал сам автор книги «SketchUp For Dummies»). Если вы не нашли необходимую информацию о книге — напишите в комментариях, мы постараемся отыскать её.
makes it easy to get started as quickly as the ideas pop into your head!
Providing real-world insight from top SketchUp insiders, these six-books-in-one teach you how to tackle the basics of the program and apply those skills to real-world projects. You’ll discover the basics of modeling as they apply to either free or paid versions of SketchUp before diving into creating models to use for making objects, constructing buildings, or redesigning interiors.
Navigate the SketchUp product mix Get familiar with the basics of modeling View and share your models Make your architecture, interior design, and woodworking dreams a reality You have tons of great ideas—and now you can harness this powerful software to bring them to life.
SketchUp For Dummies — читать онлайн ознакомительный отрывок
Ниже представлен текст книги, разбитый по страницам. Система сохранения места последней прочитанной страницы, позволяет с удобством читать онлайн бесплатно книгу «SketchUp For Dummies», без необходимости каждый раз заново искать на чём Вы остановились. Поставьте закладку, и сможете в любой момент перейти на страницу, на которой закончили чтение.
Интервал:
Закладка:
Linear guide lines: To create a guide along an edge in your model, click anywhere along the edge except on either endpoint. Then click again anywhere else along the edge.
Guide points: You may want to place a point somewhere in space; you can do exactly that with guide points. With the Tape Measure tool, click an edge’s endpoint and then click again somewhere else. A little x appears at the end of a dashed line. That’s your new guide point.
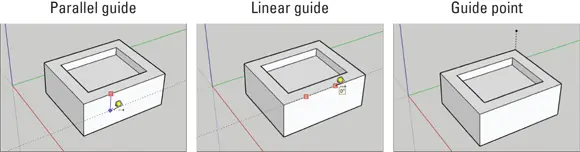
FIGURE 3-27:Use the Tape Measure tool to create guide lines and points.
 Here’s an important point about the Tape Measure tool: It has two modes, and it creates guides in only one of them. Pressing the Ctrl key (Mac: Option) toggles between the modes. When you see a + next to your cursor, your Tape Measure can make guides; when there’s no +, it can’t.
Using guides to make your life easier
 As you’re working in this software, you’ll find yourself using guides all the time; they’re an indispensable part of how modeling in SketchUp works. Here’s what you need to know about using them:
Position guides precisely, using the Measurements box. Check out “ Injecting accuracy into your model” earlier in this chapter to find out how.
Erase guides one at a time. Just click or drag over them with the Eraser tool to delete guides individually. You can also right-click them and choose Erase from the shortcut menu.
Erase all your guides at the same time. This operation comes in two flavors: Desktop: Choose Edit ⇒ Delete Guides. Web: Enter guides in the search box and then click Delete Guides.
Hide guides individually. Right-click a single guide and choose Hide from the shortcut menu to hide it.
Hide or unhide all guides at the same time. This operation also comes in two flavors: Desktop: Choose View ⇒ Guides to alternate between showing or hiding all guides. Web: Enter guides in the search box and then click the View Guides button to toggle between visible or hidden.It’s usually a good idea to hide your guides instead of erasing them, especially while you’re still modeling.
Select, move, copy, and rotate guides just like any other entities in your model. Guides aren’t edges, but you can treat them that way a lot of the time.
Painting your faces with color and texture
When you’re adding colors and textures — collectively referred to in SketchUp as materials — to your model, look no further than the Materials panel and the Paint Bucket (B) tool. Chapter 2introduces this winsome pair and provides a workflow for adding materials to your model. This section offers a more in-depth introduction to your options.
The Materials panel
The Materials panel looks different in the Windows and Mac versions of SketchUp, but both versions do basically the same thing. By default, the Materials panel appears on the Default Tray (Windows only). If the panel is ever hidden, and you need to reopen it, choose Window ⇒ Default Tray ⇒ Materials (Mac: Window ⇒ Materials).
In SketchUp, you can choose either of two kinds of materials to apply to the faces in your model:
Colors: These simple colors are always solid colors. You can’t have gradients (one color fades into another), but you can make pretty much any color you want.
Textures: A SketchUp texture is a tiny image that’s tiled to cover a face. If you paint a face with, say, a brick texture, what you’re really doing is telling SketchUp to cover the surface with however many brick-photo tiles it takes to do the job. The preview image you see in the Materials panel is actually a picture of a single texture image tile.SketchUp comes with a whole bunch of textures, and thousands more are for sale online. If that’s still not enough, you can make your own (though the process is well beyond the scope of this humble tome). For details on advanced techniques such as creating a custom texture, check out the SketchUp Help Center ( https://help.sketchup.com ).
The following facts about SketchUp materials are also handy to know as you work with them:
Materials can be translucent. Sliding the Opacity slider makes the material you’ve selected more or less translucent, which makes seeing through windows in your model a lot easier. In Windows, you find the Opacity slider on the Edit tab.
Textures can have transparent areas. If you take a look at the materials in the Landscaping, Fencing, and Vegetation library, you’ll notice that a lot of them look kind of strange; they have areas of black that don’t seem right. These black areas are areas of transparency: When you paint a face with one of these textures, you can see through the areas that look black.
 There’s a third thing (besides colors and textures) that you can apply to the faces in your models: photos. In fact, photo-texturing is an incredibly important part of some SketchUp workflows. As such, we dedicate a good portion of Chapter 8to the subject of modeling with photographs.
The Paint Bucket (B) tool
 Activating the Paint Bucket (B) tool automatically opens the Materials panel so that it’s handy. Here’s everything you need to know about the Paint Bucket (B) tool:
You fill it by clicking in the Materials panel. Just click a material to load your bucket and then click the face you want to paint. The converse is also true: If you click a material or color in the Materials panel, it launches the Paint Bucket (B) tool and fills it with the selected color or material.
You have a much wider range of choices than you may think. As mentioned in Chapter 2, if you don’t see a color or texture you like, click the down arrow at the end of the window that says something like Asphalt and Concrete, Metal, or Patterns. This produces a list of 16 categories of materials, colors, and patterns,
What if you don’t like the available carpet colors? Or any of the other materials, for that matter? No problem. Just click the Edit tab and pick a color — any color — to apply to your choice of material.
Holding down the Alt key (Mac: ⌘ ) switches to the Sample tool. With the Sample tool, you can click any face in your model to load your Paint Bucket with that face’s material. Release the Alt key to revert to the Paint Bucket (B) tool.
Holding down the Shift key paints all similar faces. Don’t like the dark brick on your house model? Select a new material in the Materials panel, hold down the Shift key, and click any face with the brick applied. In Figure 3-28, the Paint Bucket (B) tool is ready to change the dark brick to a lighter option, which you see as the active material in the top-left corner of the Materials panel. When you’re done, all faces in your model that match the one you click are painted with the new material. If things don’t turn out the way you want, just choose Edit ⇒ Undo to go back a step.
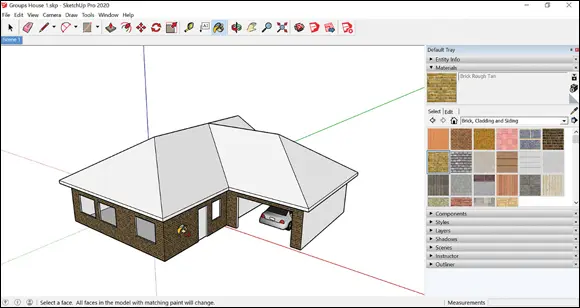
FIGURE 3-28:Press Shift and click with the Paint Bucket (B) tool to replace one material with another.
Читать дальшеИнтервал:
Закладка:
Похожие книги на «SketchUp For Dummies»
Представляем Вашему вниманию похожие книги на «SketchUp For Dummies» списком для выбора. Мы отобрали схожую по названию и смыслу литературу в надежде предоставить читателям больше вариантов отыскать новые, интересные, ещё непрочитанные произведения.


Обсуждение, отзывы о книге «SketchUp For Dummies» и просто собственные мнения читателей. Оставьте ваши комментарии, напишите, что Вы думаете о произведении, его смысле или главных героях. Укажите что конкретно понравилось, а что нет, и почему Вы так считаете.