Mark Harrison - SketchUp For Dummies
Здесь есть возможность читать онлайн «Mark Harrison - SketchUp For Dummies» — ознакомительный отрывок электронной книги совершенно бесплатно, а после прочтения отрывка купить полную версию. В некоторых случаях можно слушать аудио, скачать через торрент в формате fb2 и присутствует краткое содержание. Жанр: unrecognised, на английском языке. Описание произведения, (предисловие) а так же отзывы посетителей доступны на портале библиотеки ЛибКат.
- Название:SketchUp For Dummies
- Автор:
- Жанр:
- Год:неизвестен
- ISBN:нет данных
- Рейтинг книги:5 / 5. Голосов: 1
-
Избранное:Добавить в избранное
- Отзывы:
-
Ваша оценка:
SketchUp For Dummies: краткое содержание, описание и аннотация
Предлагаем к чтению аннотацию, описание, краткое содержание или предисловие (зависит от того, что написал сам автор книги «SketchUp For Dummies»). Если вы не нашли необходимую информацию о книге — напишите в комментариях, мы постараемся отыскать её.
makes it easy to get started as quickly as the ideas pop into your head!
Providing real-world insight from top SketchUp insiders, these six-books-in-one teach you how to tackle the basics of the program and apply those skills to real-world projects. You’ll discover the basics of modeling as they apply to either free or paid versions of SketchUp before diving into creating models to use for making objects, constructing buildings, or redesigning interiors.
Navigate the SketchUp product mix Get familiar with the basics of modeling View and share your models Make your architecture, interior design, and woodworking dreams a reality You have tons of great ideas—and now you can harness this powerful software to bring them to life.
SketchUp For Dummies — читать онлайн ознакомительный отрывок
Ниже представлен текст книги, разбитый по страницам. Система сохранения места последней прочитанной страницы, позволяет с удобством читать онлайн бесплатно книгу «SketchUp For Dummies», без необходимости каждый раз заново искать на чём Вы остановились. Поставьте закладку, и сможете в любой момент перейти на страницу, на которой закончили чтение.
Интервал:
Закладка:
Making copies with the Move tool
Lots of folks spend time hunting around in SketchUp, trying to figure out how to make copies. It’s very simple: You just press a modifier key — a key on your keyboard that tells SketchUp to do something different — while you’re using the Move tool. Instead of moving something, you move a copy of it. Here are a couple things to keep in mind:
Press the Ctrl key (Mac: Option) to create a copy. You can press the modifier key before or after you click the entity you want to move. When the Move tool is in Copy mode, a little + appears next to the Move cursor, and your copy moves when you move your mouse. Figure 3-23 shows this in action.If you decide that you don’t want to make a copy, just press the Ctrl key (Mac: Option) again to toggle back to Move; the + sign disappears.
Copying is just like moving except that you’re moving a copy. All the rules for using the Move tool apply to making copies too. FIGURE 3-23:Press Ctrl (Mac: Option) to tell SketchUp to make a copy while you move something.
To make more than one copy at a time, use the Measurements box. Suppose that you want to make five equally spaced copies of a column, as shown in Figure 3-24. First, move a copy to where you want the last column to be; then type 5/ and press Enter. SketchUp makes five copies of the column and spaces them evenly between the first and last column in the row. Neat, huh? To set a precise distance between your copies, move a copy to set the distance between each copy, type 5x, and press Enter.
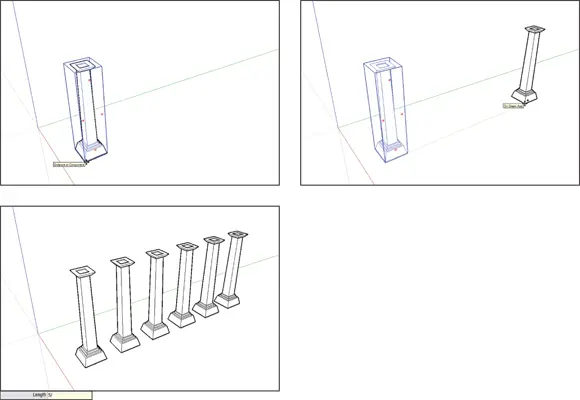
FIGURE 3-24:Use the Measurements box to make multiple copies.
Rotating the right way
 The Rotate (Q) tool spins geometry based on an angle you specify. No surprises there. But the Rotate (Q) tool also has a trick up its sleeve that most new modelers don’t discover until hours after they could’ve used it. First things first, though:
It’s better to preselect. As with the Move tool, rotating something you’ve already selected is usually easier.
The Rotate(Q) tool can make copies, too. Press the Ctrl key (Mac: Option) to switch between rotating your original and rotating a copy. You can also make several copies arranged in a circle or along an arc. Check out the earlier section “ Making copies with the Move tool” to read about using x and / to create multiples.
You can be precise. The Measurements box enables you to type exact angles while you’re rotating. Take a look at “ Injecting accuracy into your model” earlier in this chapter to find out more.
Using Rotate (Q): The basic method
Follow these steps to rotate things in your model:
1 Select everything you want to rotate.
2 Activate the Rotate (Q) tool.
3 Click to establish an axis of rotation.Your axis of rotation is the theoretical line around which your selected entities will rotate; picture the axle of a wheel. Although it’d be nice if SketchUp drew the axis of rotation in your model, you just have to imagine it. As you move the Rotate tool’s big protractor cursor around your screen, the cursor sometimes changes orientation and color. When you hover over a face, the cursor realigns itself to create an axis of rotation that’s perpendicular to that face. When the cursor is red, green, or blue, its axis of rotation is parallel to that colored axis. You can (and should) use inference locking when you’re using the Rotate (Q) tool. Just hover over any face in your model that’s perpendicular to the axis of rotation you want, hold down the Shift key to lock in that orientation, and click where you want your axis to be. See “ Using inferences to help you model” earlier in this chapter to read all about it.
4 Click again to start rotating.Clicking part of the thing you’re rotating is helpful, especially if you’re rotating visually instead of numerically (by typing an angle).
5 Move your mouse; then click again to finish rotating.If you like, now is a good time to type a rotation angle and press Enter. As with everything else in SketchUp, you can be as precise as you want or need to be.
Using Rotate (Q): The not-so-basic method
The basic method of using the Rotate (Q) tool is fine when you need to rotate something on the ground plane, but this method isn’t as useful when your axis of rotation isn’t vertical. Finding a face to use to orient your cursor can be tricky or impossible, and that’s where a lot of SketchUp modelers get hung up.
With this not-so-basic rotation method, you can establish a precise axis of rotation (the invisible line around which you’re rotating) without having any existing faces to use for orientation. This makes rotating things about a million times easier.
In this case, using the Rotate (Q) tool goes from being a five-step operation to a seven-step one. Check out Figure 3-25 for a visual explanation:
1 Select everything you want to rotate.
2 Activate the Rotate (Q) tool.
3 Click to establish your axis of rotation, but don’t let go; keep your finger on your mouse button.
4 Drag your cursor around (still holding down the mouse button) until your axis of rotation is where you want it.As you drag, notice that your Rotate protractor changes orientation; the line from where you clicked to your cursor is the axis of rotation.
5 Release your mouse button to set your axis of rotation.
6 Click (but don’t drag) the point at which you want to pick up whatever you’re rotating.
7 Click again to drop the thing you’re rotating where you want it.
Making and using guides
Sometimes, you need to draw temporary lines while you model. These temporary lines, or guides, are useful for lining up things, making things the right size, and generally adding precision and accuracy to what you’re building.
Guides are special entities that you create when and where you need them. They aren’t part of your model because they’re not edges or faces, so you can choose to hide them or delete them; like other annotations, they don’t affect the rest of your geometry.
Figure 3-26 shows an example of guides in action. The guides are positioned 12 inches from the wall and 36 inches apart to draw the sides of a doorway. Another guide (6 feet, 8 inches from the floor) indicates the top. With these guides in place, you can easily draw a rectangle, bounded by your guides, that you know is exactly the right size and in the correct location.
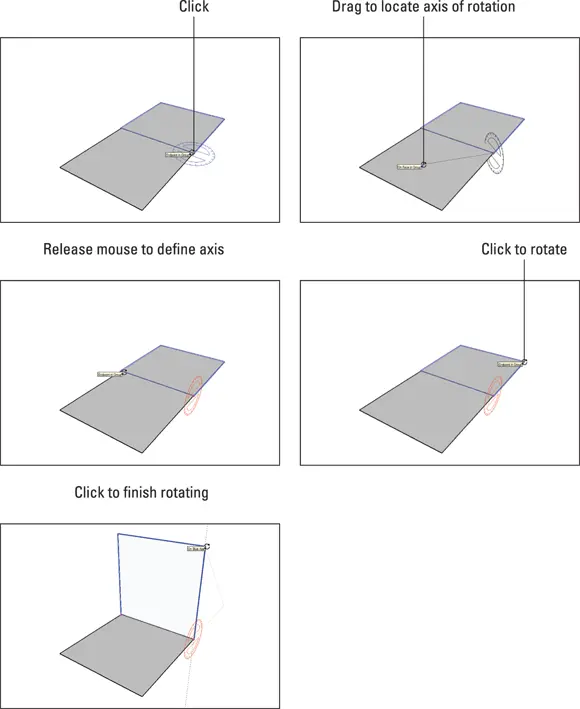
FIGURE 3-25:Define a custom axis of rotation by click-dragging.
Creating guides with the Tape Measure tool
 You can create three kinds of guides, and you use the Tape Measure (T) tool to make them all, as shown in Figure 3-27.
Parallel guide lines: To create a guide that's parallel to an edge, select the Tape Measure tool, and click anywhere (except the endpoints) along an edge. Then move your mouse, and a parallel dashed guide appears. Click again to place the guide wherever you want. FIGURE 3-26:Use guides to measure things before you draw.
Читать дальшеИнтервал:
Закладка:
Похожие книги на «SketchUp For Dummies»
Представляем Вашему вниманию похожие книги на «SketchUp For Dummies» списком для выбора. Мы отобрали схожую по названию и смыслу литературу в надежде предоставить читателям больше вариантов отыскать новые, интересные, ещё непрочитанные произведения.


Обсуждение, отзывы о книге «SketchUp For Dummies» и просто собственные мнения читателей. Оставьте ваши комментарии, напишите, что Вы думаете о произведении, его смысле или главных героях. Укажите что конкретно понравилось, а что нет, и почему Вы так считаете.