Mark Harrison - SketchUp For Dummies
Здесь есть возможность читать онлайн «Mark Harrison - SketchUp For Dummies» — ознакомительный отрывок электронной книги совершенно бесплатно, а после прочтения отрывка купить полную версию. В некоторых случаях можно слушать аудио, скачать через торрент в формате fb2 и присутствует краткое содержание. Жанр: unrecognised, на английском языке. Описание произведения, (предисловие) а так же отзывы посетителей доступны на портале библиотеки ЛибКат.
- Название:SketchUp For Dummies
- Автор:
- Жанр:
- Год:неизвестен
- ISBN:нет данных
- Рейтинг книги:5 / 5. Голосов: 1
-
Избранное:Добавить в избранное
- Отзывы:
-
Ваша оценка:
SketchUp For Dummies: краткое содержание, описание и аннотация
Предлагаем к чтению аннотацию, описание, краткое содержание или предисловие (зависит от того, что написал сам автор книги «SketchUp For Dummies»). Если вы не нашли необходимую информацию о книге — напишите в комментариях, мы постараемся отыскать её.
makes it easy to get started as quickly as the ideas pop into your head!
Providing real-world insight from top SketchUp insiders, these six-books-in-one teach you how to tackle the basics of the program and apply those skills to real-world projects. You’ll discover the basics of modeling as they apply to either free or paid versions of SketchUp before diving into creating models to use for making objects, constructing buildings, or redesigning interiors.
Navigate the SketchUp product mix Get familiar with the basics of modeling View and share your models Make your architecture, interior design, and woodworking dreams a reality You have tons of great ideas—and now you can harness this powerful software to bring them to life.
SketchUp For Dummies — читать онлайн ознакомительный отрывок
Ниже представлен текст книги, разбитый по страницам. Система сохранения места последней прочитанной страницы, позволяет с удобством читать онлайн бесплатно книгу «SketchUp For Dummies», без необходимости каждый раз заново искать на чём Вы остановились. Поставьте закладку, и сможете в любой момент перейти на страницу, на которой закончили чтение.
Интервал:
Закладка:
Using inferences to help you model
A big part of using SketchUp’s inference engine involves locking and encouraging inferences — sometimes even simultaneously. At first, these actions seem a little like that thing where you pat your head and rub your stomach at the same time, but with practice, they get easier.
Locking inferences: If you hold down the Shift key when you see any of the first four types of linear inferences described previously, that inference gets locked — and stays locked until you release Shift. When you lock an inference, you constrain whatever tool you’re using to work only in the direction of the inference you locked.
Encouraging inferences: Sometimes, an inference you need doesn’t show upon its own. When this happens, you have to encourage it. To encourage an inference, hover your cursor over the part of your model you want to “infer” from and then slowly go back to whatever you were doing when you decided you could use an inference.
The following example illustrates how you might lock and encourage inferences to draw a 3D model. In Figure 3-14, suppose that you want to draw a line on the blue axis that’s parallel to the right-rear corner of the block, in the same plane as the rear face and as tall as the block. Here’s how you might use inferences to help you:
1 With the Line tool selected, encourage a From Point inference by hovering the cursor over the right-rear bottom corner of the block until you get an endpoint inference.
2 Now slowly move your cursor to the right, away from that corner, to encourage a From Point inference. Do not click that corner.A dotted red line should trail from the pencil point back to the cube’s corner to indicate that you’re traveling parallel to the red axis. Press and hold the Shift key to lock the line in the red direction.
3 Click to set the line’s starting point, release the Shift key, and then move the pencil up a bit, making sure it’s trailing a blue line.
4 Press and hold down the Shift key to lock the line in the blue direction as you draw the line.The blue line inference becomes thicker to show that the line is locked in the blue direction.
5 Move the cursor to the right-rear vertical edge of the cube while continuing to hold down the Shift key.
6 When the inference to the Midpoint appears, click to set the endpoint of your new line.
Behold! You have a vertical line that meets all the specifications!
 Edges must lie in the same flat plane before a face can be made. Without inferences, it’s all too easy to create a series of edges that would do Escher proud. Even just three edges that appear to connect at their ends may not be connected when viewed from a different angle.
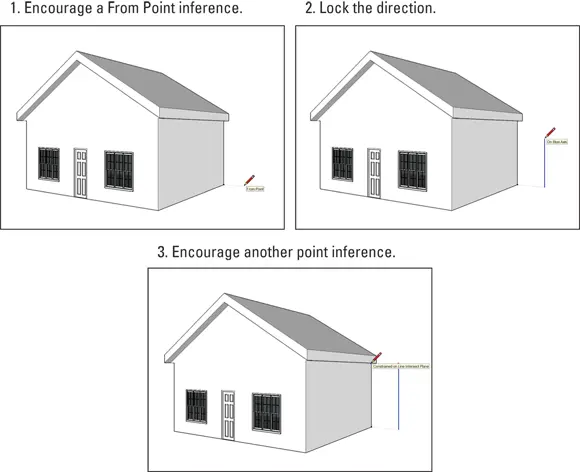
FIGURE 3-14:Lock and encourage inferences as you draw new geometry in relationship to existing geometry.
Warming Up Your SketchUp Muscles
About eight SketchUp skills are useful every time you use SketchUp. Formal-education types would probably call them core competencies. Whatever you care to call these activities, we introduce them all in the following sections. Anytime you need a quick refresher, come back to this section.
Getting the best view of what you’re doing
Using SketchUp without learning how to orbit, zoom, and pan is like trying to build a ship in a bottle. In the dark. With your hands tied behind your back. Using chopsticks. Having just consumed the contents of the wine bottle. Get the picture?
Fully half of modeling in SketchUp uses the Orbit, Zoom, and Pan (H) tools, which let you change your view so that you can see what you’re doing. Most people who try to figure out SketchUp on their own take too long to understand the importance of these navigation tools and spend hours squinting, grunting, and having an all-around miserable time trying to get at what they’re working on. The following sections help you avoid the headache (literally).
Going into orbit
 Hold a glass of water in your hand. Now twist and turn your wrist around in every direction so that the water’s all over you and the rest of the room. Stop when the glass is empty. We think that’s a pretty memorable way to find out about the Orbit tool, don’t you?
Just as your wrist helps you twist and turn a glass to see it from every angle, think of using Orbit as the way to fly around your work. Figure 3-15 shows Orbit in all its glory.
FIGURE 3-15:The Orbit tool lets you see your model from any angle.
 Press and hold down your mouse’s scroll wheel, and move your mouse around. See your model swiveling? Release the scroll wheel when you’re done. Using your mouse to orbit means that you don’t have to switch tools every time you want a better view, which saves you truckloads of time. You can even do this while you’re using most other tools.
There’s a secret trick to effective orbiting: Your model twists, turns, and rotates about the center of your screen.
Zooming in and out
 Hold your empty glass at arm’s length. Bring the glass rushing toward you, stopping just short of smashing you in the nose. Now throw the glass across the room, noticing how it shrinks as it gets farther away. That, in a nutshell, describes the Zoom tool. We couldn’t figure out why the glass was getting bigger, but then it struck us …
You use Zoom to get closer to (and farther from) your model. If you’re working on something small, you zoom in until it fills your modeling window. To see everything at once, zoom out. Figure 3-16 is a demonstration.
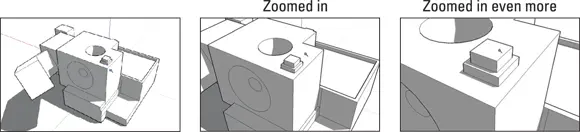
FIGURE 3-16:Use the Zoom tool to get closer to the action.
As you’re drawing in SketchUp, you zoom in and out of your model all the time. The following tips make zooming quick and easy:
To zoom in and out, roll your mouse’s scroll wheel. When you stop scrolling, you stop zooming and revert to your active tool.
As you scroll, SketchUp zooms in on your cursor. Position the cursor over whatever part of your model you want to see closer (or farther away).
Use Zoom Extents to see everything. Click the Zoom Extents button on the toolbar to have your model fill the screen.
Читать дальшеИнтервал:
Закладка:
Похожие книги на «SketchUp For Dummies»
Представляем Вашему вниманию похожие книги на «SketchUp For Dummies» списком для выбора. Мы отобрали схожую по названию и смыслу литературу в надежде предоставить читателям больше вариантов отыскать новые, интересные, ещё непрочитанные произведения.


Обсуждение, отзывы о книге «SketchUp For Dummies» и просто собственные мнения читателей. Оставьте ваши комментарии, напишите, что Вы думаете о произведении, его смысле или главных героях. Укажите что конкретно понравилось, а что нет, и почему Вы так считаете.