Mark Harrison - SketchUp For Dummies
Здесь есть возможность читать онлайн «Mark Harrison - SketchUp For Dummies» — ознакомительный отрывок электронной книги совершенно бесплатно, а после прочтения отрывка купить полную версию. В некоторых случаях можно слушать аудио, скачать через торрент в формате fb2 и присутствует краткое содержание. Жанр: unrecognised, на английском языке. Описание произведения, (предисловие) а так же отзывы посетителей доступны на портале библиотеки ЛибКат.
- Название:SketchUp For Dummies
- Автор:
- Жанр:
- Год:неизвестен
- ISBN:нет данных
- Рейтинг книги:5 / 5. Голосов: 1
-
Избранное:Добавить в избранное
- Отзывы:
-
Ваша оценка:
SketchUp For Dummies: краткое содержание, описание и аннотация
Предлагаем к чтению аннотацию, описание, краткое содержание или предисловие (зависит от того, что написал сам автор книги «SketchUp For Dummies»). Если вы не нашли необходимую информацию о книге — напишите в комментариях, мы постараемся отыскать её.
makes it easy to get started as quickly as the ideas pop into your head!
Providing real-world insight from top SketchUp insiders, these six-books-in-one teach you how to tackle the basics of the program and apply those skills to real-world projects. You’ll discover the basics of modeling as they apply to either free or paid versions of SketchUp before diving into creating models to use for making objects, constructing buildings, or redesigning interiors.
Navigate the SketchUp product mix Get familiar with the basics of modeling View and share your models Make your architecture, interior design, and woodworking dreams a reality You have tons of great ideas—and now you can harness this powerful software to bring them to life.
SketchUp For Dummies — читать онлайн ознакомительный отрывок
Ниже представлен текст книги, разбитый по страницам. Система сохранения места последней прочитанной страницы, позволяет с удобством читать онлайн бесплатно книгу «SketchUp For Dummies», без необходимости каждый раз заново искать на чём Вы остановились. Поставьте закладку, и сможете в любой момент перейти на страницу, на которой закончили чтение.
Интервал:
Закладка:
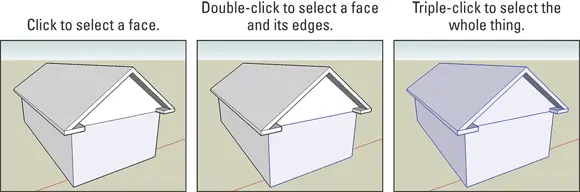
FIGURE 3-18:Try single-, double-, and triple-clicking edges and faces in your model to make different kinds of selections.
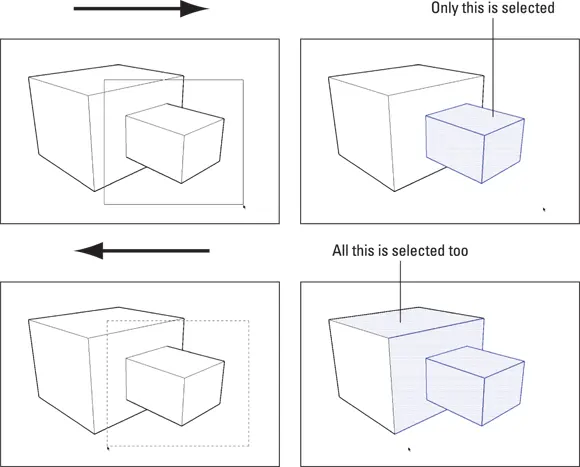
FIGURE 3-19:Dragging left to right selects everything inside your selection box. Dragging right to left selects everything that your selection box touches.
 CHANGING THE COLOR OF MODELING CUES
Whether you have color blindness or the default selection colors and other colored modeling cues simply don’t work for you, know that you can change the selection color, the axis colors, and several other visual cues. You control these colors with SketchUp styles and preferences settings. See Chapter 10for details. The doctor told the patient that they were color-blind. That came right out of the magenta…
Moving and copying like a champ
 To move, stretch, or copy geometry in SketchUp, use the Move tool. That’s right, the Move tool isn’t just for moving, and this section explains all the Move tool secrets that will help you quickly advance to more complex 3D modeling.
Moving things
Using the Move tool usually involves several steps:
1 Tap the spacebar to invoke the Select (E) tool.
2 Select the entity or entities that you want to move.
3 Activate the Move tool.
4 Click a starting point for the move and then move the cursor.As with most SketchUp tools, it’s best not to hold the mouse button down while moving; just click at the destination.
5 Click the destination point.
The maneuver isn’t complicated, but getting the hang of it takes a bit of practice.
 Here are tips for using the Move tool successfully:
Click, move, and click; don’t drag your mouse. Many new SketchUp users are tempted to move stuff by clicking and dragging. That works, but in the long run, moving things is harder that way. Instead, practice clicking to pick something up, moving your mouse without holding down any buttons, and clicking again to put down whatever you’re moving.
Click a point that will let you position whatever you’re trying to move. Figure 3-20, for example, shows two boxes. To stack one on top of the other precisely, you can’t just click anywhere on the first box and move it over the other one. You have to click the bottom corner of the soon-to-be top box and move the cursor over the top corner of the bottom box.
Press the Esc key to cancel a move operation. When you start to move something (on purpose or accidentally), it’s tempting to use Move to put things back the way they were. Inevitably, Move messes up your model. Instead, the quickest and easiest way to get out of a Move operation and keep your model intact is to tap the Esc key.
Watch for helpful inferences. To move something in one of the colored directions, wait until you see the dotted On Axis linear inference appear; then hold down Shift to lock yourself in that direction. For more information about using SketchUp’s inference engine, check out the earlier section “ Keeping an eye out for inferences.”
Move precisely with the Measurements box. You can move things precise distances with the Measurements box; see “ Injecting accuracy into your model” earlier in this chapter.
Watch where you are going. In the current release of SketchUp, if you orbit during the move so that you can no longer see the starting point on the selected objects, the objects become semitransparent, allowing you to find the desired destination point more easily.
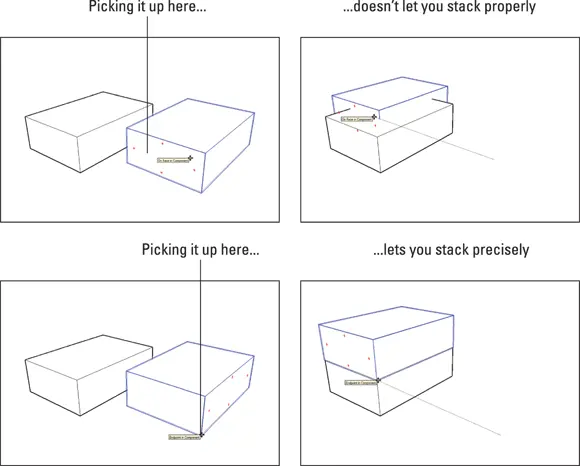
FIGURE 3-20:To move things precisely, choose precise points to grab things and put them down.
Shaping forms with the Move tool
SketchUp’s Move tool isn’t just for moving whole objects. You can also use this tool to change the shape of your model. To do this, move a vertex (the place where edges’ endpoints come together), an edge, a face, or a combination of any of these. By moving only certain entities (all the things we just mentioned), you can change the shape of your geometry pretty drastically, as shown in Figure 3-21.
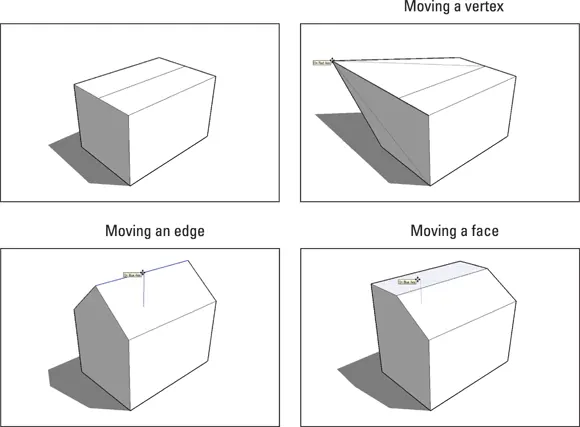
FIGURE 3-21:You can use the Move tool on vertices, edges, and faces to model different forms.
Using the Move tool to create forms (instead of just moving them around) is an incredibly powerful way to work but isn’t particularly intuitive. After all, nothing in the physical world behaves like the Move tool. You can’t just grab the edge of a hardwood floor and move it up to turn it into a ramp in real life. In SketchUp, you can — and should.
To preselect or not to preselect
The Move tool works in two ways, and you’ll eventually need to use them both, depending on what you’re trying to move:
Moving a selection: This process is the basic one, described earlier in this chapter in “ Moving and copying like a champ.” When you select one or more entities, the Move tool moves only the selection. This behavior is handy when you need to move more than one thing at the same time. Figure 3-22 shows how to move selected items with the Move tool.
Moving without a selection: If you start the Move tool without making a selection first, you can click anything in the drawing window to move it around. Only the thing you click moves. This technique can create some unpredictable results, however, so we generally advise using the preselect method.
TELLING SketchUp WHO’S BOSS WITH AUTOFOLD
This will happen to you sooner or later: As you try to move a vertex, an edge, or a face, you can’t go in the direction you want. SketchUp doesn’t like to let you create folds (when extra faces and edges are created in place of a single face) with the Move tool, so SketchUp constrains your movement to directions that won’t add folds. To force the move, tap the Alt key (Mac: ⌘ ) while you move. When you do this, you’re telling SketchUp that it’s okay to proceed — to create folds if it has to. This feature is called autofold, and the following figure shows how it works. The Alt/⌘ key is a toggle; each time you tap it, SketchUp switches to the other mode.
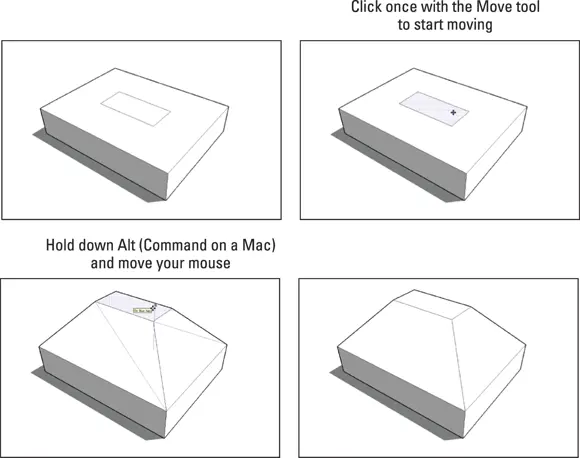
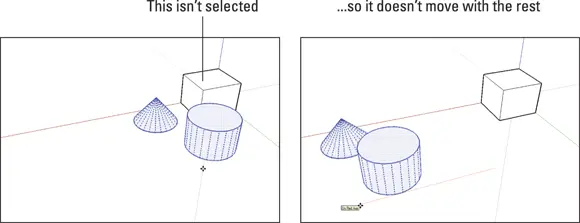
FIGURE 3-22:Using the Move tool when you have a selection moves only the things in that selection.
Читать дальшеИнтервал:
Закладка:
Похожие книги на «SketchUp For Dummies»
Представляем Вашему вниманию похожие книги на «SketchUp For Dummies» списком для выбора. Мы отобрали схожую по названию и смыслу литературу в надежде предоставить читателям больше вариантов отыскать новые, интересные, ещё непрочитанные произведения.


Обсуждение, отзывы о книге «SketchUp For Dummies» и просто собственные мнения читателей. Оставьте ваши комментарии, напишите, что Вы думаете о произведении, его смысле или главных героях. Укажите что конкретно понравилось, а что нет, и почему Вы так считаете.