Mark Harrison - SketchUp For Dummies
Здесь есть возможность читать онлайн «Mark Harrison - SketchUp For Dummies» — ознакомительный отрывок электронной книги совершенно бесплатно, а после прочтения отрывка купить полную версию. В некоторых случаях можно слушать аудио, скачать через торрент в формате fb2 и присутствует краткое содержание. Жанр: unrecognised, на английском языке. Описание произведения, (предисловие) а так же отзывы посетителей доступны на портале библиотеки ЛибКат.
- Название:SketchUp For Dummies
- Автор:
- Жанр:
- Год:неизвестен
- ISBN:нет данных
- Рейтинг книги:5 / 5. Голосов: 1
-
Избранное:Добавить в избранное
- Отзывы:
-
Ваша оценка:
SketchUp For Dummies: краткое содержание, описание и аннотация
Предлагаем к чтению аннотацию, описание, краткое содержание или предисловие (зависит от того, что написал сам автор книги «SketchUp For Dummies»). Если вы не нашли необходимую информацию о книге — напишите в комментариях, мы постараемся отыскать её.
makes it easy to get started as quickly as the ideas pop into your head!
Providing real-world insight from top SketchUp insiders, these six-books-in-one teach you how to tackle the basics of the program and apply those skills to real-world projects. You’ll discover the basics of modeling as they apply to either free or paid versions of SketchUp before diving into creating models to use for making objects, constructing buildings, or redesigning interiors.
Navigate the SketchUp product mix Get familiar with the basics of modeling View and share your models Make your architecture, interior design, and woodworking dreams a reality You have tons of great ideas—and now you can harness this powerful software to bring them to life.
SketchUp For Dummies — читать онлайн ознакомительный отрывок
Ниже представлен текст книги, разбитый по страницам. Система сохранения места последней прочитанной страницы, позволяет с удобством читать онлайн бесплатно книгу «SketchUp For Dummies», без необходимости каждый раз заново искать на чём Вы остановились. Поставьте закладку, и сможете в любой момент перейти на страницу, на которой закончили чтение.
Интервал:
Закладка:
The Measurements box lets you change your mind. As long as you don’t do anything after you press Enter, you can always type a new value and press Enter again. There’s no limit to the number of times you can change your mind.
You can use the Measurements box during an operation. In most cases, you can use the Measurements box to be precise while you’re using a tool. Here’s how that works: Click to start your operation (such as drawing a line or using the Move tool). Move your mouse so that you’re going in the correct color direction, and be sure not to click again. If you’re using the Line tool, and you want to draw parallel to the green axis, make sure that the edge you’re drawing is green (displays the green edge inference). Without clicking the Measurements box, type the dimension you want. The dimension appears in the box. Press Enter to complete the operation.
You can also use the Measurements box after an operation. Doing so revises what you’ve just done. Suppose that you want to move a box, as shown in Figure 3-17, 5 meters in the red direction (parallel to the red axis). Here’s what you do: With the Move tool, click the box to pick it up. Move the mouse until you see the red linear inference. Type 5m, and press Enter. The box is positioned exactly 5 meters from where you picked it up. After you see that placement, however, you realize that the box needs to move a little farther. Type 15m, and press Enter. The box moves another 10 meters in the red direction. Keep changing the box’s position until you’re happy (or bored).
The Measurements box tells you what value or values it’s expecting. If you select the Line tool, the Measurements box tells you it’s listening for a length. Select the Move tool, and you see that the box is expecting a distance. This feature is great because remembering everything the box can do at any given moment is pretty difficult — even for experienced SketchUp modelers.
RESIZING EVERYTHING WITH THE TAPE MEASURE TOOL
Consider that you’ve been working away in SketchUp, not paying particular attention to how big anything in your model is, when you suddenly decide that you need what you’ve made to be a specific size. SketchUp has a terrific trick for taking care of this exact situation: You can use the Tape Measure tool to resize your whole model based on a single measurement.
Here’s how this tool works: In the following figure, the designer started to model a simple staircase. Making sure that it’s the right size will make working on it easier. They know that the riser height, the vertical distance between the steps, should be 7 inches, so this is what they do:
 Start the Tape Measure tool.
 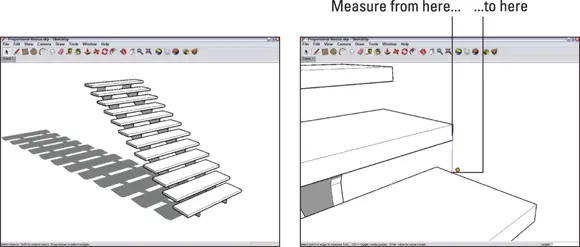 To put the Tape Measure in Measure mode, press the Ctrl key (Mac: Option) so that the plus sign (+) next to the Tape Measure cursor disappears. Click to start measuring the distance that will change (in this case, the riser height) and then click again to stop. Type the desired dimension (7 for 7 inches).
In the dialog box, confirm the resize by clicking Yes.
The whole model is resized proportionately to the dimension that was entered.
Note that everything is resized by the ratio of the original distance versus the new distance!
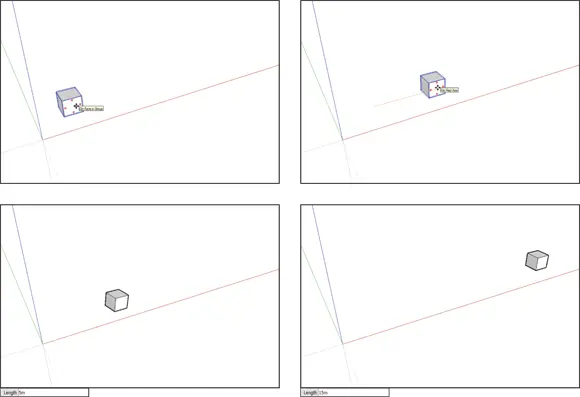
FIGURE 3-17:You can move the box 5 meters, change your mind, and move it 15 meters instead.
Selecting what you mean to select
If you want to move, rotate, copy, scale, or otherwise manipulate existing geometry in your model, you need to select it first. Your selection tells SketchUp what geometry you want to change.
 To select things, you use (drum roll, please) the Select (E) tool, which looks exactly the same as the Select tool in every other graphics program on the planet: It’s an arrow. That’s a good thing, because selecting isn’t the sort of thing you should have to relearn every time you pick up a new program. Here’s everything you need to know about selecting things in SketchUp:
Technically, every single thing you see in your modeling window is an entity . SketchUp has three kinds of entities: Elements are basic pieces of geometry, like edges and faces. Objects are made up of elements. Components and groups, which we cover in Chapter 5, are objects. Anytime you want to make a separate thing with its own name and metadata, you make an object. In SketchUp, objects are everywhere. Annotations are things like text, guides, dimensions, and section planes. Annotations is kind of a catch-all category; anything that isn’t an element or an object is an annotation.
Click anything in your model to select it — while you’re using the Select (E) tool, of course.
To select more than one thing, hold down the Shift key while you click all the things you want to select. The Shift key works both ways when it comes to the Select (E) tool. You can use it to add to your set of selected things (as we mention earlier), but you can also use it to subtract something from your selection. In other words, if you have a bunch of stuff selected, and you want to deselect something in particular, just hold down Shift while you click it; it isn’t selected anymore.
Selected entities in SketchUp look different depending on what they are:Selected edges turn blue.Selected faces change from plain gray to blue-gray (if you’re using the default style).Selected groups and components have a blue box around them.Selected annotations turn blue.
A much fancier way to select things in your model is to double- and triple-click them. When you double-click a face, you select that face and all the edges that define it. Double-clicking an edge gives you that edge plus all the faces that are connected to it. When you triple -click an edge or a face, you select the whole conglomeration that it’s part of. See Figure 3-18.
You can select several things at the same time by dragging a box around them. You have two kinds of selection boxes; the one you use depends on what you’re trying to select (see Figure 3-19): Window selection: If you click and drag from left to right to make a selection box, you create a window selection. In this case, only things that are entirely inside your selection box are selected. Crossing selection: If you click and drag from right to left to make a selection box, you create a crossing selection. With one of these, anything your selection box touches (including what’s inside) is selected. The Window selection box (left to right) is shown using solid lines, while a Crossing box (right to left) uses dashed lines.
 Just because you can’t see something doesn’t mean it isn’t selected. Whenever you make a selection, it’s a very good idea to orbit around to make sure you have only what you intended to get. Selecting too much is an easy mistake to make.
Интервал:
Закладка:
Похожие книги на «SketchUp For Dummies»
Представляем Вашему вниманию похожие книги на «SketchUp For Dummies» списком для выбора. Мы отобрали схожую по названию и смыслу литературу в надежде предоставить читателям больше вариантов отыскать новые, интересные, ещё непрочитанные произведения.


Обсуждение, отзывы о книге «SketchUp For Dummies» и просто собственные мнения читателей. Оставьте ваши комментарии, напишите, что Вы думаете о произведении, его смысле или главных героях. Укажите что конкретно понравилось, а что нет, и почему Вы так считаете.