Wendy Jo Peterson - Bread Making For Dummies
Здесь есть возможность читать онлайн «Wendy Jo Peterson - Bread Making For Dummies» — ознакомительный отрывок электронной книги совершенно бесплатно, а после прочтения отрывка купить полную версию. В некоторых случаях можно слушать аудио, скачать через торрент в формате fb2 и присутствует краткое содержание. Жанр: unrecognised, на английском языке. Описание произведения, (предисловие) а так же отзывы посетителей доступны на портале библиотеки ЛибКат.
- Название:Bread Making For Dummies
- Автор:
- Жанр:
- Год:неизвестен
- ISBN:нет данных
- Рейтинг книги:4 / 5. Голосов: 1
-
Избранное:Добавить в избранное
- Отзывы:
-
Ваша оценка:
Bread Making For Dummies: краткое содержание, описание и аннотация
Предлагаем к чтению аннотацию, описание, краткое содержание или предисловие (зависит от того, что написал сам автор книги «Bread Making For Dummies»). Если вы не нашли необходимую информацию о книге — напишите в комментариях, мы постараемся отыскать её.
explores the science behind the art of bread making and our cultural connection to wild and commercial yeasts. Break out your kitchen scale and favorite wholesome grains and join us on the journey, from classic German Pretzels (Brezeln) to warm Salted Pecan Rolls to Rustic Sourdough.
Popular culinary author and dietician Wendy Jo Peterson has your foolproof loaf, flatbread, and roll needs covered. If you want to
start from scratch and culture your own yeast—no problem! She’ll also let you in on the secrets of the fashionable no-knead and sourdough recipes that have been drawing chefs’ kisses of discerning delight from bread-aficionados for the past decade.
Discover the tools and ingredients needed in bread making Grow your own sourdough starter Form savory or sweet loaves Stuff breads for a complete meal Boost the nutritional quality of breads with wholesome ingredients, like nuts, seeds, and old-world grains Whether you’re a nervous newbie or a seasoned, floury-aproned baker,
is the beginning of a delicious, doughy adventure—so get your butter knife ready and discover just how easy and extra-tasty home bread-making can be!
Bread Making For Dummies — читать онлайн ознакомительный отрывок
Ниже представлен текст книги, разбитый по страницам. Система сохранения места последней прочитанной страницы, позволяет с удобством читать онлайн бесплатно книгу «Bread Making For Dummies», без необходимости каждый раз заново искать на чём Вы остановились. Поставьте закладку, и сможете в любой момент перейти на страницу, на которой закончили чтение.
Интервал:
Закладка:
Then follow these steps:
1 Place a clean glass jar on the scale and tare the scale to 0.
2 Add 50 grams of the starter in the jar.
3 Tare the scale to 0 and add 50 grams of flour.
4 Tare the scale to 0 again and add 50 grams of water.
5 Using a spoon, give the mixture a stir.
6 Screw the lid loosely onto the jar.
7 Place a rubber band around the jar at the line where the starter is now.The rubber band will serve as a marker showing you how much the starter is growing each day.
8 Place the jar in a warm spot in your kitchen.Many people like to use their oven (turned off) with the light on.After about six to eight hours, your starter should be bubbly and ready to use to bake bread.
To bake bread, you’ll use however much starter you need in a recipe (usually around 50 to 100 grams), and then create another jar to keep your starter going, and discard the remaining amount. To break this down for you more simply:
You have a jar with starter (say, about 150 grams of starter in total in this jar).
You take 50 grams out to bake bread.
You take 50 grams out to put in another jar and continue the starter jar, which you feed as described earlier.
The remaining 50 grams you dispose of in the trash or compost. (Or check out the recipes in Chapter 13using sourdough discard.)
COPING WITH COMMON STARTER WOES
Yes, your starter can have troubles. Generally speaking, most starter troubles start with a mistake a person makes. For example, cross contamination, from not using clean jars, utensils, or hands while dealing with a starter, can invite unfriendly foes into your jar. If you see a dark brown or pink streak in your starter, it’s time to start again. Molds and unfriendly yeasts can take over, so it’s important to always use clean tools and clean hands.
I bake a lot, and I’m not immune from starter woes. In fact, I have a funny story about my own starter getting overheated: I had placed my starter on the center of my stovetop. It’s a warm spot and it had always kept my starter happy … until the fateful day I turned on my oven and forgot to move Elvira (yes, that was her name). The heat from the oven went up the backside of my stovetop and baked poor Elvira. She was toast, and I had to start again.
Now when I’m keeping my starter warm in the oven or on top, I place a sticky note on the oven to remind myself not to bake my poor starter. Also, I keep an extra batch of starter on hand, either in my freezer, in my refrigerator, or dried. You can never be too careful — sourdough starter is like gold!
 This may be a great time to name your starter! Go ahead, give it a fun name. Naming your starter may help ensure that you always keep your starter growing!
Before returning your jar to the refrigerator be sure to feed the starter using the same 1:1:1 ratio. Refrigerate until ready to use again.
The more you bake, the more vivacious your starter will be. Some bakers who have a healthy, well-used starter can leave theirs unfed (in the refrigerator) for a month between feedings. But with a brand-new starter, it’s important to feed weekly and keep your starter healthy.
DRYING YOUR STARTER
Most bakers enjoy sharing their starters across the globe, and to do so, they send it off in its dried form. To dry your starter, follow these steps:
1 Feed it as you normally would.
2 Place a piece of parchment paper on the counter.
3 Pour a thin layer of sourdough starter on the parchment paper.
4 Let the starter dry for three to five days, until completely dry.
5 Break the starter into pieces and store the pieces in an airtight container or glass jar.
Dried starter can keep for a year safely in your pantry. To use the dried starter, follow these steps:
1 Place a clean glass jar on a scale and tare the scale to 0.
2 Add 30 grams of dried starter to the jar.
3 Tare the jar to 0 again and add 30 grams of warm water.
4 Stir the mixture and let it bubble for 4 to 8 hours.
5 Feed your starter as you normally would (1:1:1 ratio) until it becomes active, doubling in size.
I recommend fully waking up your starter by feeding it twice a day for two to three days before baking.
Forming Your Dough
Finally, what you’ve been waiting for: making your first loaf of sourdough bread! In this section, I break down the exact process to making sourdough bread. There are variances as you advance your skills in sourdough bread making, but the basics will get you started and moving in the right direction. When your starter is ready to bake, these are the general steps you take in baking a bread loaf. Chapter 7has all the sourdough bread recipes you need to get started.
Making sourdough bread can be tricky, so keep in mind the following tips:
Watch videos if you struggle with shaping, folding, or stretching. Sourdough is a constant learning process. You never stop learning — that’s the fun of it!
Pay attention to how the seasons affect your bread. Adjust your sails when it’s summer or winter. If it’s very warm, use less starter or bulk-rise for less time. If it’s cold, you may want to increase your starter or bulk-rise longer.
Feed your starter and keep it well loved and viable. Neglected starters don’t thrive.
Start with the Rustic Sourdough recipe ( Chapter 7 ) and make it two or three times per week for a whole month. Get the feel for it. Learn from this one loaf and perfect it. Then advance to other recipes.
Don’t give up. Keep practicing!
Realize that appearance is not as important as flavor and texture. If it tastes good, great! That’s what matters most.
When you have the sourdough process down, share a loaf and starter with a friend! Spread the love. Oh, and don’t forget to give them a copy of this book, too!
Step 1: Autolyzing
You’ll start by pulling out a large, glass mixing bowl. In this bowl, you’ll gently mix together your flour, water, and starter in the recipe you’re following. The dough will look like a shaggy mess. Don’t worry, it’ll get there! Allow the mixture to autolyze (hydrate the flour, allowing the enzymes to be activated). This process can take anywhere from ten minutes to an hour.
 Some bakers wait to add the starter, but after testing numerous loaves, I haven’t seen a difference based on when I added the starter, and think this technique cleans up the process for beginners.
Step 2: Adding salt
Next, you’ll fold in the salt. Sprinkle the salt over the dough and lift the bottom edge of the dough and fold into the center. If your hands are feeling sticky, dip them in water and continue. Give the bowl a quarter turn, lift up the bottom edge and gently stretch the dough up and fold it over the center. Repeat this twice more. This process is called stretching and folding (see Figure 4-2), and it’s very different from kneading dough. Cover the bowl with a warm, damp towel and begin the bulk rise.
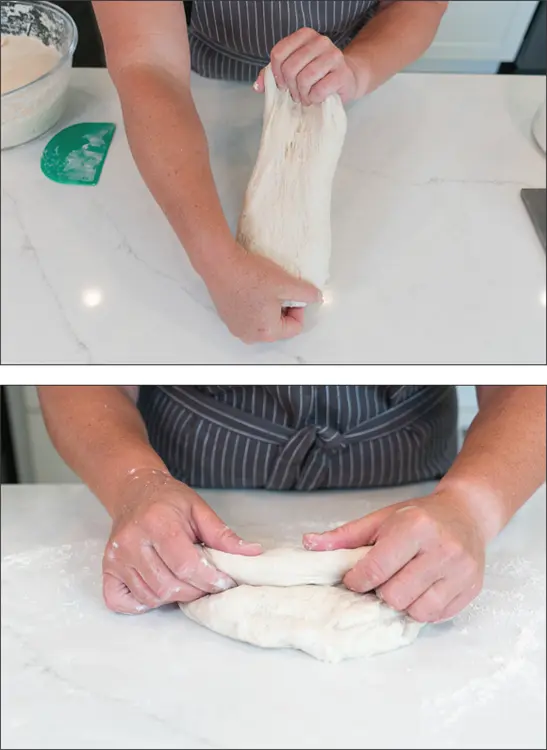
FIGURE 4-2:Stretching, folding, and shaping sourdough.
Читать дальшеИнтервал:
Закладка:
Похожие книги на «Bread Making For Dummies»
Представляем Вашему вниманию похожие книги на «Bread Making For Dummies» списком для выбора. Мы отобрали схожую по названию и смыслу литературу в надежде предоставить читателям больше вариантов отыскать новые, интересные, ещё непрочитанные произведения.


Обсуждение, отзывы о книге «Bread Making For Dummies» и просто собственные мнения читателей. Оставьте ваши комментарии, напишите, что Вы думаете о произведении, его смысле или главных героях. Укажите что конкретно понравилось, а что нет, и почему Вы так считаете.