How long you bulk ferment depends greatly on the amount of starter used in the recipe and the temperature of your home. If you’re making a basic white sourdough, you can simply cover the dough and let it rest and ferment for eight to ten hours. If you’re making a whole-grain variety, you’ll want to help the gluten formation by folding the dough (as described in Step 2, with four quarter turns and folds) every 30 to 60 minutes twice more.
Production could look like this:
8 p.m.: Autolyze the dough and feed the starter.
8:30 p.m.: Add in the salt and fold.
9:30 p.m.: Perform four stretch and folds.
10:30 p.m.: Perform four stretch and folds and rest the dough for eight to ten hours.
By now your dough has probably doubled in size, and you’ll see bubbles just under the surface of the dough. Sprinkle flour onto a counter or workspace. Use a dough scraper and scrape out the dough onto a floured surface. Sprinkle the dough lightly with flour and flour your hands. Using the same stretch-and-fold technique described earlier, stretch and fold the dough to tighten the tension in the dough. Let the dough rest for ten minutes to relax the gluten.
After resting, stretch and fold the bottom piece of dough over to the center. Next, stretch and fold the top piece of dough over to the center. Using two hands, gently pull the dough toward you, tucking and tightening the shape of the dough. If you’re forming a round, you’ll tuck in the sides and form a tightened ball.
Step 5: Cold proofing or second rise
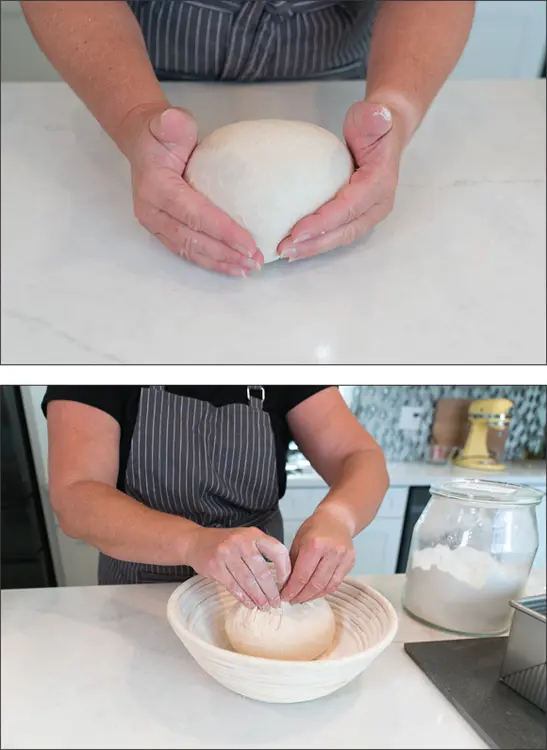
If you’re using a banneton (a woven or braided basket that helps a loaf hold its shape and creates a desired design on the surface of the dough during its final proofing), add rice flour to the banneton, filling in the crevices, and place the tightened dough shape into your preform banneton (see Figure 4-3). Cover with a damp tea towel.
If you’re using a Dutch oven, place the parchment paper into the Dutch oven and place the dough onto the parchment paper. Cover with the lid.
If you want a more sour-flavored dough, place the dough in the refrigerator for 4 to 24 hours (even longer in some recipes). If you prefer a less pronounced sour flavor, let the dough rest at room temperature for an hour.

FIGURE 4-3:Tightened and shaped sourdough being placed into a prepared banneton.
After cold proofing your dough, spread out a piece of parchment paper and gently turn the banneton over onto the parchment paper. Place the parchment paper into a Dutch oven.
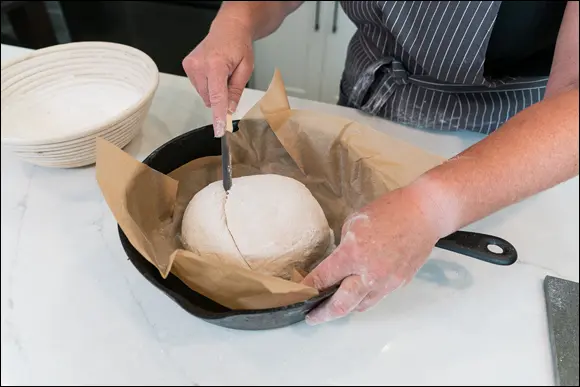
This is when the artists among us get happy! Sourdough can be scored into beautiful designs. Artistry is not my forte, however, so I prefer to be simple with either a long slice into the dough, about ⅛ inch to ¼ inch deep or an X across the top (see Figure 4-4).
 Scoring sourdough isn’t just decorative — it has a purpose. The skin is taut and tight after shaping, and when the dough gets placed into a very hot oven, it wants to rise and push on the surface. Scoring with a lame or serrated knife allows for gasses to release at those score marks, creating a picturesque loaf of baked bread.
Some like it hot, and sourdough bread likes it hotter! Make sure your oven rack is in the center of your oven and allows enough space for your Dutch oven to fit into the oven. Then crank your oven to 450 or 500 degrees. After you heat the oven, secure the lid on your Dutch oven and place the dough into the hot oven. Quickly close the oven door and set the timer for 30 minutes. After 30 minutes, carefully remove the lid and bake for another 20 to 30 minutes, or until the dough is golden in color and has reached an internal temperature of 200 to 210 degrees.

FIGURE 4-4:Scoring a sourdough boule.
This part may break your heart, but hear me out. You really must let the dough rest and cool for at least one to three hours prior to slicing. If you don’t wait, your dough can turn into a gummy mess. Some loaves, like rye breads, deserve a good 24 to 48 hours of cooling before slicing! But, a basic white loaf can be sliced after a few hours outside the oven.
 Artisan breads take time and patience. The wait is worth the rewards!
A TYPICAL BAKER’S SCHEDULE
To help you get a better picture of a baking timeline and structure of sourdough planning, here’s my typical baker’s schedule:
6 a.m.:Place the starter on the counter and let it bubble up throughout the day.
6 p.m.:Check the starter. If it doesn’t seem bubbly or viable, do a day of feedings. If it seems bubbly and viable, begin the recipe. After prepping the recipe, feed the starter and either return it to your refrigerator or leave it on the counter to bake again tomorrow.
7 p.m.:Stretch and fold the dough.
8 p.m.:Stretch and fold the dough. Cover for the night.
6 a.m.:Shape and tighten the dough. Place the dough into a rice-floured banneton. Place in the refrigerator to bake at a later time (that night or the next night) or cover and leave on the counter to rise 1 to 2 hours before baking.
7 a.m.:If the bread was left out to rise, begin heating the oven 1 hour prior to baking. If you’re slow to put the bread into the oven, heat the oven to 500 degrees and then reduce to 450 degrees when the Dutch oven is inside and the door is closed.
8 a.m.:Line a Dutch oven with parchment paper and flip the dough into the Dutch oven. Next, score the dough with an X or one single line. Place the lid onto the Dutch oven and put into the oven. Close the door. Set a timer for 30 minutes.
8:30 a.m.:Remove the lid. Reset the timer to 20 to 30 minutes (depending on the loaf and how dark you’d like the crust).
9 a.m.:Remove from the oven. Hold the parchment paper and remove the dough to a cooling rack. Let the dough cool for at least 3 hours or up to 12 hours for rye bread. Then slice and serve.
Конец ознакомительного фрагмента.
Текст предоставлен ООО «ЛитРес».
Прочитайте эту книгу целиком, на ЛитРес.
Безопасно оплатить книгу можно банковской картой Visa, MasterCard, Maestro, со счета мобильного телефона, с платежного терминала, в салоне МТС или Связной, через PayPal, WebMoney, Яндекс.Деньги, QIWI Кошелек, бонусными картами или другим удобным Вам способом.


 Scoring sourdough isn’t just decorative — it has a purpose. The skin is taut and tight after shaping, and when the dough gets placed into a very hot oven, it wants to rise and push on the surface. Scoring with a lame or serrated knife allows for gasses to release at those score marks, creating a picturesque loaf of baked bread.
 Artisan breads take time and patience. The wait is worth the rewards!


