 Bread baking isn’t magic, but it is a science. And when you stick to the steps, you can master the chemical reactions, too.
Step 1: Measuring your ingredients
Accuracy is key in bread making, and the plain truth is that weighing ingredients on a kitchen scale is more accurate than measuring volume with cups and spoons (see Chapter 1for more on this subject). In the recipes in this book, I list ingredients in in grams first, followed by the measurements in volume, like this:
125 grams (1 cup) all-purpose flour
 Because of variances in humidity, flour mills, and temperature, you may need to adjust how much flour you use. Experience will teach you when to use more or less flour and water. The more you make bread, the better you’ll be at making these adjustments on your own, but especially if you’re just getting started with bread, stick to the recipe your first time through.
Two key mixing methods are used in bread making:
Straight dough method: In the straight dough method, you combine and mix all the ingredients. Then you knead the dough until it is smooth and can be stretched without breaking.
Sponge method: The sponge method has two stages. First, you mix together the yeast, the liquid, and part of the flour and allow it to rise. When the dough has doubled in size, you add the remaining flour and ingredients and knead the dough. The sponge method is often used with denser flours that absorb more water, such as whole-wheat flour. The sponge method allows the flour to hydrate before it’s mixed more, allowing for a lighter, airier product in the end.
 If you’re new to kneading, check out the nearby sidebar for step-by-step instructions.
You’re starting to smell the flavors of your bread taking shape. But don’t get impatient and pop the dough into the oven too soon! You need to let the dough fully rise and ferment first.
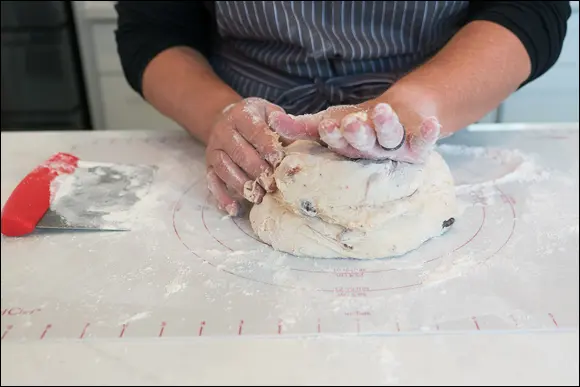
Most of the recipes in the book specify an exact time to use a stand mixer with the dough hook attachment and at what level. But it’s still important to know how to knead dough by hand. Follow these steps to knead dough:
1 Form the dough into a ball.
2 Pat the dough into a flatter ball.
3 Lift the part of the dough that is closest to you, and fold it over the top.Use the heal or palm of your hand to push the dough down into the rounded dough (see the nearby figure).
4 Turn the dough a quarter turn to the left, and repeat Step 3.Keep repeating until the dough is smooth and has elasticity. If the dough is sticky, coat your hands and dust the dough with a little flour before continuing to knead.

Generally, when you use a stand mixer with the dough hook attachment, you can knead dough in 5 to 10 minutes. By hand, the same process can take 10 to 15 minutes — but kneading is a great form of exercise!
As the yeast feeds on the sugars in the bread, they release gas. The gas is captured in the gluten matrix (see Chapter 1), and the dough rises. Fermentation, or rising, is complete when the dough has doubled in size. The length of time it takes varies based on the type of flour, the amount of yeast, and the temperature.
 While the dough is rising, keep it in a warm, draft-free place. To help the dough not dry out, place a dampened tea towel over the bowl. The towel will keep the dough from drying out and add humidity to the air as the dough rises.
Step 4: Punching and shaping the dough
When the dough has doubled in size, it’s time to use a dough scraper and place the dough onto a floured surface. You don’t literally need to punch the dough — instead, you gently fold it down to redistribute the gas throughout the dough. If you do this too many times, you may end up with a flat baked product, so be gentle to your dough. Folding over one or two times should be enough.
After the dough has been folded over, it’s time to shape the dough. Whether you’re making rolls, baguettes, or loaves, there’s technique involved. The recipes in this book describe the shaping in detail so you’ll end up with the best results.
 If the dough seems difficult to shape or too wet to work with, cover the dough and place it into the refrigerator and let it chill for an hour and see if it’s easier to shape. Some doughs, like sweet breads, require at least 6 to 12 hours of chilling for best results.
 Shaping can take time. Measuring out equal pieces of dough is a process. If you’re rolling the dough into knots or pretzels, it can take a couple tries to stretch and shape the long pieces, allowing the gluten to relax and stretch.
Step 5: Proofing the dough
After you’ve shaped the dough, it’s time for a final rising, referred to as proofing. Some ovens are equipped with a bread proofing setting, which is a slightly warmer temperature than a standard home (usually between 80 and 115 degrees). For each recipe, the length of proofing required is different, but usually it’s anywhere from 15 minutes to an hour.
Now you’ve come to the fun part! Depending on the recipe, you may brush the bread with an egg wash for a golden glaze or top the dough with seeds. Some recipes even have you score the dough, or mark it with a serrated knife or bread lame (a scoring knife that looks similar to a box cutter or razor). Regardless of what the recipe calls for, just be gentle and make sure not to deflate your gorgeous creation before baking.
When you place the dough into a hot oven, you’ll see a quick, initial rise, often referred to as oven spring. This is when the gases from the yeast get trapped in the matrix of gluten, allowing the bread to rise and hold its form.
 Avoid opening the oven — when you open the oven, you allow cool air to enter and disrupt the baking process.
When is your bread done? Instead of thumping the loaf and playing a guessing game, use an instant-read thermometer. For a typical loaf of white or wheat bread, the goal is 190 to 210 degrees. For a bread that’s rich in fat or egg based, like challah, aim for 180 to 190 degrees.
Not every bread is baked. Some breads are steamed, cooked in a skillet, or even boiled. Here’s a guide to each of these techniques and when and why they’re used:
Читать дальше

 Bread baking isn’t magic, but it is a science. And when you stick to the steps, you can master the chemical reactions, too.
 Because of variances in humidity, flour mills, and temperature, you may need to adjust how much flour you use. Experience will teach you when to use more or less flour and water. The more you make bread, the better you’ll be at making these adjustments on your own, but especially if you’re just getting started with bread, stick to the recipe your first time through.
 Avoid opening the oven — when you open the oven, you allow cool air to enter and disrupt the baking process.


