Paul McFedries - iPhone Portable Genius
Здесь есть возможность читать онлайн «Paul McFedries - iPhone Portable Genius» — ознакомительный отрывок электронной книги совершенно бесплатно, а после прочтения отрывка купить полную версию. В некоторых случаях можно слушать аудио, скачать через торрент в формате fb2 и присутствует краткое содержание. Жанр: unrecognised, на английском языке. Описание произведения, (предисловие) а так же отзывы посетителей доступны на портале библиотеки ЛибКат.
- Название:iPhone Portable Genius
- Автор:
- Жанр:
- Год:неизвестен
- ISBN:нет данных
- Рейтинг книги:5 / 5. Голосов: 1
-
Избранное:Добавить в избранное
- Отзывы:
-
Ваша оценка:
iPhone Portable Genius: краткое содержание, описание и аннотация
Предлагаем к чтению аннотацию, описание, краткое содержание или предисловие (зависит от того, что написал сам автор книги «iPhone Portable Genius»). Если вы не нашли необходимую информацию о книге — напишите в комментариях, мы постараемся отыскать её.
iPhone Portable Genius
Before you know it, you’ll be:
Mastering the touchscreen Setting up your iPhone to suit the way you work and play Connecting your iPhone to Wi-Fi and setting up your phone as an internet hub Solving the most common iPhone problems Getting the most out of email With straightforward and step-by-step instructions in a portable and convenient package and engaging illustrations,
is the ideal resource for owners and users of one of the world’s most popular phones.
iPhone Portable Genius — читать онлайн ознакомительный отрывок
Ниже представлен текст книги, разбитый по страницам. Система сохранения места последней прочитанной страницы, позволяет с удобством читать онлайн бесплатно книгу «iPhone Portable Genius», без необходимости каждый раз заново искать на чём Вы остановились. Поставьте закладку, и сможете в любой момент перейти на страницу, на которой закончили чтение.
Интервал:
Закладка:
On larger iPhones, rotate the phone into landscape mode to see an extended keyboard that includes dedicated buttons for Cut (the scissors icon), Copy (the letter A in a square), and Paste (a glue bottle).
Pasting text
With your text cut or copied and residing snugly in the memory of your iPhone, you're ready to paste the text. If you want to paste the text into a different app, open that app. Position the cursor where you want the text to appear, tap the cursor, and then tap Paste (see Figure 1.9). Your iPhone dutifully adds the cut or copied text.
Copying and pasting a photo
If you want to make a copy of a photo, such as an image shown on a web page, the process is more or less the same as copying noneditable text:
1 Tap and hold the photo. After a second or two, your iPhone displays a pop‐up menu of image options.
2 Tap Copy. The iPhone copies the photo into its memory.
3 Open the app where you want the copy of the photo to appear.
4 Position the cursor where you want the photo to appear and then tap the cursor.
5 Tap Paste. The iPhone pastes the photo.
Undoing a paste
The Cut, Copy, and Paste commands make the iPhone feel even more like a computer. That's good, but it also means you can make the same pasting errors that you can with your regular computer. For example, you might paste the text or photo in the wrong spot, or once you've performed the paste, you might realize that you selected the wrong data.
Frustrating? Yes. A big problem? Nope! Slap your forehead lightly in exasperation and then perform one of the coolest iPhone tricks: Shake it. Your iPhone displays the options shown in Figure 1.10. Tap Undo Paste to reverse your most recent paste and then move on with your life.

1.10 Reverse an imprudent paste by shaking the iPhone and then tapping Undo Paste.
 Genius
On a larger iPhone, rotate into landscape mode and tap the Undo key (the semicircular arrow pointing to the left).
Running Your iPhone from the Control Center
As you read the rest of this book, you'll see that your iPhone is rightly called a “Swiss Army phone” because it's positively bristling with useful tools. However, unlike the easy‐to‐access tools in a typical Swiss Army knife, the tools on your iPhone aren't always so readily accessible. Most features and settings require several taps, which doesn't sound like much, but it can get old fast with features you use frequently.
Fortunately, iOS aims to solve that problem by offering the Control Center. This is a special screen that offers one‐flick access to more than a dozen of the most useful features on your iPhone. By “one‐flick access” I mean just this:
If your iPhone has a notch at the top, flick down from the top‐right edge of the screen (as pointed out in Figure 1.11).
For all other iPhones, flick your finger up from the bottom of the screen.
This displays the Control Center, as shown in Figure 1.11, which also points out what each icon and control represents. (Depending on your iPhone model and the version of iOS it's running, you might see more or fewer icons than shown here.) Most of these features are covered elsewhere in the book, so I won't go into the details here. To hide the Control Center, tap any empty section of the Control Center screen.
Genius
You can customize the bottom row of the Control Center. Open the Settings app, tap Control Center, then add the controls you want and remove those you don't use.
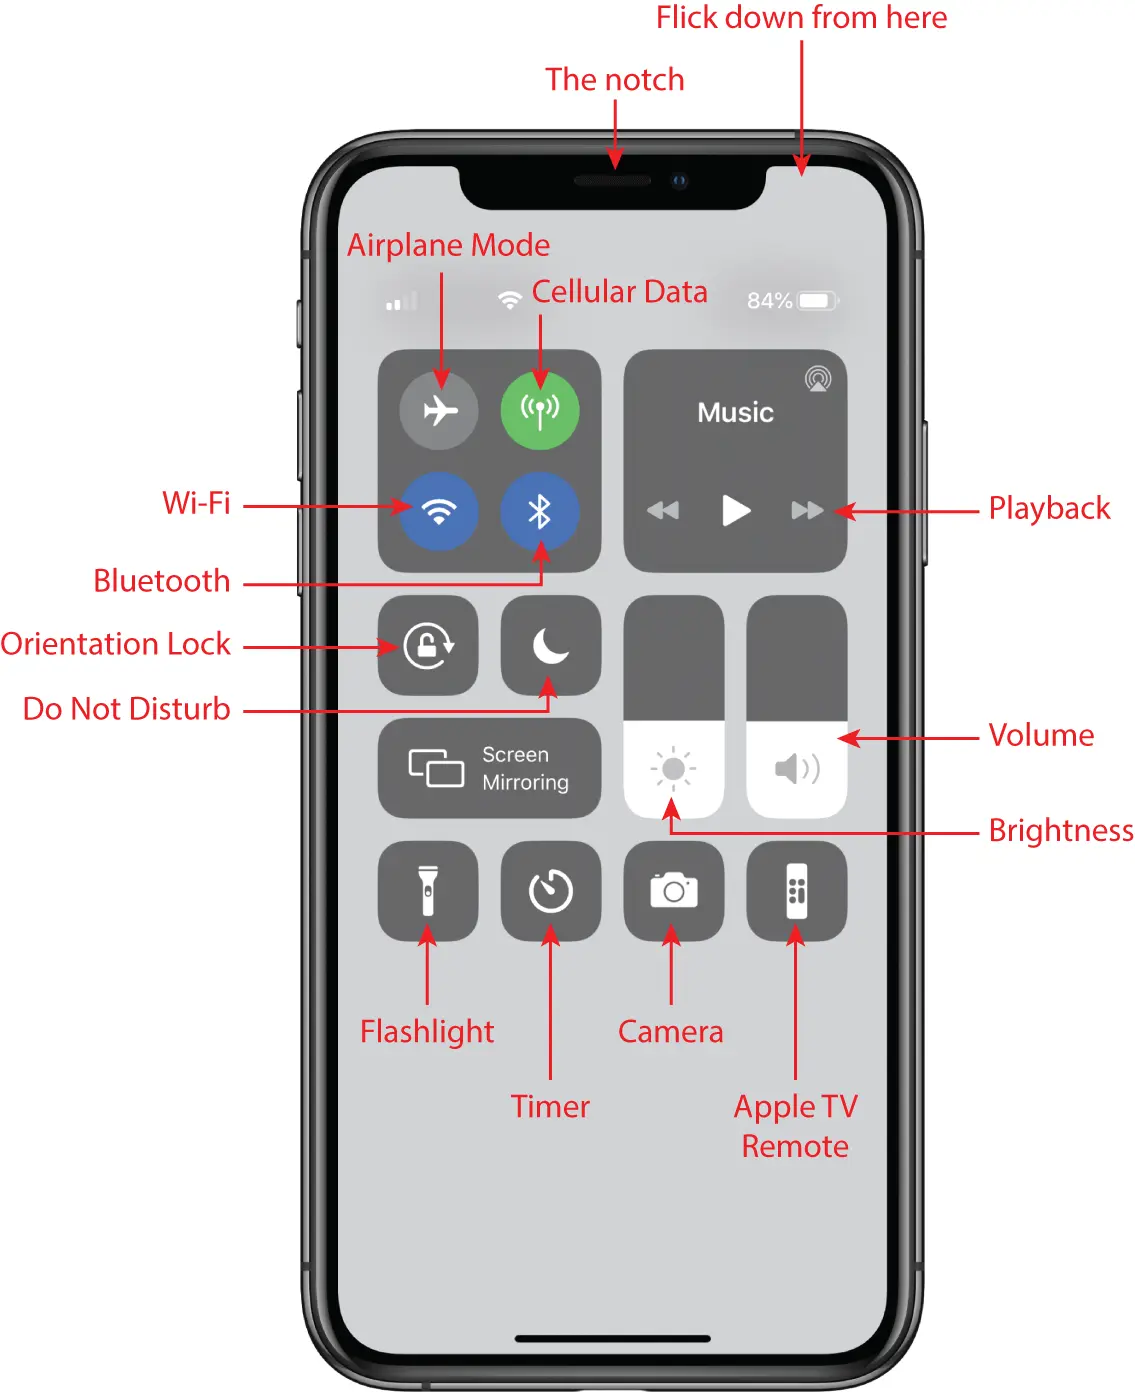
1.11 The Control Center offers “one‐flick” access to some key iPhone features.
Конец ознакомительного фрагмента.
Текст предоставлен ООО «ЛитРес».
Прочитайте эту книгу целиком, на ЛитРес.
Безопасно оплатить книгу можно банковской картой Visa, MasterCard, Maestro, со счета мобильного телефона, с платежного терминала, в салоне МТС или Связной, через PayPal, WebMoney, Яндекс.Деньги, QIWI Кошелек, бонусными картами или другим удобным Вам способом.
Интервал:
Закладка:
Похожие книги на «iPhone Portable Genius»
Представляем Вашему вниманию похожие книги на «iPhone Portable Genius» списком для выбора. Мы отобрали схожую по названию и смыслу литературу в надежде предоставить читателям больше вариантов отыскать новые, интересные, ещё непрочитанные произведения.


Обсуждение, отзывы о книге «iPhone Portable Genius» и просто собственные мнения читателей. Оставьте ваши комментарии, напишите, что Вы думаете о произведении, его смысле или главных героях. Укажите что конкретно понравилось, а что нет, и почему Вы так считаете.