What you really need is a “genius” of your own that's easier to access, more convenient, and doesn't require pleading emails or bribery. What you really need is a portable genius that enables you to be more productive and solve problems — wherever you and your iPhone happen to be.
Welcome, therefore, to iPhone Portable Genius, Sixth Edition. This book is kind of a genius all wrapped up in an easy‐to‐use, easy‐to‐access, and eminently portable format. In this book, you learn how to get more out of your iPhone by accessing all the powerful and timesaving features that aren't obvious at a casual glance. In this book, you learn about all the amazing new features found in the latest iPhones and the latest version of iOS. In this book, you learn how to prevent iPhone problems from occurring and (just in case your preventative measures are for naught) how to fix many common problems.
This book is for iPhone users who know the basics but want to take their iPhone education to a higher level. It's a book for people who want to be more productive, more efficient, more creative, and more self‐sufficient (at least as far as the iPhone goes). It's a book for people who use their iPhone every day but would like to incorporate it into more of their day‐to‐day activities. It's a book I had a blast writing, so I think it's a book you'll enjoy reading.
How Do I Start Using My iPhone?
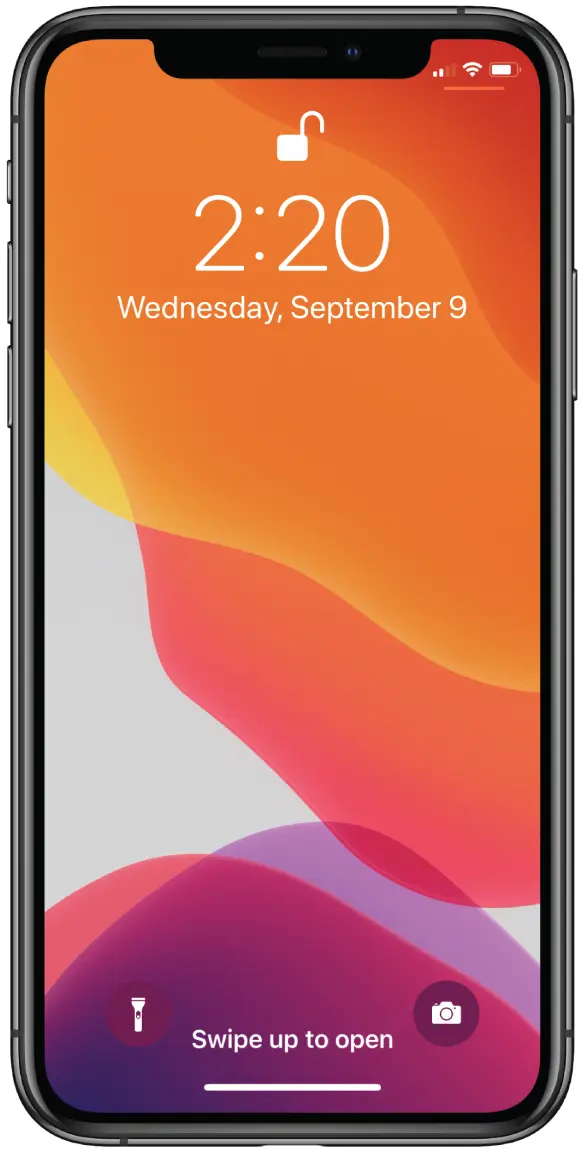
When you first look at your iPhone, you notice its sleek, curvaceous design, and then you notice what might be its most remarkable feature: It's nearly button‐free! Unlike your garden‐variety smartphone bristling with keys and switches and ports, your iPhone has very few physical buttons. This makes for a stylish, possibly even sexy, design, but it also leads to an obvious problem out of the box: How do you work the darn thing? This chapter solves that problem by giving you the grand tour of your iPhone. You learn about the few physical buttons on the phone, and then I show you the real heart of the iPhone, the remarkable touchscreen.
Working with the Side Button Working with the Side Button If your iPhone is on but you're not using it, the phone automatically goes into standby mode after one minute. This is called Auto‐Lock, and it's a handy feature because it saves battery power when your iPhone is just sitting there. However, you can also put your iPhone into standby mode at any time by using the Side button (also called the Sleep/Wake button). As pointed out in Figure 1.1 , you find this button on the right side of your phone, assuming you're holding the phone as shown in Figure 1.1 (this is called portrait orientation). (On older iPhones, the Side button is on the top of your phone.) 1.1 On all recent iPhone models, the Side button appears on the right side. As I describe in the following sections, the Side button has four main functions: sleeping and waking, powering on and off, handling incoming calls, and authorizing purchases.
Working with the Ring/Silent Switch Working with the Ring/Silent Switch When a call comes in and you press the Side button once, your iPhone silences the ringer. That's great if you're in a meeting or a movie, but the only problem is that it may take you one or two rings before you can tap the Side button, and by that time the folks nearby are already glaring at you. To prevent this phone faux pas, you can switch your iPhone into Silent Mode, which means it doesn't ring, and it doesn't play any alerts or sound effects. When the sound is turned off, only alarms that you've set using the Clock application will sound. The phone will still vibrate unless you turn this feature off as well. You switch the iPhone between Ring Mode and Silent Mode using the Ring/Silent switch, which is located on the left side of the iPhone, near the top (assuming you're holding the phone in portrait orientation), as shown earlier in Figure 1.1 . Use the following techniques to switch between Silent Mode and Ring Mode: Put the phone in Silent Mode. Flick the Ring/Silent switch toward the back of the phone. You see an orange stripe on the switch, the iPhone vibrates briefly, and you see a brief notification telling you that Silent Mode is on. Return to Ring Mode. Flick the Ring/Silent switch toward the front of the phone. You no longer see the orange stripe on the switch, and the iPhone displays the current ringer volume setting.
Operating the Volume Controls Operating the Volume Controls The volume controls are on the left side of the iPhone (again, when you're holding the phone in portrait orientation), right below the Ring/Silent switch (see Figure 1.1 ). The button closer to the top of the iPhone is Volume Up, and you press it to increase the volume; the button closer to the bottom of the iPhone is Volume Down, and you press it to decrease the volume. As you adjust the volume, a slider appears on‐screen representing the volume level. You use these buttons to control the volume throughout your iPhone: If you're on a call, the volume controls adjust your speaker volume. If you're using the Music app, the volume controls adjust the music volume. In all other situations, the volume controls adjust the output of sounds such as alerts and effects.
Inserting a SIM Card Inserting a SIM Card Before you can use your iPhone to make and receive calls over the cellular network, you need to insert a SIM (subscriber identity module) card, which your cellular provider includes with your phone (or which you can purchase separately as a prepaid card). With your SIM card at hand, follow these steps to insert it into your iPhone: 1 Locate the SIM removal tool that came with your phone. Figure 1.4 points out this tool. If you can't find the SIM removal tool, you can use any object with a similarly narrow end, such as a small paperclip or a safety pin. 1.4 Push a SIM removal tool or pin into the hole to eject the tray. 2 Push the SIM removal tool into the hole that appears on the SIM card tray. This tray appears just below the Side button, as shown in Figure 1.4 . Insert the tool until the tray ejects. 3 Carefully lay the SIM card into the SIM card tray. To ensure you insert the card correctly, match the notch in one corner of the SIM card with the corresponding notch in the tray. 4 Reinsert the SIM card tray until you feel a soft click as the tray slides into its correct position. Your SIM card is ready to use.
Operating the Touchscreen Operating the Touchscreen The most distinctive feature of the iPhone is its versatile touchscreen. You can zoom in and out, scroll through lists, drag items here and there, and even type messages. Amazingly, the touchscreen requires no external hardware to do all this. You don't need a stylus or digital pen, and you don't need to attach anything to the iPhone. Instead, the touchscreen requires just your finger (or, for some operations, a couple of fingers).
Running Your iPhone from the Control Center Running Your iPhone from the Control Center As you read the rest of this book, you'll see that your iPhone is rightly called a “Swiss Army phone” because it's positively bristling with useful tools. However, unlike the easy‐to‐access tools in a typical Swiss Army knife, the tools on your iPhone aren't always so readily accessible. Most features and settings require several taps, which doesn't sound like much, but it can get old fast with features you use frequently. Fortunately, iOS aims to solve that problem by offering the Control Center. This is a special screen that offers one‐flick access to more than a dozen of the most useful features on your iPhone. By “one‐flick access” I mean just this: If your iPhone has a notch at the top, flick down from the top‐right edge of the screen (as pointed out in Figure 1.11 ). For all other iPhones, flick your finger up from the bottom of the screen. This displays the Control Center, as shown in Figure 1.11 , which also points out what each icon and control represents. (Depending on your iPhone model and the version of iOS it's running, you might see more or fewer icons than shown here.) Most of these features are covered elsewhere in the book, so I won't go into the details here. To hide the Control Center, tap any empty section of the Control Center screen.
Читать дальше
