Point-of-Care Ultrasound Techniques for the Small Animal Practitioner
Здесь есть возможность читать онлайн «Point-of-Care Ultrasound Techniques for the Small Animal Practitioner» — ознакомительный отрывок электронной книги совершенно бесплатно, а после прочтения отрывка купить полную версию. В некоторых случаях можно слушать аудио, скачать через торрент в формате fb2 и присутствует краткое содержание. Жанр: unrecognised, на английском языке. Описание произведения, (предисловие) а так же отзывы посетителей доступны на портале библиотеки ЛибКат.
- Название:Point-of-Care Ultrasound Techniques for the Small Animal Practitioner
- Автор:
- Жанр:
- Год:неизвестен
- ISBN:нет данных
- Рейтинг книги:5 / 5. Голосов: 1
-
Избранное:Добавить в избранное
- Отзывы:
-
Ваша оценка:
Point-of-Care Ultrasound Techniques for the Small Animal Practitioner: краткое содержание, описание и аннотация
Предлагаем к чтению аннотацию, описание, краткое содержание или предисловие (зависит от того, что написал сам автор книги «Point-of-Care Ultrasound Techniques for the Small Animal Practitioner»). Если вы не нашли необходимую информацию о книге — напишите в комментариях, мы постараемся отыскать её.
New chapters in
cover ultrasound-guided nerve blocks, musculoskeletal, brain imaging, and applications of focused ultrasound techniques in cats, exotics and marine mammals—making it an essential purchase for veterinarians wanting to incorporate point-of-care ultrasound techniques into their veterinary practices.
Presents a standardized approach to point-of-care ultrasound as an extension of the physical exam, including trauma, non-trauma, and monitoring applications Includes coverage of new techniques for focused ultrasound exams, including lung, anesthesia and ultrasound guided nerve blocks, transcranial brain imaging, musculoskeletal, volume status evaluation, and rapid assessment for treatable forms of shock Adds cats, exotic and wildlife mammals, and marine mammals to the existing canine coverage Emphasizes the integration of point-of-care ultrasound techniques for optimizing patient care and accurate patient assessment Offers access to a companion website with supplementary video clips showing many clinically relevant didactic examples The second edition of
is an excellent resource for veterinary practitioners, ranging from the general practitioner to nearly all clinical specialists, including internal medicine, oncology, cardiology, emergency and critical care, anesthesiology, ophthalmology, exotics, and zoo medicine specialists, and veterinary students.
Point-of-Care Ultrasound Techniques for the Small Animal Practitioner — читать онлайн ознакомительный отрывок
Ниже представлен текст книги, разбитый по страницам. Система сохранения места последней прочитанной страницы, позволяет с удобством читать онлайн бесплатно книгу «Point-of-Care Ultrasound Techniques for the Small Animal Practitioner», без необходимости каждый раз заново искать на чём Вы остановились. Поставьте закладку, и сможете в любой момент перейти на страницу, на которой закончили чтение.
Интервал:
Закладка:
Check your gain. Generally, the time gain compensation (TGC) should be a gentle curve from the near‐field to the far‐field ( Figures 5.16and 5.17). Then, only the overall gain is used for the rest of the Global FAST ultrasound examination. However, using the TGC sliders is another strategy, depending on what level of the image needs to be brighter or darker. A common mistake when moving from AFAST and TFAST to Vet BLUE is having too much gain, in other words too bright in the near‐field for lung because you needed more gain for soft tissue than lung surface imaging. Thus, the “lung line” is now too bright, lacking the contrast you need for Vet BLUE. Conversely, moving from Vet BLUE to AFAST or TFAST, you are now too dark (undergained) because the “lung line” imaging did not need as much gain as the soft tissue of abdominal and cardiac structures.
Check your depth. Depending on the area of interest and the size of your patient, paying attention to the depth will help you to get where you want to go more quickly (see Figure 5.13). Generally, it’s best to start with too much depth to gain an overview of what you are imaging, and to survey for recognizable landmarks prior to magnifying (decreasing the gain). And time is valuable on many fronts, including the patience of your patient and its tolerance of your physical and chemical restraint. Figure 5.14. Splenic mass and estimating size from the centimeter scale. These images were captured during a POCUS spleen following AFAST. In (A) is the spleen (*) and arrows showing its borders. The spleen is sonographically recognized by its hyperechoic (bright white) capsule, and its splenic vessels splitting the capsule (not shown). In (B) the mass detected is eyeballed at approximately 4 × 4 cm using the centimeter scale. The mass appears large when in fact it is quite small. The finding is important and concerning because the mass deforms the capsule of the spleen.Source: Courtesy of Dr Gregory Lisciandro, Hill Country Veterinary Specialists and FASTVet.com, Spicewood, TX. Figure 5.15. An algorithm for trouble shooting image acquisition with some clinical pearls and descriptors.Source: Courtesy of Dr Gregory Lisciandro, Hill Country Veterinary Specialists and FASTVet.com, Spicewood, TX. Figure 5.16. Time gain compensation (sliders) and the overall gain (wheel). Shown in (A) is an ultrasound machine with its keyboard and screen. The time gain compensation (TGC) is in the upper right on this keyboard. These TGC sliders can be intimidating but gain adjusts your gray scale when in B‐mode. The sliders represent the different levels from the near‐field to the far‐field. In general, they should look like the circled upper two images in (B) and not like the lower two images (marked with an "X"). In (C) is the overall gain (circled wheel with arrow pointing to it) that may be turned clockwise and counterclockwise that alters the overall picture. If your sliders are adjusted as in (B) then you should mostly only be using the overall gain thereafter. If the image still doesn't look good then go through the trouble‐shooting algorithm (see Figure 5.15).Source: Courtesy of Dr Gregory Lisciandro, Hill Country Veterinary Specialists and FASTVet.com, Spicewood, TX.
Check the location and numbers of your focus cursor(s). Generally, a single focus cursor is best that is centered on the screen or directly across your area of interest.
Check your probe–skin contact (coupling). Is the probe head directly on skin? Do you have ample acoustic coupling medium?
Check your probe hand placement and beam direction. Make sure that you are in the right region, using external landmarks as well as considering the direction and path of your ultrasound beam (see Figures 5.10and 5.11).
Default back to original settings. If you still cannot figure out why the image looks so wrong, push the B‐mode button first and then go to presets and change to a different preset or return to the original preset, as many machines will default back to the original settings. The reality is sometimes you have no idea what you did to make everything look so bad.
See Chapter 4for additional explanation and examples.
Not Knowing How to Freeze and Roll the Cine Ball
You will need to know how to freeze the image on the screen. This is especially helpful when you have short‐duration images of the region of interest. Examples include air (lung) interference of cardiac views in a panting patient, the tachycardic patient with normal higher heart rates (cats) in which the eyeball method is error prone; or you caught a quick glimpse of a structure you want to measure. Freezing the image on the screen and then rolling the cine ball through preceding frames allows you to evaluate better than in real time.
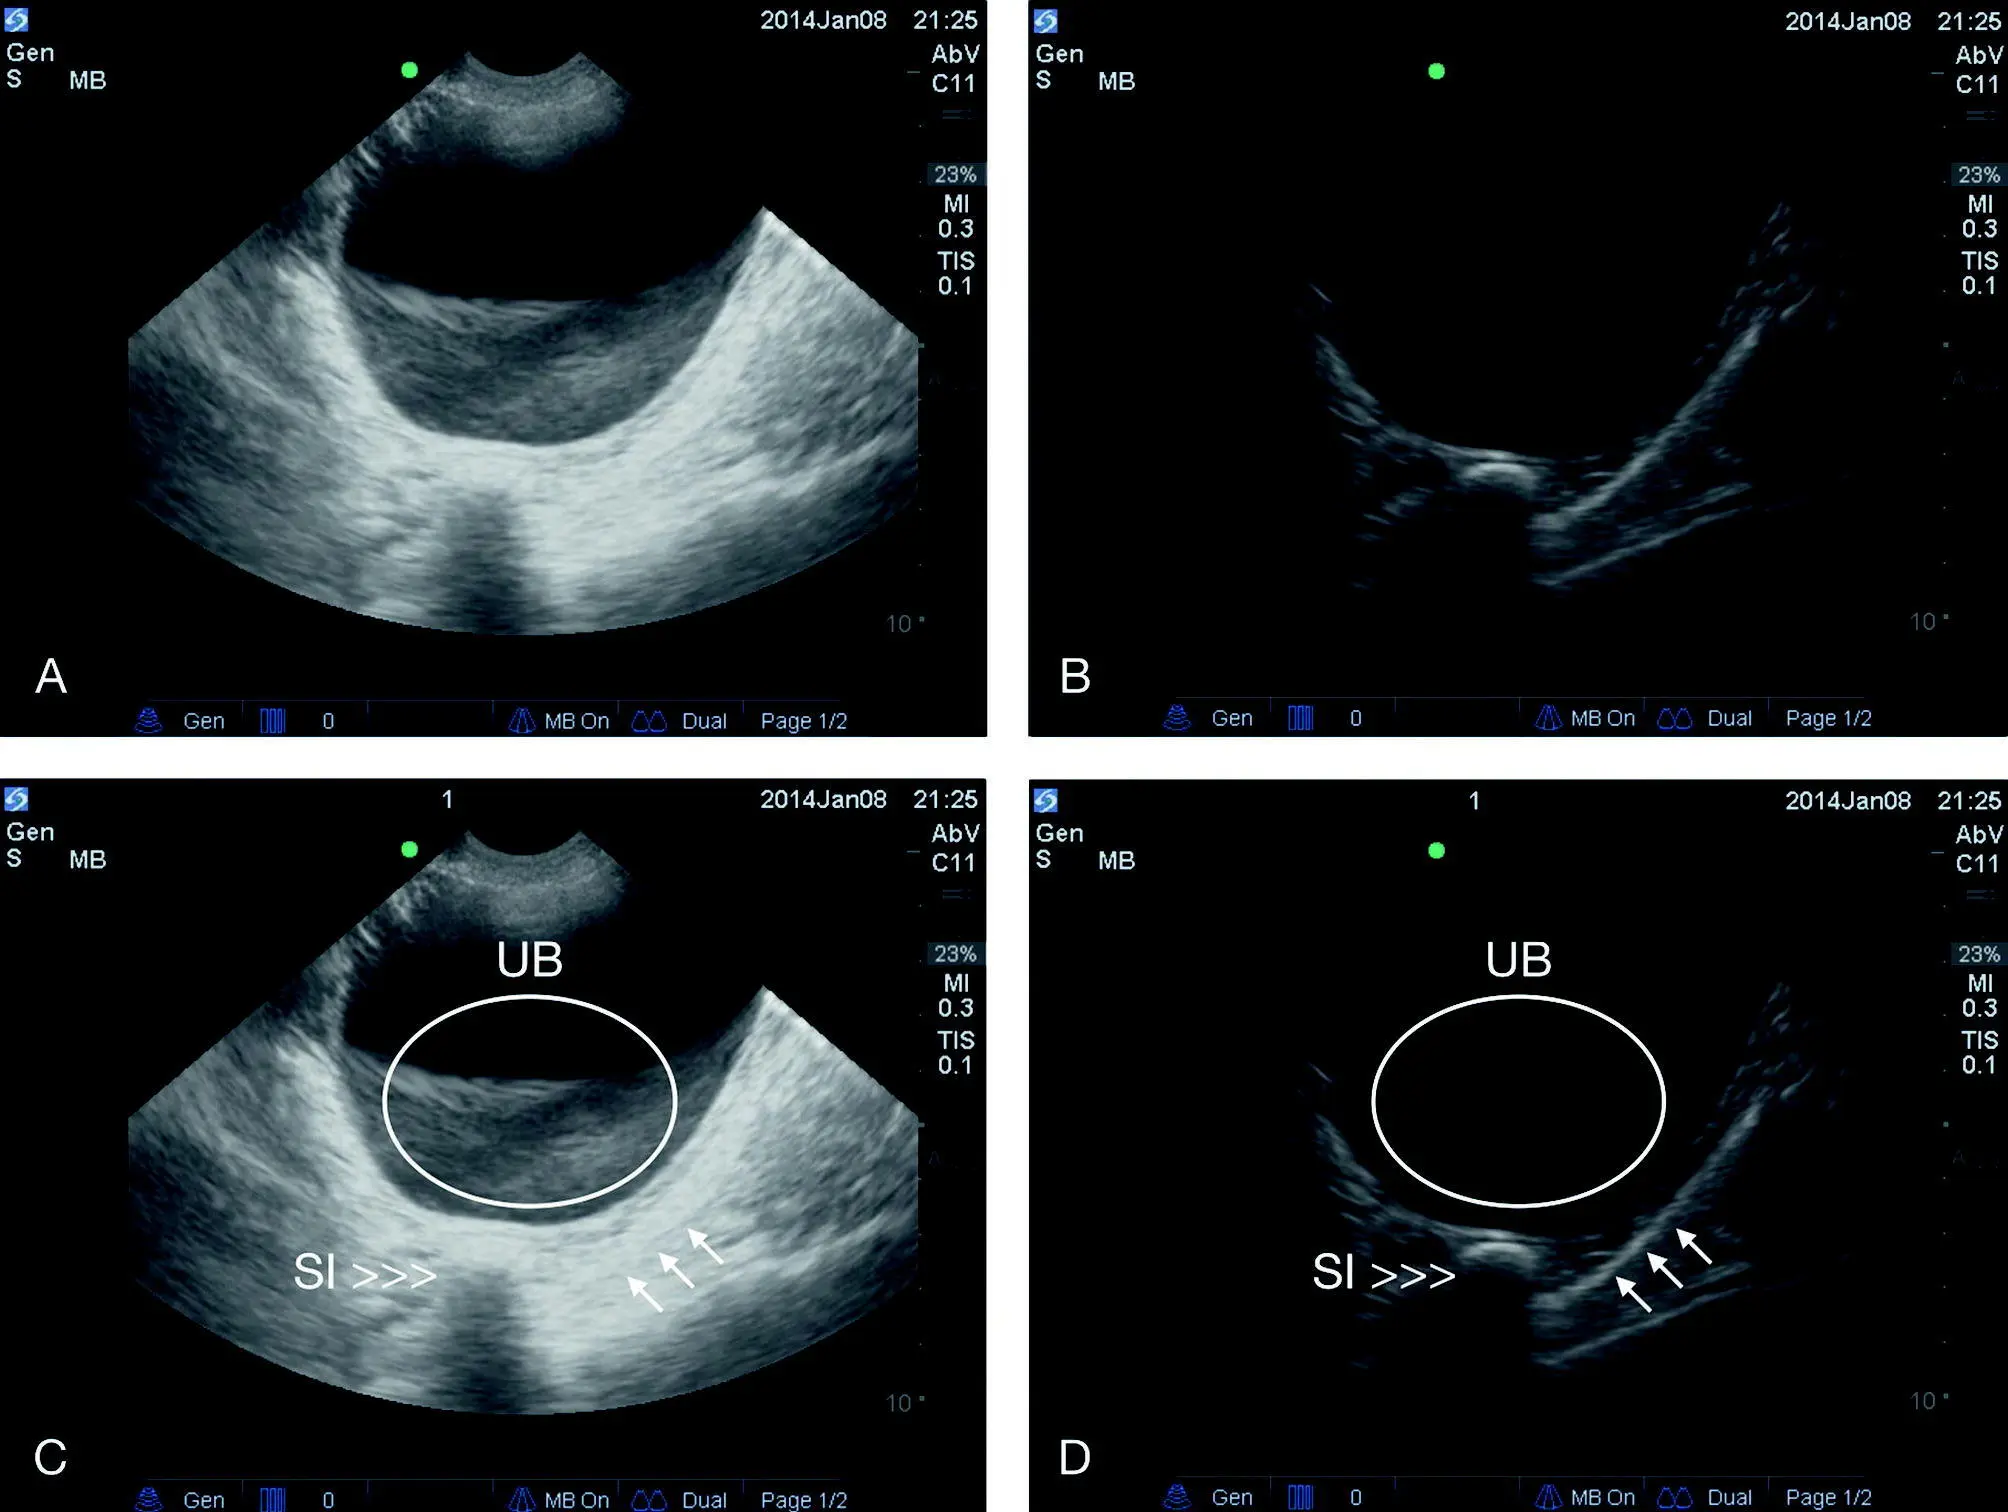
Figure 5.17. Slice‐thickness artifact at the AFAST CC view. (A) and (B) are the same images within the same cine loop that have been extracted to show how much gain settings affect the image. In (A) is a slice‐thickness artifact that is circled in (C). In (B) the gain is turned down, eliminating the artifact (true sediment would persist in gravity‐dependent regions). Color flow Doppler is another technique used to look for flow (mass versus thrombus versus sediment versus artifact). (C) and (D) are labeled images of (A) and (B) respectively. Note how the loop of small intestine outside the lumen of the urinary bladder could mimic a bladder stone (cystic calculi) with a hyperechoic line (reflective air) and clean shadowing through the far‐field. Note also that the screen provides a lot of information including a depth of 10 cm, an abdominal preset (Abv) in the upper right. Note, there is uniquely no focus cursor on machines from this manufacturer (SonoSite). Arrows indicate the body wall in the CC pouch. SI, small intestine; UB, urinary bladder.
Source: Courtesy of Dr Gregory Lisciandro, Hill Country Veterinary Specialists and FASTVet.com, Spicewood, TX.
Image Interpretation
Lacking Awareness of Most Common Locations for Artifacts
In Chapter 3, Table 3.1lists the common ultrasound artifacts and the most common locations and examples for each. Briefly, we will list here some strategies to create better awareness of these artifacts, especially during the Global FAST approach. This leads to another major point…
Saving images is important not only for archiving patient information but for learning by reviewing studies and being able to compare to other modalities, future studies, and clinical course and outcome. For learning artifacts and how your machine interprets them, you can go through studies playing the “artifact game.” For example, look at the AFAST views for mirror image artifact at the DH view on the pleural cavity side of the diaphragm, the CC view and the other side of the abdominal wall, and TFAST echo views for mirror image artifact on the far side of the pericardium. This can also be done with other artifacts in their most common locations, such as edge shadowing off the curved surface of the stomach wall, renal cortex, urinary bladder, etc.
Mirror Image
This most commonly occurs at the diaphragm but the most problematic is the mirroring of the gallbladder into the thorax, especially when it’s a partial mirror image. In this case, the gallbladder can mimic pleural and pericardial effusion to the hasty sonographer.
Other places for mirror image, where generally a strong air–soft tissue interface exists, are on the far side of the heart when aerated lung is in direct opposition to the pericardium, and the urinary bladder against the colon or thin body wall. See Chapter 3for more explanation and examples.
Читать дальшеИнтервал:
Закладка:
Похожие книги на «Point-of-Care Ultrasound Techniques for the Small Animal Practitioner»
Представляем Вашему вниманию похожие книги на «Point-of-Care Ultrasound Techniques for the Small Animal Practitioner» списком для выбора. Мы отобрали схожую по названию и смыслу литературу в надежде предоставить читателям больше вариантов отыскать новые, интересные, ещё непрочитанные произведения.


Обсуждение, отзывы о книге «Point-of-Care Ultrasound Techniques for the Small Animal Practitioner» и просто собственные мнения читателей. Оставьте ваши комментарии, напишите, что Вы думаете о произведении, его смысле или главных героях. Укажите что конкретно понравилось, а что нет, и почему Вы так считаете.