Point-of-Care Ultrasound Techniques for the Small Animal Practitioner
Здесь есть возможность читать онлайн «Point-of-Care Ultrasound Techniques for the Small Animal Practitioner» — ознакомительный отрывок электронной книги совершенно бесплатно, а после прочтения отрывка купить полную версию. В некоторых случаях можно слушать аудио, скачать через торрент в формате fb2 и присутствует краткое содержание. Жанр: unrecognised, на английском языке. Описание произведения, (предисловие) а так же отзывы посетителей доступны на портале библиотеки ЛибКат.
- Название:Point-of-Care Ultrasound Techniques for the Small Animal Practitioner
- Автор:
- Жанр:
- Год:неизвестен
- ISBN:нет данных
- Рейтинг книги:5 / 5. Голосов: 1
-
Избранное:Добавить в избранное
- Отзывы:
-
Ваша оценка:
Point-of-Care Ultrasound Techniques for the Small Animal Practitioner: краткое содержание, описание и аннотация
Предлагаем к чтению аннотацию, описание, краткое содержание или предисловие (зависит от того, что написал сам автор книги «Point-of-Care Ultrasound Techniques for the Small Animal Practitioner»). Если вы не нашли необходимую информацию о книге — напишите в комментариях, мы постараемся отыскать её.
New chapters in
cover ultrasound-guided nerve blocks, musculoskeletal, brain imaging, and applications of focused ultrasound techniques in cats, exotics and marine mammals—making it an essential purchase for veterinarians wanting to incorporate point-of-care ultrasound techniques into their veterinary practices.
Presents a standardized approach to point-of-care ultrasound as an extension of the physical exam, including trauma, non-trauma, and monitoring applications Includes coverage of new techniques for focused ultrasound exams, including lung, anesthesia and ultrasound guided nerve blocks, transcranial brain imaging, musculoskeletal, volume status evaluation, and rapid assessment for treatable forms of shock Adds cats, exotic and wildlife mammals, and marine mammals to the existing canine coverage Emphasizes the integration of point-of-care ultrasound techniques for optimizing patient care and accurate patient assessment Offers access to a companion website with supplementary video clips showing many clinically relevant didactic examples The second edition of
is an excellent resource for veterinary practitioners, ranging from the general practitioner to nearly all clinical specialists, including internal medicine, oncology, cardiology, emergency and critical care, anesthesiology, ophthalmology, exotics, and zoo medicine specialists, and veterinary students.
Point-of-Care Ultrasound Techniques for the Small Animal Practitioner — читать онлайн ознакомительный отрывок
Ниже представлен текст книги, разбитый по страницам. Система сохранения места последней прочитанной страницы, позволяет с удобством читать онлайн бесплатно книгу «Point-of-Care Ultrasound Techniques for the Small Animal Practitioner», без необходимости каждый раз заново искать на чём Вы остановились. Поставьте закладку, и сможете в любой момент перейти на страницу, на которой закончили чтение.
Интервал:
Закладка:
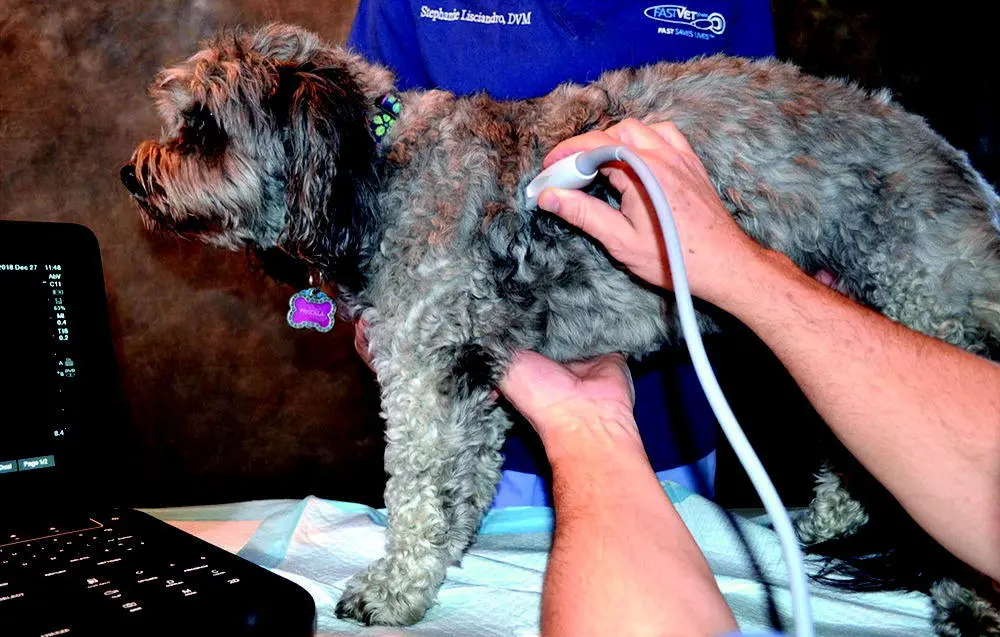
Figure 5.7. V trough your patient with your nonprobe helper hand. Your nonprobe helper hand is used as a V trough to keep your patient from swaying and maintaining probe to skin contact. Every time you lose contact, you potentially lose your good acoustic window and precious time. As much as possible, keep all four legs of your patient on the table.
Source: Courtesy of Dr Gregory Lisciandro, Hill Country Veterinary Specialists and FASTVet.com, Spicewood, TX.
Third, as often as possible, let the patient have all four legs on the exam tabletop (see Figures 5.4and 5.7). The only time a three‐legged approach is mandatory is for the Vet BLUE cranial lung region for defining the cranial transition zone of soft tissue of the neck and then sliding caudally to image the first three intercostal spaces. Most of the time, the standing TFAST PCS views and imaging the heart may be done with all four legs on the exam table. By this approach, the patient is not swaying and feels more secure than lifting and extending a foreleg off the table. Fourth, when lifting and extending a foreleg, we lift and extend near the patient's elbow, especially for dogs. Many dogs do not like their paws being handled and associate it with the unpleasant experience of having their nails trimmed ( Figure 5.8). Thus, by handling the paws, your patient becomes restless, wary, and tachycardic and may try to bite you!
Other Probe–Skin Contact Issues
Not Being Aware of Drifting
Drifting is the phenomenon of looking intensely at the ultrasound screen and not realizing that the weight of your hand and gravity has taken you to a place where no man (or woman) has gone before – a bit of an exaggeration which will hopefully help you remember this very common mistake. The Star Trek phrase sounds funny but you started at the costal arch and hypaxial muscles looking for the left kidney, not realizing the probe has made it to the midline at the umbilicus (by drifting). No wonder you cannot find the left kidney! If you double‐check yourself by frequently looking at the screen and then at the probe's external location on your patient, you will get to where you want to go much faster! This also occurs commonly while performing Vet BLUE in standing patients. You think you are at the Caudodorsal Vet BLUE lung region but the weight of your hand has brought you close to the Middle Vet BLUE lung region.
The best way to prevent drifting is to routinely “kickstand” out a finger that solidly touches your patient’s body wall (or have another comfortable part of your hand against the patient's body wall) ( Figure 5.9).
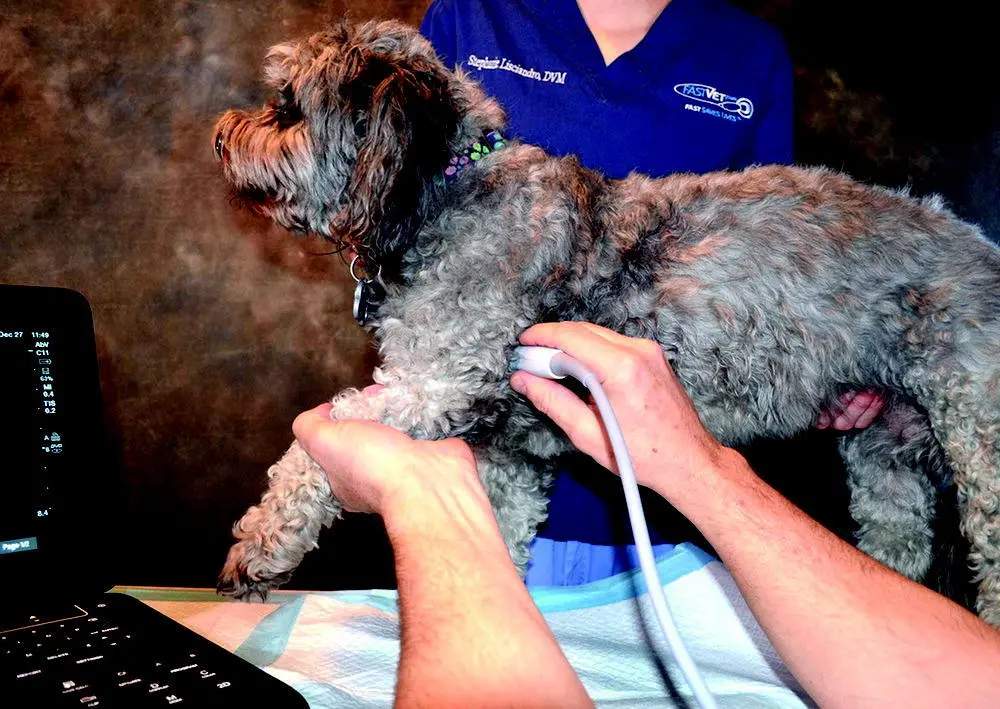
Figure 5.8. When extending the foreleg, don’t touch the paw! Gently extend the foreleg with your helper hand placed near the elbow and away from the paw. The paw is sensitive and you may create an uncooperative patient (e.g., may bite, may become resistant to restraint, may become tachycardic) by triggering a negative response. Stay near the elbow. Shown is the acquisition of the right Vet BLUE cranial lung region view.
Source: Courtesy of Dr Gregory Lisciandro, Hill Country Veterinary Specialists and FASTVet.com, Spicewood, TX.
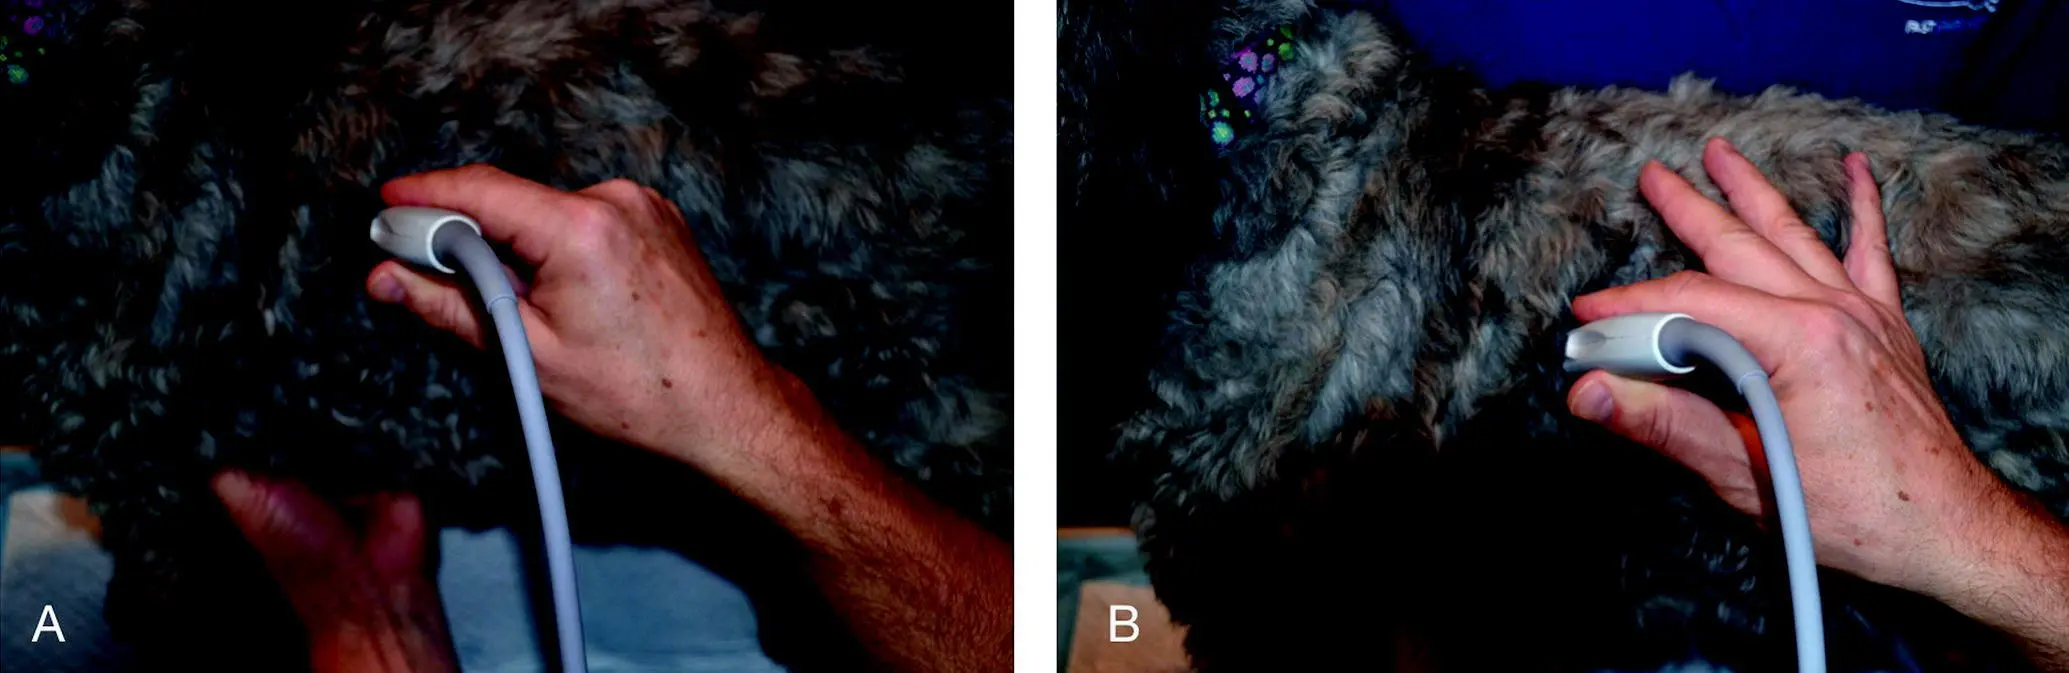
Figure 5.9. “Kickstand” your probe hand to prevent drifting. Having some part of your probe hand in contact with the patient will prevent drifting, which is when the sonographer is focused on the screen and unaware that the weight of their probe hand has moved the probe to a different acoustic window. In (A) the probe hand is not braced against the patient, so the sonographer is susceptible to drifting. In (B) the fingers are comfortably spread in contact with the patient's body, thus preventing drifting. Common views for drifting are especially during Vet BLUE and the least gravity‐dependent SR and HR views.
Source: Courtesy of Dr Gregory Lisciandro, Hill Country Veterinary Specialists and FASTVet.com, Spicewood, TX.
Not Checking Where the Probe is Externally on the Patient
This is really Part 2 of the previous paragraph. A few years ago, while I was performing Global FAST imaging on dolphins, the concept proved most helpful. Without goggles showing the ultrasound screen, two people were needed for imaging – one on the dock monitoring the ultrasound screen and directing the sonographer who was in the water with the dolphin, unable to see the ultrasound screen. Paying attention to external landmarks helped guide the sonographer to the AFAST target organs (and all of Global FAST) efficiently and confidently.
The same holds true with our small animal and exotic patients. Pay attention to where the probe is externally on your patient, double‐checking between the ultrasound screen and the probe's external location. Look at your patient! For example, if you can't find the urinary bladder then slide toward the patient’s pubis slightly off midline in lateral recumbency or along midline when standing or sternal. Some other examples – the gallbladder is right of midline in both dogs and cats so the probe has to be directed to that side of your patient; the TFAST chest tube site (CTS) view generally takes you to the caudodorsal transition zone, thus helping to prevent mistaking abdominal structures for lung pathology; and the kidneys are close to the caudal vena cava and aorta attached by their short renal artery and veins.
Not Visualizing the Path of the Beam from the Probe Head
Mental visualization of success prior to a motor skill performance such as an athletic event is important and so is mentally visualizing the path of the ultrasound beam from the probe head ( Figure 5.10). To get the “cardiac bump” at the diaphragmatico‐hepatic (DH) view, the probe's beam must be directed toward the muscular apex of the heart which requires the probe being rocked far cranially and the beam approximating being parallel to the sternum. The AFAST CC pouch is in the most gravity‐dependent region of that view so the probe should be directed toward the tabletop (when in lateral recumbency), not at the spine! Visualizing the direction in which the ultrasound beam is projecting from the probe head will contribute to your imaging success, save time, and build confidence in locating structures of interest.
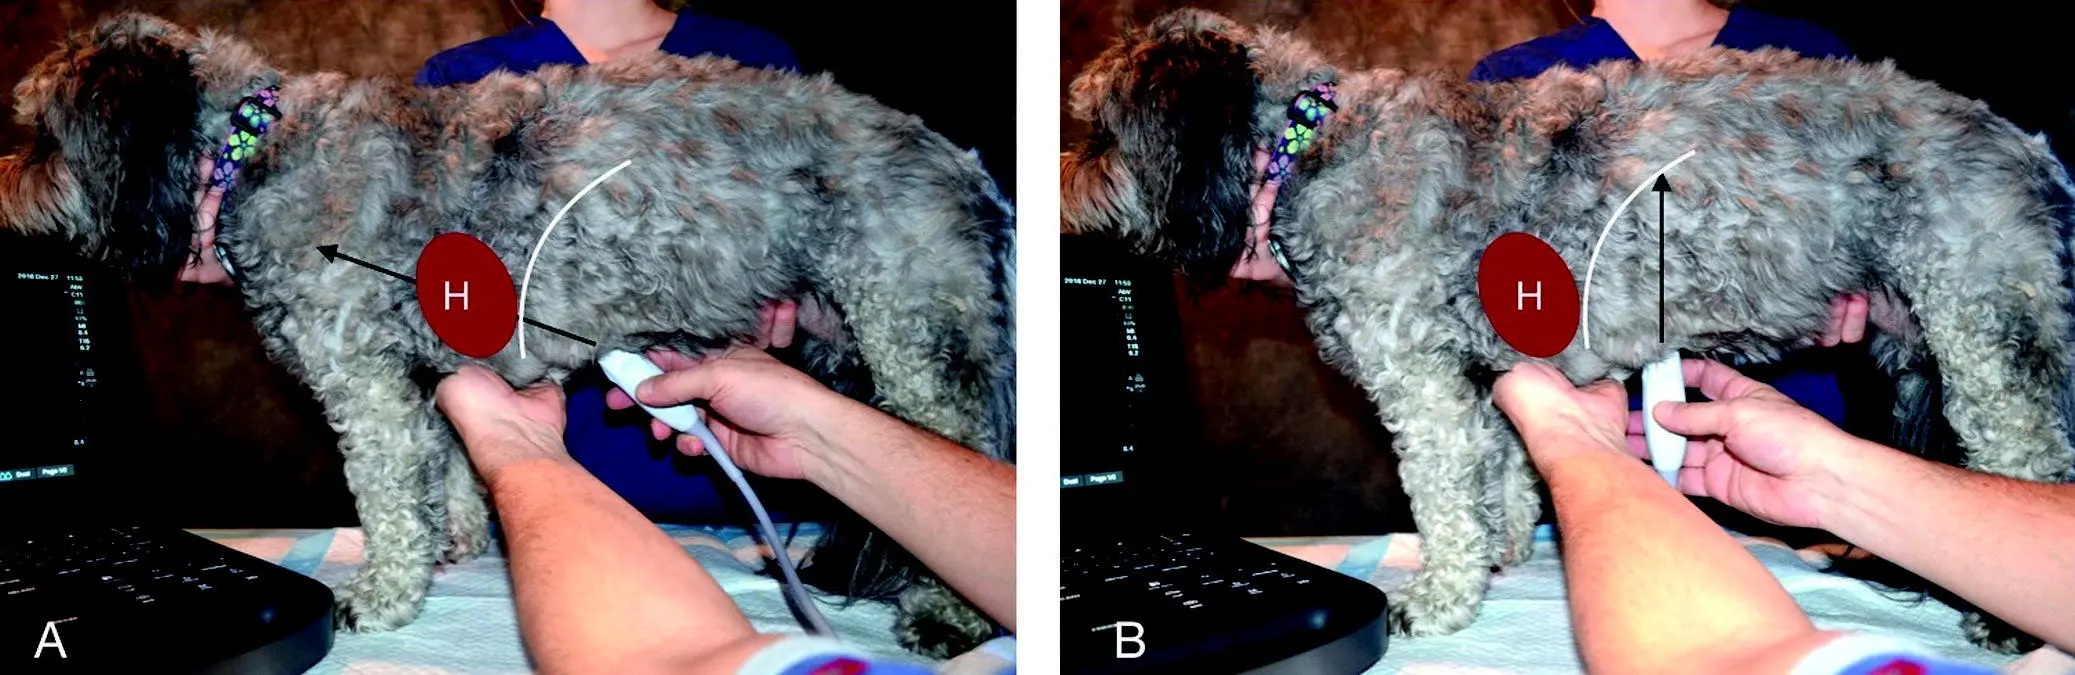
Figure 5.10. Paying attention to the direction of the beam. If the sonographer is to image the heart and its cardiac bump at the DH view, then the beam must be directed where the heart would be. In (A) the beam is directed in the correct direction whereas in (B) the heart will never be imaged. The "H" and red oval represent the heart; the black arrow the ultrasound beam; and the white curved line the diaphragm.
Source: Courtesy of Dr Gregory Lisciandro, Hill Country Veterinary Specialists and FASTVet.com, Spicewood, TX.
Losing Track of the Probe Orientation Marker
Make it a habit to have a finger or thumb on the probe marker or be able to clearly see the probe marker ( Figure 5.11). It is easy to lose track of the probe marker without making this habitual while imaging. It not only helps with orientation but also prevents creating confusing planes through structures by the sonographer's awareness of being in longitudinal, sagittal, transverse, and short‐ and long‐axis planes. Moreover, keep the screen orientation marker to the left so you maintain the “head to the left, tail to the right” orientation, which is the same as radiography (see Figure 1.6).
Читать дальшеИнтервал:
Закладка:
Похожие книги на «Point-of-Care Ultrasound Techniques for the Small Animal Practitioner»
Представляем Вашему вниманию похожие книги на «Point-of-Care Ultrasound Techniques for the Small Animal Practitioner» списком для выбора. Мы отобрали схожую по названию и смыслу литературу в надежде предоставить читателям больше вариантов отыскать новые, интересные, ещё непрочитанные произведения.


Обсуждение, отзывы о книге «Point-of-Care Ultrasound Techniques for the Small Animal Practitioner» и просто собственные мнения читателей. Оставьте ваши комментарии, напишите, что Вы думаете о произведении, его смысле или главных героях. Укажите что конкретно понравилось, а что нет, и почему Вы так считаете.