Point-of-Care Ultrasound Techniques for the Small Animal Practitioner
Здесь есть возможность читать онлайн «Point-of-Care Ultrasound Techniques for the Small Animal Practitioner» — ознакомительный отрывок электронной книги совершенно бесплатно, а после прочтения отрывка купить полную версию. В некоторых случаях можно слушать аудио, скачать через торрент в формате fb2 и присутствует краткое содержание. Жанр: unrecognised, на английском языке. Описание произведения, (предисловие) а так же отзывы посетителей доступны на портале библиотеки ЛибКат.
- Название:Point-of-Care Ultrasound Techniques for the Small Animal Practitioner
- Автор:
- Жанр:
- Год:неизвестен
- ISBN:нет данных
- Рейтинг книги:5 / 5. Голосов: 1
-
Избранное:Добавить в избранное
- Отзывы:
-
Ваша оценка:
Point-of-Care Ultrasound Techniques for the Small Animal Practitioner: краткое содержание, описание и аннотация
Предлагаем к чтению аннотацию, описание, краткое содержание или предисловие (зависит от того, что написал сам автор книги «Point-of-Care Ultrasound Techniques for the Small Animal Practitioner»). Если вы не нашли необходимую информацию о книге — напишите в комментариях, мы постараемся отыскать её.
New chapters in
cover ultrasound-guided nerve blocks, musculoskeletal, brain imaging, and applications of focused ultrasound techniques in cats, exotics and marine mammals—making it an essential purchase for veterinarians wanting to incorporate point-of-care ultrasound techniques into their veterinary practices.
Presents a standardized approach to point-of-care ultrasound as an extension of the physical exam, including trauma, non-trauma, and monitoring applications Includes coverage of new techniques for focused ultrasound exams, including lung, anesthesia and ultrasound guided nerve blocks, transcranial brain imaging, musculoskeletal, volume status evaluation, and rapid assessment for treatable forms of shock Adds cats, exotic and wildlife mammals, and marine mammals to the existing canine coverage Emphasizes the integration of point-of-care ultrasound techniques for optimizing patient care and accurate patient assessment Offers access to a companion website with supplementary video clips showing many clinically relevant didactic examples The second edition of
is an excellent resource for veterinary practitioners, ranging from the general practitioner to nearly all clinical specialists, including internal medicine, oncology, cardiology, emergency and critical care, anesthesiology, ophthalmology, exotics, and zoo medicine specialists, and veterinary students.
Point-of-Care Ultrasound Techniques for the Small Animal Practitioner — читать онлайн ознакомительный отрывок
Ниже представлен текст книги, разбитый по страницам. Система сохранения места последней прочитанной страницы, позволяет с удобством читать онлайн бесплатно книгу «Point-of-Care Ultrasound Techniques for the Small Animal Practitioner», без необходимости каждый раз заново искать на чём Вы остановились. Поставьте закладку, и сможете в любой момент перейти на страницу, на которой закончили чтение.
Интервал:
Закладка:
Using More than One Probe Maneuver at a Time
One of the main rules of imaging is only performing one probe maneuver at a time . The five major maneuvers are rocking, fanning, rotating, sliding, sweeping and pressure/compression (see Figures 4.5– 4.11). Performing only a single maneuver at a time while optimizing your image should become habitual. When you perform multiple maneuvers at the same time, you are really doodling and nothing productive typically results. This is very common with “flashing” the abdomen, thorax, and lung (see Preface). We strongly discourage flashing but rather stick with the exact clarity of the 15 acoustic windows of Global FAST.
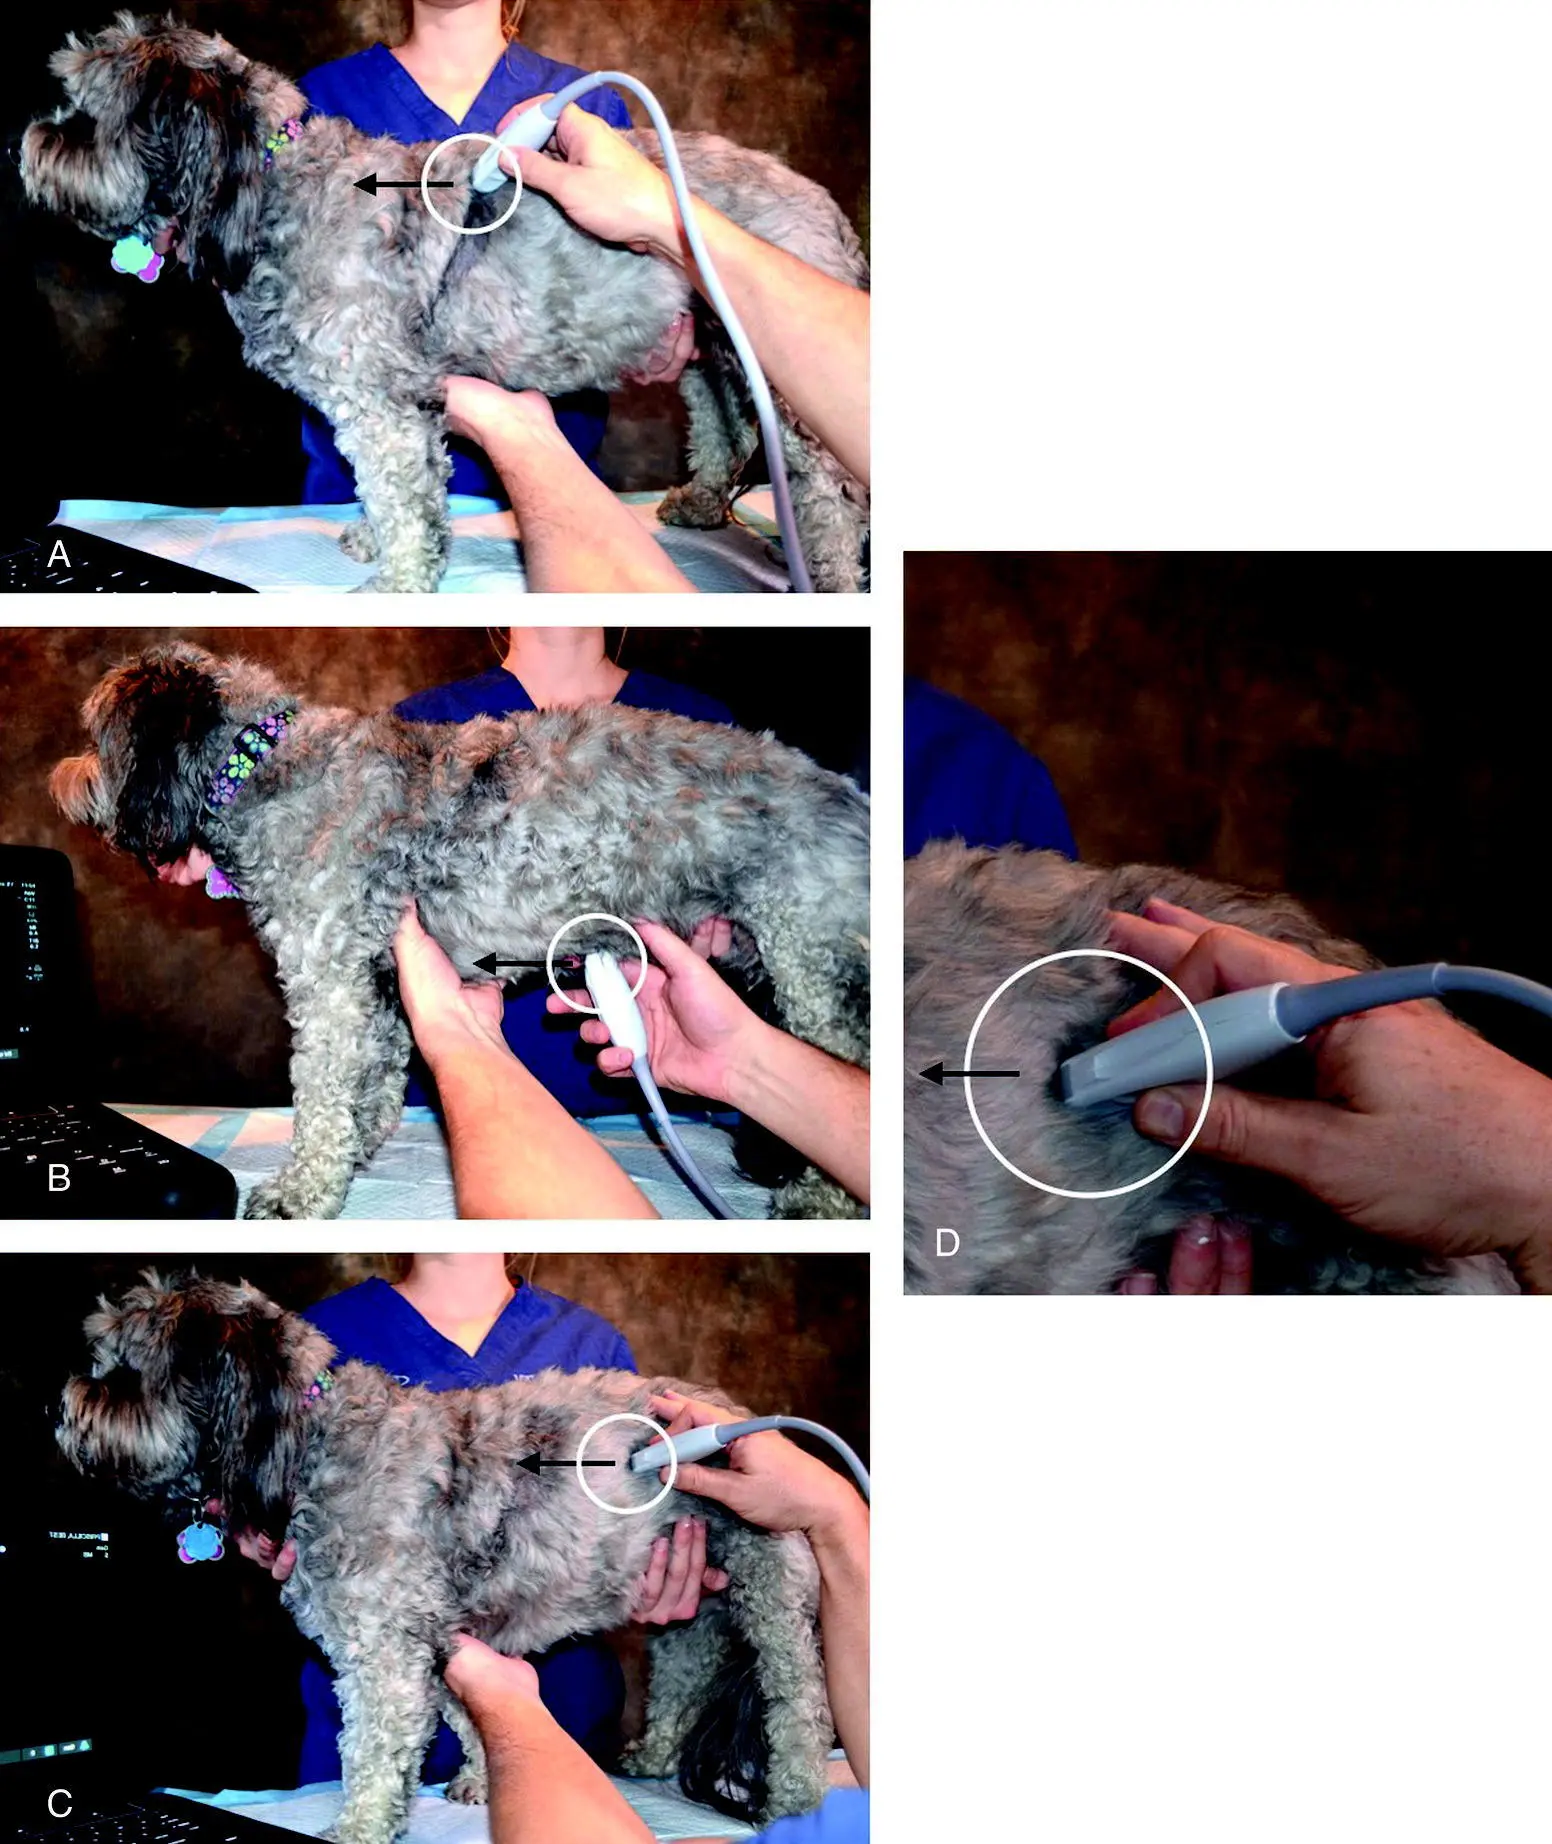
Figure 5.11. Be aware of the probe marker. Every probe has a marker or notch that serves as its orientation marker. Always keep track of the marker and when in longitudinal or sagittal orientation, keep it directed toward the patient’s head. Getting into the habit of holding the probe with your index finger or thumb on the marker or be able to clearly see the probe marker keeps you from making mistakes and getting confused during image acquisition and interpretation. Screen orientation is also important (see Figure 1.6).
Source: Courtesy of Dr Gregory Lisciandro, Hill Country Veterinary Specialists and FASTVet.com, Spicewood, TX.
Ultrasound Machine Optimization
A trouble‐shooting algorithm is provided that incorporates the following major image optimization features of your machine (see Figure 5.15).
Failing to be Aware of the Focus Cursor
The position of the focus cursor can have profound effects on image quality ( Figure 5.12). Most sonographers are familiar with gain, and its effect on making the image brighter or darker; and frequency, lower for better imaging of the larger patient and higher for more detail and imaging the smaller patient. However, the focus cursor is often forgotten. It is usually an arrow or an icon that moves along the centimeter scale. It can be increased from one to two or three or more on some machines, but generally it’s best to have only one, a single focus cursor, on your screen. Think of it as when having more focus cursors than just one, you are dividing up the energy in your ultrasound beam and the image will not be as high quality as a result.
The focus cursor should be directly across from the area or region of interest. A common mistake is moving the focus cursor to the “lung line” during Vet BLUE and then leaving the cursor in the very near‐field when you then image deeper thoracic, like heart, and abdominal structures. The deeper structures will often not look good no matter what you do to the gain and frequency until you move the focus cursor back to the center of the screen . Conversely, you may have the focus cursor in the center of the screen while imaging abdominal and thoracic structures that may be less than optimum for lung, in which the focus cursor placed in the near‐field across from the “lung line” could make a big difference in image quality (see Chapters 22and 23). In some machines, the focus cursor actually moves on its own as depth settings are changed, and it may move to a less than optimal level within your image, so learn what your machine does to the focus cursor when you change the depth.
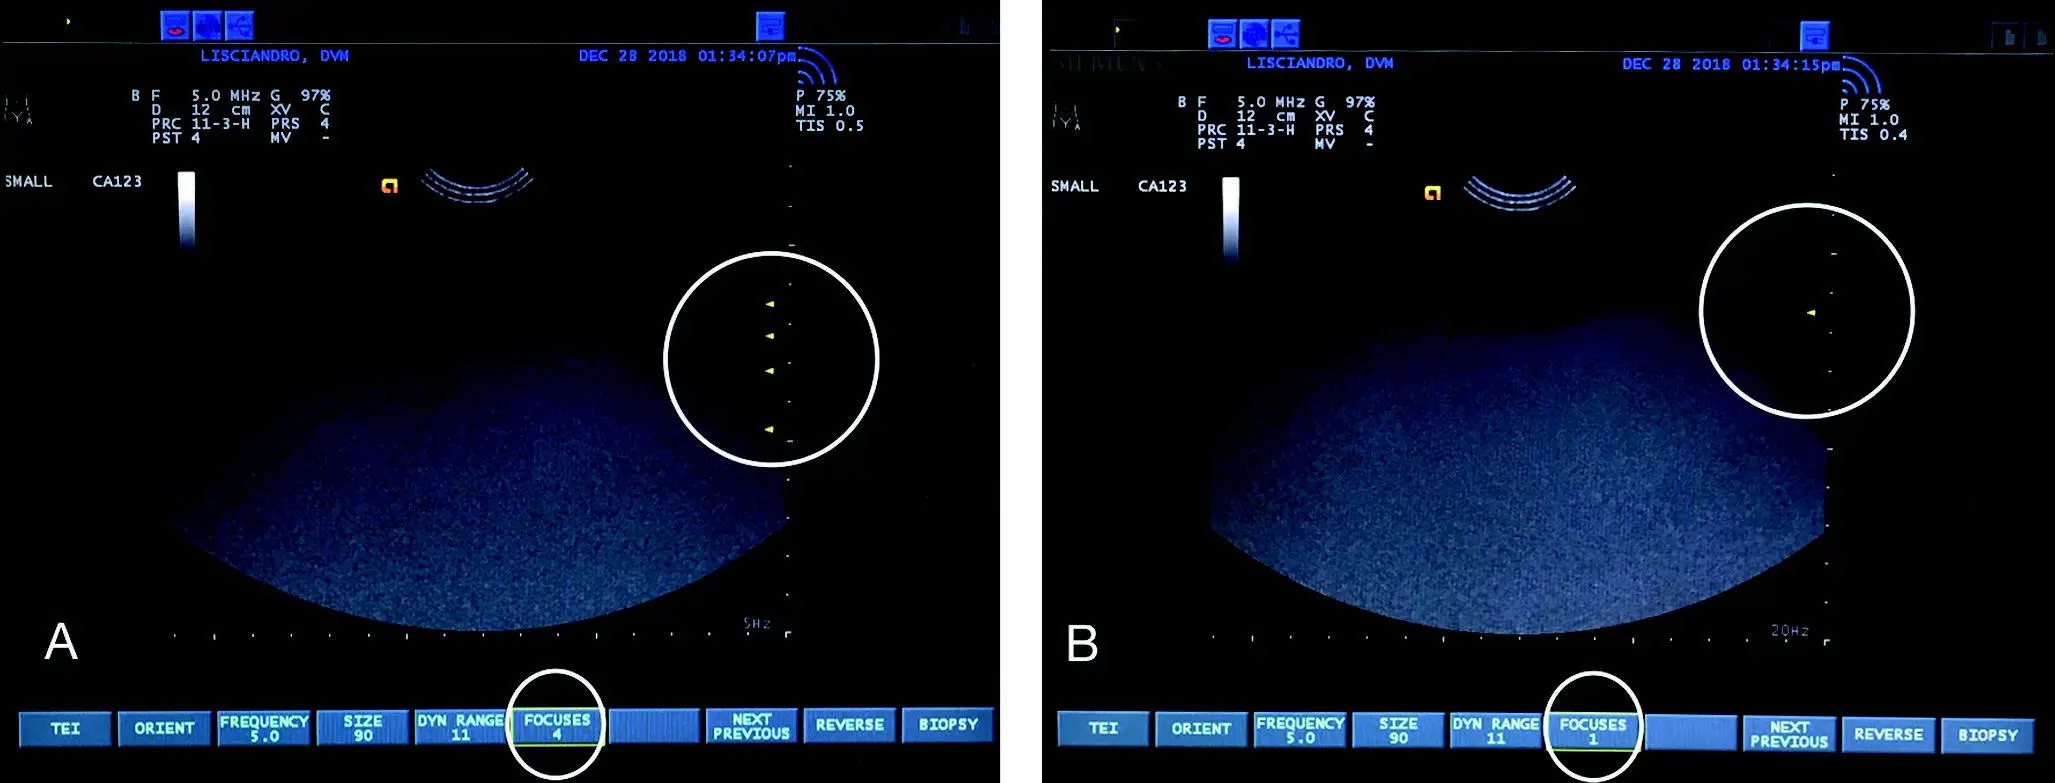
Figure 5.12. Focus cursor and depth. In (A) there are four focus cursors ( upper right circle ) and in (B) a single focus cursor ( upper right circle ). The best image is usually obtained by having a single focus cursor directly across from the area of interest so generally in the middle of the screen, unless imaging the lung in which a position directly across from the "lung line" is best. The number of focus cursors on this machine is also noted at the bottom of the screen ( circled ).
Source: Courtesy of Dr Gregory Lisciandro, Hill Country Veterinary Specialists and FASTVet.com, Spicewood, TX.
Not Paying Attention to the Centimeter Scale
Every machine has a centimeter (cm) scale ( Figure 5.13). Be familiar with where the maximum depth is on the screen, and how the marks are set up – as one hash mark every centimeter or are the hash marks every 5 mm or even every 2.5 mm? This will help you to locate the area of interest; for example, starting the FAST DH (subxiphoid) view at a depth of 5 cm even in medium‐sized dogs is too superficial (shallow or magnified) and won't properly image the diaphragm and gallbladder. The wise sonographer knows to start with a depth between 9 and 13 cm, get a feel for the four DH targets – diaphragm, gallbladder, cardiac bump, and caudal vena cava – and then magnify (decrease depth) once the targeted structures are identified from afar (see Chapters 6and 7). On the other hand, lung is imaged at more shallow depths between 4 and 8 cm for smaller and larger patients, respectively.
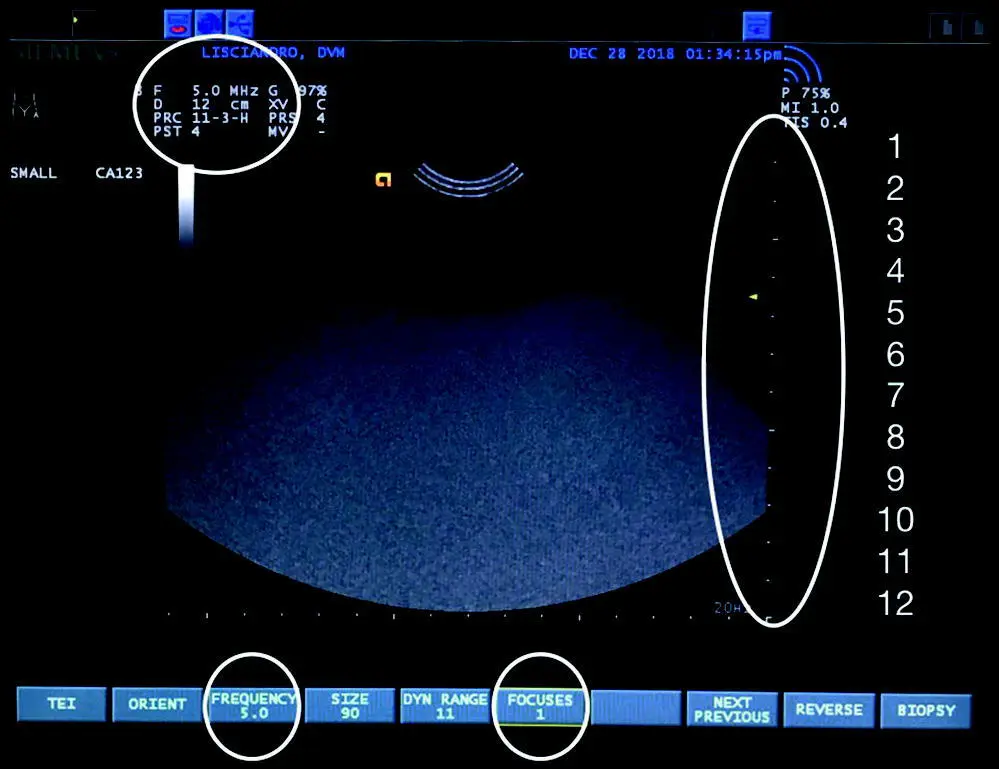
Figure 5.13. Depth setting and the centimeter scale. The image is the same as Figure 5.12B with the focus cursor near center. The image has the centimeter scale to the right of the screen and then added numbers by the author for the depth of 12 cm. See how the hash marks correlate with 1 cm increments. Every ultrasound screen has a centimeter scale. Individual hash marks are often 1 cm (10 mm) on abdominal presets but can be every 0.5 cm (5 mm) or less. Find your cm scale and be aware of its depth scale. The screen itself has the depth (cm) and frequency (5 MHz), circled upper left and also at the screen's bottom along with number of focus cursors (1), plus other parameters noted (including the preset). Take the time to look over all the information provided on your machine's screen.
Source: Courtesy of Dr Gregory Lisciandro, Hill Country Veterinary Specialists and FASTVet.com, Spicewood, TX.
Not Using the Centimeter Scale
What looks really large on ultrasound may in fact be quite small. This is especially true with pleural effusion that looks like a lot on ultrasound but the maximum dimension is only 2 cm (or less than an inch), and merely a fissure line on the thoracic radiograph (TXR) or is missed altogether by TXR. As for masses, the seemingly large splenic mass that deforms the spleen, a serious finding, is really only 3 × 3 × 3 cm (or approximately 1¼ × 1¼ × 1¼ inches), easily missed by palpation during your physical exam and on abdominal radiography; and the lung lesion that appears so obvious is in fact a mere few millimeters (<1/3 inch) being missed or occult by thoracic radiography (and possibly CT) ( Figure 5.14). Don't get me wrong, these findings may have a significant clinical bearing on your case, but a small pocket of pleural effusion in a stable case requires a calm and collected mind for decision making, and not overresponding.
Pearls: Trouble Shooting a Poor Image
See the trouble‐shooting algorithm ( Figure 5.15).
Check your frequency. In small dogs and cats, you can get away with higher frequencies such as 7–9 MHz; however, in large dogs (and other patients), the image will not be optimized until you lower the frequency to the 4–6 MHz range. You may have to change your preset, for example from small abdomen to medium or large abdomen, to change your frequency on some machines. Get used to looking at the frequency setting when starting to image the patient (see Figure 5.13).
Читать дальшеИнтервал:
Закладка:
Похожие книги на «Point-of-Care Ultrasound Techniques for the Small Animal Practitioner»
Представляем Вашему вниманию похожие книги на «Point-of-Care Ultrasound Techniques for the Small Animal Practitioner» списком для выбора. Мы отобрали схожую по названию и смыслу литературу в надежде предоставить читателям больше вариантов отыскать новые, интересные, ещё непрочитанные произведения.


Обсуждение, отзывы о книге «Point-of-Care Ultrasound Techniques for the Small Animal Practitioner» и просто собственные мнения читателей. Оставьте ваши комментарии, напишите, что Вы думаете о произведении, его смысле или главных героях. Укажите что конкретно понравилось, а что нет, и почему Вы так считаете.