Barbara Obermeier - Photoshop Elements 2022 For Dummies
Здесь есть возможность читать онлайн «Barbara Obermeier - Photoshop Elements 2022 For Dummies» — ознакомительный отрывок электронной книги совершенно бесплатно, а после прочтения отрывка купить полную версию. В некоторых случаях можно слушать аудио, скачать через торрент в формате fb2 и присутствует краткое содержание. Жанр: unrecognised, на английском языке. Описание произведения, (предисловие) а так же отзывы посетителей доступны на портале библиотеки ЛибКат.
- Название:Photoshop Elements 2022 For Dummies
- Автор:
- Жанр:
- Год:неизвестен
- ISBN:нет данных
- Рейтинг книги:5 / 5. Голосов: 1
-
Избранное:Добавить в избранное
- Отзывы:
-
Ваша оценка:
Photoshop Elements 2022 For Dummies: краткое содержание, описание и аннотация
Предлагаем к чтению аннотацию, описание, краткое содержание или предисловие (зависит от того, что написал сам автор книги «Photoshop Elements 2022 For Dummies»). Если вы не нашли необходимую информацию о книге — напишите в комментариях, мы постараемся отыскать её.
Photoshop Elements 2022 For Dummies
Photoshop Elements 2022 For Dummies — читать онлайн ознакомительный отрывок
Ниже представлен текст книги, разбитый по страницам. Система сохранения места последней прочитанной страницы, позволяет с удобством читать онлайн бесплатно книгу «Photoshop Elements 2022 For Dummies», без необходимости каждый раз заново искать на чём Вы остановились. Поставьте закладку, и сможете в любой момент перейти на страницу, на которой закончили чтение.
Интервал:
Закладка:
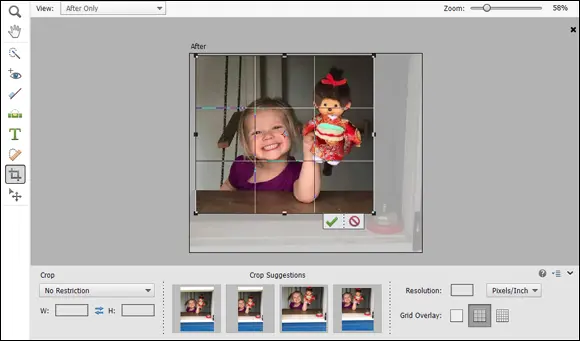
FIGURE 1-4:The Crop tool sized on a photo.
Sharing a Photo
After you edit your photo, you can print the photo to share with family and friends or post the photo on a social network site.
In earlier versions of Elements, you could upload directly from within Facebook. In more recent versions, you need to edit the file, save it, and then open your Facebook account to upload the file. Here’s how to do it:
1 Prepare the photo you want to upload to Facebook.Typically, digital cameras take photos sized very large — too large for an image that your friends and family will want to download quickly and view via Facebook on a computer screen or mobile device. To adjust your image so that it’s the right size and resolution for viewing online, follow these steps:Choose Image ⇒ Resize ⇒ Image Size.In the Image Size dialog box that appears, enter your desired width (or height).Either Width or Height is fine because the image will maintain correct proportions by choosing either. A width of 720 pixels, 960 pixels, or 2,048 pixels works well. Facebook recommends that supported sizes for regular photos are widths of 720 pixels, 960 pixels, and 2,048 pixels, with file sizes no more than 100KB — especially if you have text in the cover photo. When you save as JPEG, the files are compressed, and you’ll find the larger size to be within Facebook recommendations. However, you don’t have to be too concerned about staying within Facebook recommendations. You can upload images much larger than 100KB, but the uploads and screen refreshes will take longer. Just be certain to stay within 100 KB if you have text on a cover photo.Select the Resample Image check box if for some reason the box is not selected.Type either 72 or 144 in the Resolution box.For screen viewing only, 72 ppi is fine. However, if you want your friends to print the image, 144 is a better choice. You can use either resolution. Be sure the file size is no larger than 100KB.The image is sized to a workable size for Facebook. Click OK when finished editing in the Image Size dialog box.
2 Choose File ⇒ Save As ⇒ JPEG to save the file as a JPEG.Note the location where you save the file on your hard drive. (JPEG is one of many file formats that Elements supports.)
3 Log in to your Facebook account.
4 Click Photo/Video.Locate the saved file and upload it to Facebook.Your photo is added to your Facebook account, as shown in Figure 1-5.
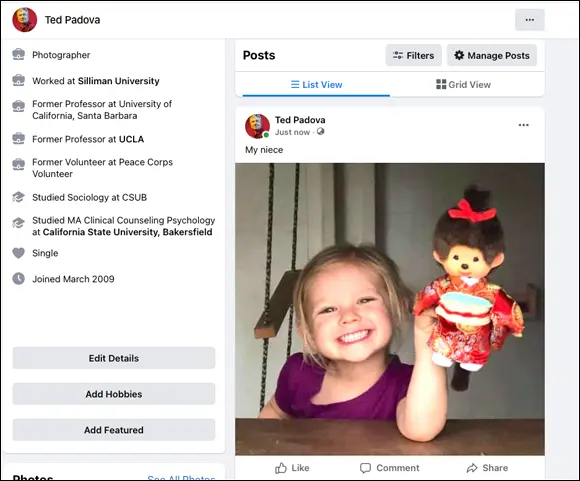
FIGURE 1-5:An edited photo uploaded to Facebook.
Retracing Your Steps
In Elements, Undo is a favorite command for both beginners and experienced users alike. If you don’t like a change to your image, you simply choose Edit ⇒ Undo or press the keyboard shortcut Ctrl+Z (⌘ +Z on the Mac).
Because the process of trial and error (and thus the ability to undo your work) is so important to making your image look just right, Elements also offers ways to undo that are much more sophisticated than simply reverting to the last view. In the following sections, we introduce you to these more sophisticated tools.
Using the History panel
On the History panel, you see a record of your changes in an editing session. And from this record, you can undo your changes from any step in an editing sequence. To work with the History panel, you must be in Expert mode. After you click Expert at the top of the Photo Editor, here’s how undoing with the History panel works:
1 Click Expert in the Photo Editor and choose Window ⇒ History.The History panel displays a record of each step you made in the current editing session, as shown in Figure 1-6.
2 To undo one or more edits, click any item on the History panel.Elements reverts your image to that last edit. All edits that follow the selected item are grayed out.
3 If you want to bring back the edits, click any grayed-out step on the panel.Elements reinstates your edits up to that level. If you make a new edit after going back a few steps, the grayed-out steps disappear.
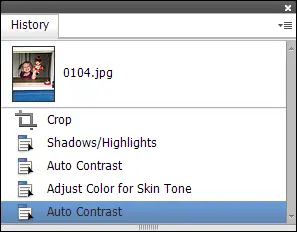
FIGURE 1-6:The History panel.
 All your steps are listed on the History panel if you remain in Elements and don’t close the file. When the file is closed, all history information is lost.
 Storing all this editing history can affect Elements’ performance. If your computer slows to a snail’s pace when you’re using Elements, check out the following options:
Choose Edit ⇒ Clear ⇒ Clear History. Elements flushes all the recorded history and frees some precious memory, which often enables you to work faster. Just be sure you’re okay with losing all the history in the History panel thus far.
Eliminate Clipboard data from memory. To do so, choose Edit ⇒ Clear ⇒ Clipboard Contents or Edit ⇒ Clear ⇒ All.
Restore the number of history states stored to the default of 50. In Elements Performance Preferences, you can change the number of history states. You can ratchet this number up to 1,000 if you like, but realize that the more history states you record, the more memory Elements requires.
Reverting to the last save
While you edit photos in Elements, plan on saving your work regularly. Each time you save in an editing session, the History panel preserves the list of edits you make until you hit the maximum number or close the file.
If you save, perform more edits, and then want to return to the last saved version of your document, Elements provides you with a quick, efficient way to do so. If you choose Edit ⇒ Revert, Elements eliminates your new edits and takes you back to the last time you saved your file.
When you choose Revert, Revert appears in the History panel. You can eliminate the Revert command from the History panel by right-clicking (Windows) or Ctrl-clicking (on a Mac with a one-button mouse) the Revert item and choosing Delete from the contextual menu that appears.
Getting a Helping Hand
You probably bought this book because you’re not a fan of sifting through Help files and want an expert guide to image editing. We share everything a beginner needs to get started in Elements, but Elements is too sophisticated a program to cover completely in the pages we have here. You may also need some quick help if you don’t have this book nearby.
Whenever you need a hand, know that you can find valuable help information quickly and easily within Elements itself. If you’re stuck on understanding a feature, ample help documents are only a mouse click away and can help you overcome some frustrating moments.
Your first stop is the Help menu, where you can find several commands that offer information:
Photoshop Elements Help: Choose Help ⇒ Photoshop Elements Help or press the F1 key (Windows) or the Help key (on a Mac with an extended keyboard) to open the Elements Help file. You can type a search topic and press Enter to display a list of search results.
Читать дальшеИнтервал:
Закладка:
Похожие книги на «Photoshop Elements 2022 For Dummies»
Представляем Вашему вниманию похожие книги на «Photoshop Elements 2022 For Dummies» списком для выбора. Мы отобрали схожую по названию и смыслу литературу в надежде предоставить читателям больше вариантов отыскать новые, интересные, ещё непрочитанные произведения.


Обсуждение, отзывы о книге «Photoshop Elements 2022 For Dummies» и просто собственные мнения читателей. Оставьте ваши комментарии, напишите, что Вы думаете о произведении, его смысле или главных героях. Укажите что конкретно понравилось, а что нет, и почему Вы так считаете.