Barbara Obermeier - Photoshop Elements 2022 For Dummies
Здесь есть возможность читать онлайн «Barbara Obermeier - Photoshop Elements 2022 For Dummies» — ознакомительный отрывок электронной книги совершенно бесплатно, а после прочтения отрывка купить полную версию. В некоторых случаях можно слушать аудио, скачать через торрент в формате fb2 и присутствует краткое содержание. Жанр: unrecognised, на английском языке. Описание произведения, (предисловие) а так же отзывы посетителей доступны на портале библиотеки ЛибКат.
- Название:Photoshop Elements 2022 For Dummies
- Автор:
- Жанр:
- Год:неизвестен
- ISBN:нет данных
- Рейтинг книги:5 / 5. Голосов: 1
-
Избранное:Добавить в избранное
- Отзывы:
-
Ваша оценка:
Photoshop Elements 2022 For Dummies: краткое содержание, описание и аннотация
Предлагаем к чтению аннотацию, описание, краткое содержание или предисловие (зависит от того, что написал сам автор книги «Photoshop Elements 2022 For Dummies»). Если вы не нашли необходимую информацию о книге — напишите в комментариях, мы постараемся отыскать её.
Photoshop Elements 2022 For Dummies
Photoshop Elements 2022 For Dummies — читать онлайн ознакомительный отрывок
Ниже представлен текст книги, разбитый по страницам. Система сохранения места последней прочитанной страницы, позволяет с удобством читать онлайн бесплатно книгу «Photoshop Elements 2022 For Dummies», без необходимости каждый раз заново искать на чём Вы остановились. Поставьте закладку, и сможете в любой момент перейти на страницу, на которой закончили чтение.
Интервал:
Закладка:
 Finding help
Saving your files
Image editing is incredibly fun, especially with a tool like Photoshop Elements, which enables you to modify, combine, and even draw your own images to your imagination’s content. To get the most out of Elements, you need to understand some basic technical concepts, but like most people, you probably want to jump in, play around, and basically just get started right away.
You’re in luck: In Quick mode, Elements helps you make basic edits to your photos, like revealing your child’s face darkened by a baseball cap’s shadow or cropping out the gigantic trash can on the left edge of your otherwise perfect landscape shot. In this chapter, we help you jump-start your image-editing skills by guiding you through Quick mode and how to share photos online, retrace your steps, save your edits, and more.
Getting Familiar with the Home Screen
After installing Elements, launch the Elements application, and you arrive at the Home screen (or Hub, as Adobe calls it), shown in Figure 1-1.

FIGURE 1-1:The Photoshop Elements Home screen.
 From the Home screen, you have the following options:
Search (What would you like to do today?): At the top of the window, you can search for a task and have help returned to you (see the text at the top of the window where it reads: “What would you like to do today?”).
Instagram, Facebook, Twitter, and Help: At the top right, click one of the three respective buttons to share files on Instagram, Facebook, and Twitter. Click the fourth icon to get some help using Elements. Clicking Help takes you to a web link.
Try This/What’s New/Guided Edits/Make Creations: The individual cards appearing at the top of the Home screen offer options for trying different tasks, exploring features, performing a Guided Edit (Guided Edit is a step-by-step set of instructions to perform an edit), and a quick launch to make a new creation. When you mouse over a card, a link is shown where you perform the task in question.
Application Launcher: Click one of the three icons to launch the Elements Photo Editor, the Organizer, or Video Editor (Adobe Premier Elements must be installed to launch this item).
Recent Files: Click an image in the Recent Files list, and the file opens in the Photo Editor.
Launching the Photo Editor
Photoshop Elements has two separate components:
The Organizer is where you manage photos. It’s full of tools for tagging, rating, sorting, and finding your images. Part 2of this book helps you start using the Organizer.
The Photo Editor is where you correct photos for brightness and color, add effects, repair images, and so on.
In this chapter, you work in the Photo Editor to make basic edits to a photo.
Here’s how to start Elements and open the Photo Editor:
1 Double-click the Photoshop Elements shortcut on your desktop or in your Applications folder (Mac) to launch the Home screen.
2 Click the Photo Editor button shown in the Home screen (refer to Figure 1-1).The Photo Editor workspace loads and appears, as shown in Figure 1-2. By default, you see the Quick tab selected at the top of the Photo Editor workspace, which means you’re in Quick mode (or right where you want to be for the purposes of this chapter). Quick mode offers a limited number of tools for adjusting brightness, contrast, color, and sharpness.
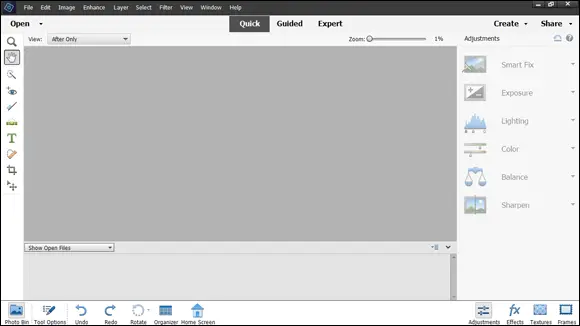
FIGURE 1-2:The default Photo Editor workspace with the Quick tab selected.
On the right side of the workspace, you see the Adjustments panel docked in an area dubbed the Panel Bin. When in any one of the three editing modes (Quick, Guided, Expert), you find different panels, always on the right side of the window. On the left side of the workspace, you see a Tools panel. Interacting with the items in the Panel Bin and using tools in the Tools panel provide you with an enormous number of options for editing, improving, and stylizing your pictures.
Making Basic Edits in Quick Mode
For beginning users, the Quick mode in the Photo Editor is both powerful and easy to use. Follow these steps to make some simple changes to an image:
1 Open the Photo Editor and make sure the Quick tab is selected at the top.
2 Choose File ⇒ Open or click the Open button at the top left of the Photo Editor.If Elements is your default editing application, you can also double-click your photo file in Windows Explorer or the Mac Finder, and the file opens in Elements.
3 In the Open dialog box that appears, navigate your hard drive to locate the file you want to open, select the file, and click Open.
4 From the View drop-down list (in the upper left of the image window), choose Before & After – Horizontal, as shown in Figure 1-3.
5 Make edits to your photo.Here’s an introduction to two simple edits you can make in Quick mode:Apply a Smart Fix: Click Smart Fix in the Panel Bin to see the options. To begin with, click Auto at the bottom of the Smart Fix panel. At the top left of the window, you find options for viewing by opening the drop-down menu. Choose After Only or choose Before & After (Horizontal or Vertical) to see before and after views.Several items are listed in the Panel Bin below the Smart Fix option. Click an item to expand it, and move the sliders or click the thumbnail images to tweak the overall brightness, contrast, and color. In many cases, there isn’t a right or wrong adjustment. Play with the options to bring it close to your overall vision for the picture. For a more in-depth look at correcting photos in Quick mode, flip to Chapter 10. FIGURE 1-3:The before and after views in Quick mode. Each of the Quick Fix options provides you with thumbnail previews showing you the result of a given edit. For a quick preview of an editing task, mouse over a Smart Fix thumbnail to see what the edit will look like when it is applied.Crop the photo: In the Tools panel on the left side of the window, click the Crop tool. You immediately see a rectangle on top of the photo. Drag the sides to crop the image to your liking. When finished, click the green check mark, as shown in Figure 1-4, to accept your edit. When making any one of a huge number of edits to your pictures, you often see icons on top of the image, similar to what’s shown in Figure 1-4. The green check mark accepts the edit you’re making at the time the icons appear. The circle with a diagonal line is the Cancel button. Click this button when you don’t want to apply the recent edit. At the bottom of the Editor window, you see some hints that Elements gives you for crop suggestions. Click one of the options to employ the respective crop.
6 Choose File ⇒ Save As and, in the Save As dialog box that opens, provide a new name for the photo. Click Save. Note: When you use Save As and give your image a new name, you don’t destroy your original image. You save a copy of the original with the new edits applied. For more on saving files, see the section “ Saving Files with Purpose,” later in this chapter.
Читать дальшеИнтервал:
Закладка:
Похожие книги на «Photoshop Elements 2022 For Dummies»
Представляем Вашему вниманию похожие книги на «Photoshop Elements 2022 For Dummies» списком для выбора. Мы отобрали схожую по названию и смыслу литературу в надежде предоставить читателям больше вариантов отыскать новые, интересные, ещё непрочитанные произведения.


Обсуждение, отзывы о книге «Photoshop Elements 2022 For Dummies» и просто собственные мнения читателей. Оставьте ваши комментарии, напишите, что Вы думаете о произведении, его смысле или главных героях. Укажите что конкретно понравилось, а что нет, и почему Вы так считаете.