Sara Perrott - Windows Server 2022 & Powershell All-in-One For Dummies
Здесь есть возможность читать онлайн «Sara Perrott - Windows Server 2022 & Powershell All-in-One For Dummies» — ознакомительный отрывок электронной книги совершенно бесплатно, а после прочтения отрывка купить полную версию. В некоторых случаях можно слушать аудио, скачать через торрент в формате fb2 и присутствует краткое содержание. Жанр: unrecognised, на английском языке. Описание произведения, (предисловие) а так же отзывы посетителей доступны на портале библиотеки ЛибКат.

- Название:Windows Server 2022 & Powershell All-in-One For Dummies
- Автор:
- Жанр:
- Год:неизвестен
- ISBN:нет данных
- Рейтинг книги:3 / 5. Голосов: 1
-
Избранное:Добавить в избранное
- Отзывы:
-
Ваша оценка:
Windows Server 2022 & Powershell All-in-One For Dummies: краткое содержание, описание и аннотация
Предлагаем к чтению аннотацию, описание, краткое содержание или предисловие (зависит от того, что написал сам автор книги «Windows Server 2022 & Powershell All-in-One For Dummies»). Если вы не нашли необходимую информацию о книге — напишите в комментариях, мы постараемся отыскать её.
Windows Server 2022 & PowerShell All-in-One For Dummies
Windows Server 2022 & Powershell All-in-One For Dummies — читать онлайн ознакомительный отрывок
Ниже представлен текст книги, разбитый по страницам. Система сохранения места последней прочитанной страницы, позволяет с удобством читать онлайн бесплатно книгу «Windows Server 2022 & Powershell All-in-One For Dummies», без необходимости каждый раз заново искать на чём Вы остановились. Поставьте закладку, и сможете в любой момент перейти на страницу, на которой закончили чтение.
Интервал:
Закладка:
5 Click OK.
6 Click the Close button in the System Properties dialog box.You’re prompted to either Restart Now or Restart Later.
7 Click Restart Now if you want to reboot the server immediately. Click Restart Later if you want to finish other administrative tasks you may have first.If you click Restart Later, you’ll need to manually reboot the server when you’re ready.
8 To join a domain, perform Steps 1 through 3.
9 In the Computer Name/Domain Changes dialog box, click the Domain radio button, and enter the name of the domain you want to join.
10 Click OK.A dialog box appears telling you that you need to restart the server.
11 Click OK.
12 Click the Close button in the System Properties dialog box.
13 Click Restart Now or Restart Later.After the restart, the server will be joined to the domain.
Configure networking
Your server will use a dynamically assigned IP address by default. If this is not desirable, you’ll want to set a static IP address so that the server will continue to use the same address.
1 In Server Manager, click Local Server in the left-hand menu.
2 Next to Ethernet, click the hyperlink that says IPv4 Address Assigned by DHCP, IPv6 Enabled.
3 Right-click your network adapter (it should be called Ethernet), and click Properties.
4 Click Internet Protocol Version 4, and then click the Properties button.By default, the server is set to obtain an IP address automatically and obtain DNS server addresses automatically. If this is what is desired, then no changes are necessary.
5 If you need to make changes, select Use the Following IP Address.
6 Fill in the IP address, subnet mask, and default gateway.
7 Manually enter the addresses for the preferred DNS servers.See Figure 4-2 for an example.
8 Click OK to close the dialog box.
9 Click OK one more time to exit out of Ethernet Properties.
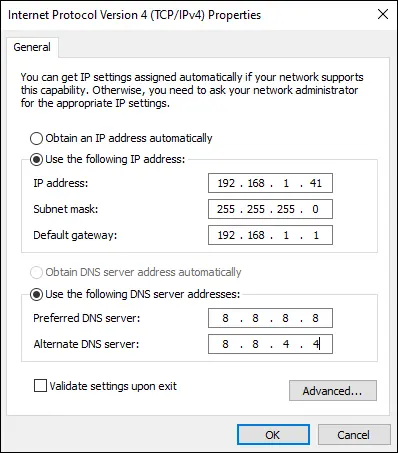
FIGURE 4-2:The Internet Protocol Version 4 Properties dialog box.
Windows Server 2022 Core
Many system administrators have configured a Windows Server with a GUI, but not many have used Windows Server Core. As you see in this section, Windows Server Core has a simple interface, and when you learn how to navigate it, you may find it simpler to work with than Windows Server with Desktop Experience.
Activation
Windows Server Core gives you a few different options for activating your copy of Windows Server 2022. In this section, I cover activating via sconfig, as well as activating via PowerShell.
ACTIVATING WITH SCONFIG
Sconfig is the built-in configuration utility in Windows Server Core. It’s a text-based menu that allows you to do the majority of your initial configuration tasks all from one central location. By default, sconfig launches automatically after you’ve logged in.
1 From the sconfig utility, type 11 for Windows Activation and press Enter.
2 Type 3 to install your product key.
3 Enter your 25-character product key in the dialog box that pops up, and then click OK.After the key is installed, you see a message saying the key was installed successfully.
4 Close the window by clicking the red X, or by pressing Enter twice.
5 When you’re back on the sconfig screen, type 2 to Activate Windows, and then press Enter.A Command Prompt window launches again with the slmgr.vbs script to perform the activation. Assuming there are no errors, this will complete with no message.
6 Close the window by clicking the red X or by pressing Enter twice.
ACTIVATING FROM POWERSHELL
After you’ve logged into Windows Server Core, you’re presented with the sconfig utility. From there, you can activate your copy of Windows. To set the license and do the activation from the command line, you’ll need to select menu option 15, “Exit to command line (PowerShell)”. To activate, you have to set the key. You do this with the Windows Server License Manager script, slmgr.vbs.
 The slmgr.vbs script allows you to work with your Windows Server product keys in different ways depending on the parameter that you use along with it. In the example in this book, I use both
 -ipkand -ato. The -ipkparameter is used when installing product keys, and the -atoparameter is used to specify online activation.
To install the product key that will be needed for your version of Windows Server 2022, use the following command with the parameter -ipk. Just replace < productkey >with your 25-character license key, including the dashes.
slmgr.vbs -ipk
You get a dialog box that tells you the product key installed successfully. Click OK.
After the license key is installed, you use the same script with the -atoparameter to do an online activation of your copy of Windows. You do that with the following command:
slmgr.vbs -ato
If the activation was successful, you get a dialog box that says the product was activated successfully (see Figure 4-3).
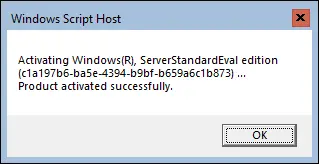
FIGURE 4-3:Using slmgr.vbs to activate Windows Server.
Time zone
Much like activation in Windows Server Core, you can set the time zone via sconfig or PowerShell. In this section, I cover both methods. The great thing about PowerShell version is that it will work on Windows Server with Desktop Experience as well.
SETTING THE TIME ZONE WITH SCONFIG
Sconfig is the built-in configuration utility in Windows Server Core. Because it's a simple text-based menu, it provides a simple way for administrators to configure the time zone without needing scripting knowledge to do so.
1 From the sconfig utility, type 9 to go into the settings for Date and Time.The Date and Time dialog box appears.
2 Click the Change Time Zone button.
3 Select your time zone from the drop-down list.
4 If you’re in an area that uses Daylight Saving Time, click the check box next to Automatically Adjust Clock for Daylight Saving Time. If you do not use Daylight Saving Time, leave the box unchecked.
5 Click OK to exit out of the Time Zone Settings dialog box, and click OK once more to exit out of the Date and Time dialog box.
SETTING THE TIME ZONE FROM POWERSHELL
If you prefer to work in PowerShell, you can also set the time zone from there. This utilizes the control command to call the Control Panel’s Date and Time screen.
In PowerShell, type the following:
Set-TimeZone -Id
 If you aren’t sure what your time zone ID is, you can run
 Get-TimeZone -ListAvailableto see all the time zones you can choose from.
Computer name and domain
Setting the name and adding a server to a Windows domain are some of the most common activities that system administrators do with new servers. With Windows Server Core, there are two methods that you should know to complete this task: sconfig (the configuration utility in Windows Server Core) and PowerShell.
Читать дальшеИнтервал:
Закладка:
Похожие книги на «Windows Server 2022 & Powershell All-in-One For Dummies»
Представляем Вашему вниманию похожие книги на «Windows Server 2022 & Powershell All-in-One For Dummies» списком для выбора. Мы отобрали схожую по названию и смыслу литературу в надежде предоставить читателям больше вариантов отыскать новые, интересные, ещё непрочитанные произведения.


Обсуждение, отзывы о книге «Windows Server 2022 & Powershell All-in-One For Dummies» и просто собственные мнения читателей. Оставьте ваши комментарии, напишите, что Вы думаете о произведении, его смысле или главных героях. Укажите что конкретно понравилось, а что нет, и почему Вы так считаете.