Sara Perrott - Windows Server 2022 & Powershell All-in-One For Dummies
Здесь есть возможность читать онлайн «Sara Perrott - Windows Server 2022 & Powershell All-in-One For Dummies» — ознакомительный отрывок электронной книги совершенно бесплатно, а после прочтения отрывка купить полную версию. В некоторых случаях можно слушать аудио, скачать через торрент в формате fb2 и присутствует краткое содержание. Жанр: unrecognised, на английском языке. Описание произведения, (предисловие) а так же отзывы посетителей доступны на портале библиотеки ЛибКат.
- Название:Windows Server 2022 & Powershell All-in-One For Dummies
- Автор:
- Жанр:
- Год:неизвестен
- ISBN:нет данных
- Рейтинг книги:3 / 5. Голосов: 1
-
Избранное:Добавить в избранное
- Отзывы:
-
Ваша оценка:
Windows Server 2022 & Powershell All-in-One For Dummies: краткое содержание, описание и аннотация
Предлагаем к чтению аннотацию, описание, краткое содержание или предисловие (зависит от того, что написал сам автор книги «Windows Server 2022 & Powershell All-in-One For Dummies»). Если вы не нашли необходимую информацию о книге — напишите в комментариях, мы постараемся отыскать её.
Windows Server 2022 & PowerShell All-in-One For Dummies
Windows Server 2022 & Powershell All-in-One For Dummies — читать онлайн ознакомительный отрывок
Ниже представлен текст книги, разбитый по страницам. Система сохранения места последней прочитанной страницы, позволяет с удобством читать онлайн бесплатно книгу «Windows Server 2022 & Powershell All-in-One For Dummies», без необходимости каждый раз заново искать на чём Вы остановились. Поставьте закладку, и сможете в любой момент перейти на страницу, на которой закончили чтение.
Интервал:
Закладка:
Get-WindowsFeature *file*
When you type the preceding command, you get three results of items that have file in their names. You can see File Server under Display Name. For the installation command, you need the name under the Name column. In this case, it's FS-FileServer. Now you’re ready to install it! Use the following command to install the File Server (see Figure 4-10):
Install-WindowsFeature FS-FileServer
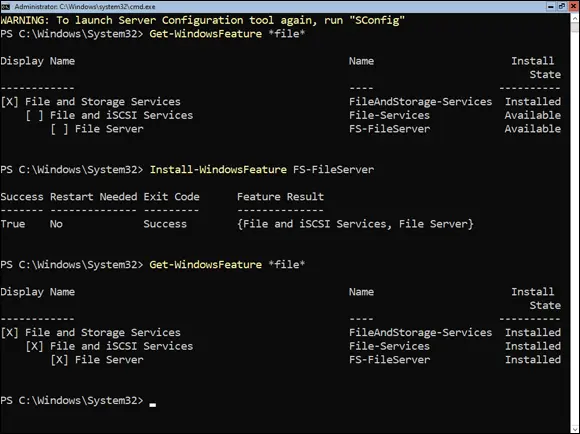
FIGURE 4-10:Using PowerShell to install roles and features.
You see a progress bar as the feature is installed. After it’s installed, if you run the first command again, you see that all three results are now installed. File and iSCSI Services was installed because File Server relies on it.
Enabling remote administration
Remote Management is enabled by default in Windows Server 2022. If it was disabled in your environment, you can enable it by running the Configure-SMRemotingcommand. This allows you remotely administer your server with Server Manager.
Configure-SMRemoting -Enable
To be able to administer the server remotely with PowerShell, you need two additional commands. Enable-PSRemotingconfigures PowerShell to receive remote commands that are sent to your system. Winrm quickconfigwill analyze and automatically configure the WinRM service for you. This is very helpful when you just want it to work and don't need to customize it. The command starts the WinRM service if it isn’t already started, and ensures that WinRM is set to automatically start. It also configures listeners for HTTP and HTTPS, and ensures that the Windows firewall is allowing HTTP and HTTPS traffic inbound.
The Enable-PSRemotingcommand will not give you any output if it succeeds. You’ll simply be presented with the PowerShell prompt again.
Enable-PSRemoting -force
Running winrm quickconfigis a little different. After it runs its analysis, it tells you what needs to be changed and asks for a yes or no as to whether it can make the necessary changes. Select Y and press Enter. If everything looked good during the analysis, you'll be told that WinRM is already running and is already set up for Remote Management instead of the yes/no question.
winrm quickconfig
Configure Windows Firewall
Working with the Microsoft Defender Firewall on Server Core is pretty simple. You need to find the name of the rule you want to work with first. You can do that with the Get-NetFirewallRulecommand (see Figure 4-11). Using the Format-tablecommand at the end makes the output more easily readable. Try the command without it — you'll see what I mean!
Get-NetFirewallRule *remote* | Format-table

FIGURE 4-11:Using Get- NetFirewallRuleto find rules.
The preceding command looks for any rules that have remote in the name. You can see each rule and whether it's enabled.
Let’s enable the Remote Firewall Management rules. These would allow you to administer this server’s firewall from another system. The rules you’re interested in are RemoteFwAdmin-In-TCPand RemoteFWAdmin-RPCSS-In-TCP.
Here are the commands you'll use to enable these (see Figure 4-12):
Set-NetFirewallRule –Name "RemoteFwAdmin-In-TCP" –Enabled TrueSet-NetFirewallRule –Name "RemoteFwAdmin-RPCSS-In-TCP" –Enabled True
If the commands complete successfully, you’ll get no response. You’ll be returned to the PowerShell prompt. If you run your search again, you’ll see that these rules are now enabled.
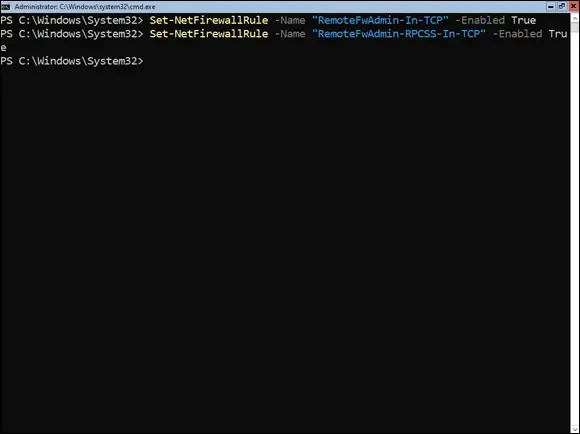
FIGURE 4-12:Using PowerShell to set firewall rules and validate that they’re enabled.
Configuring Startup Options with BCDEdit
With Windows Server 2008, Microsoft introduced a utility called BCDEdit, which allows you to manipulate the Windows boot configuration data (BCD) store. The BCD is used to tell the operating system how it should boot; it contains all the boot configuration parameters needed to support that function. This replaced the older bootcfg.exeutility that was used to edit the boot.inifile pre–Windows Vista. You must be a member of the local Administrator's group on a system to use BCDEdit. This is an advanced utility that is useful in troubleshooting issues that are preventing a server from booting properly.
 You may need to disable or suspend both BitLocker and Secure Boot on a system before you can use BCDEdit.
 Mistakes made using the BCDEdit utility could leave your system unable to boot at all. Always make sure that you either have a good backup of the system, or if you don’t have a good backup, export the current settings from BCDEdit so that you can restore them if needed. You can export the current boot configuration database by typing BCDEdit /Export . If you need to restore from that export, the command is very similar. You need only type BCDEdit /Import .
Table 4-2lists some of the more common options available for BCDEdit.
TABLE 4-2BCDEdit Common Options
| Option | Description |
|---|---|
/bootdebug |
Enables or disables boot debugging. |
/dbgsettings |
Configures the type of debugging connection. |
/debug |
Enables or disables kernel debugging. |
/delete |
Deletes boot entries from the datastore — use with caution! |
/deletevalue |
Deletes or removes a boot entry option — use with caution! |
/displayorder |
Sets the order used by the boot manager when displaying the multiboot menu. |
/enum |
Lists all the entries in the boot configuration datastore. |
/export |
Exports the contents of the BCD; can be used as a backup to restore the BCD. |
/import |
Imports the contents of an exported file; can be used as a restore option if needed. |
/set |
Sets a value in a boot option. |
Most often, you'll use bcdedit /setto make changes to your boot configuration datastore. Before you make any changes, you need to know what your BCD looks like currently. You can use the /enumoption to do that. In Figure 4-13, you can see the current settings for the Windows Boot Manager and the Windows Boot Loader.
You may notice that the description in the Windows Boot Loader just says Windows Server. Maybe you want it to be more descriptive than that. You can change it with bcdedit /set. You need the ID of the object that you're wanting to work on. In this case, you’re wanting to edit the Windows Boot Loader; the identifier that you can see in Figure 4-13 is {current}. The full command you type will look something like this:
Интервал:
Закладка:
Похожие книги на «Windows Server 2022 & Powershell All-in-One For Dummies»
Представляем Вашему вниманию похожие книги на «Windows Server 2022 & Powershell All-in-One For Dummies» списком для выбора. Мы отобрали схожую по названию и смыслу литературу в надежде предоставить читателям больше вариантов отыскать новые, интересные, ещё непрочитанные произведения.


Обсуждение, отзывы о книге «Windows Server 2022 & Powershell All-in-One For Dummies» и просто собственные мнения читателей. Оставьте ваши комментарии, напишите, что Вы думаете о произведении, его смысле или главных героях. Укажите что конкретно понравилось, а что нет, и почему Вы так считаете.