Sara Perrott - Windows Server 2022 & Powershell All-in-One For Dummies
Здесь есть возможность читать онлайн «Sara Perrott - Windows Server 2022 & Powershell All-in-One For Dummies» — ознакомительный отрывок электронной книги совершенно бесплатно, а после прочтения отрывка купить полную версию. В некоторых случаях можно слушать аудио, скачать через торрент в формате fb2 и присутствует краткое содержание. Жанр: unrecognised, на английском языке. Описание произведения, (предисловие) а так же отзывы посетителей доступны на портале библиотеки ЛибКат.

- Название:Windows Server 2022 & Powershell All-in-One For Dummies
- Автор:
- Жанр:
- Год:неизвестен
- ISBN:нет данных
- Рейтинг книги:3 / 5. Голосов: 1
-
Избранное:Добавить в избранное
- Отзывы:
-
Ваша оценка:
Windows Server 2022 & Powershell All-in-One For Dummies: краткое содержание, описание и аннотация
Предлагаем к чтению аннотацию, описание, краткое содержание или предисловие (зависит от того, что написал сам автор книги «Windows Server 2022 & Powershell All-in-One For Dummies»). Если вы не нашли необходимую информацию о книге — напишите в комментариях, мы постараемся отыскать её.
Windows Server 2022 & PowerShell All-in-One For Dummies
Windows Server 2022 & Powershell All-in-One For Dummies — читать онлайн ознакомительный отрывок
Ниже представлен текст книги, разбитый по страницам. Система сохранения места последней прочитанной страницы, позволяет с удобством читать онлайн бесплатно книгу «Windows Server 2022 & Powershell All-in-One For Dummies», без необходимости каждый раз заново искать на чём Вы остановились. Поставьте закладку, и сможете в любой момент перейти на страницу, на которой закончили чтение.
Интервал:
Закладка:
SETTING THE COMPUTER NAME WITH SCONFIG
The sconfig utility in Windows Server Core makes it simple to change the name of your server with its text-driven menus. Follow these steps:
1 In the sconfig utility, type 2 to change the computer name.You’re prompted to enter a new name.
2 Enter the new name, and press Enter.You need to restart your computer to apply the change.
3 Type yes to reboot now or no to reboot later.
ADDING TO A DOMAIN WITH SCONFIG
When the server has the correct name, you may want to add it to a Windows domain. You can do this with the sconfig utility as well.
1 In the sconfig utility, type 1 to change the domain.
2 Type D to join a domain and press Enter.
3 Give it the name of the domain you want to join and then press Enter.
4 Enter the name of an authorized user and press Enter.
5 Enter the password of the user and press Enter.You need to restart your computer to apply the change.
6 Click yes to reboot now or no to reboot later.
SETTING THE COMPUTER NAME FROM POWERSHELL
Although sconfig is a nice utility, you may want to be able to script the changes that you want to make. Whenever this is the case, PowerShell can be very helpful. From running batch scripts in the Command Prompt, to running PowerShell scripts in PowerShell, both methods work regardless of whether you’re on Windows Server Core or Windows Server with Desktop Experience.
1 From the sconfig utility, type 15 to exit to command line (PowerShell).The PowerShell window opens on your Server Core box.
2 Use the Rename-Computer command to change the name of your server: Rename-Computer -NewName < new-name >
3 You get a message stating that the NetBIOS name will be truncated if your name is longer than 15 characters.
4 If you receive this message, type Y and then press Enter to accept.
ADDING TO A DOMAIN FROM POWERSHELL
The ability to script the joining of the domain is a useful skill if you're going to be deploying any quantity of servers. Not only does adding a domain via PowerShell make it simpler to do, but it also helps to ensure that there are no mistakes in the process of joining the domain.
1 From the sconfig utility, type 15 to exit to command line (PowerShell).The PowerShell window opens on your Server Core box.
2 Use the Add-Computer command to add the server to the domain.Here’s an example:Add-Computer -DomainName "your_domain_name" -RestartA dialog box appears asking for a username and password.
3 Enter a username that is authorized to add systems to your Active Directory domain and enter the corresponding password.
4 Click OK.The server restarts.
Configure networking
Before you can set the IP address for the adapter with PowerShell, you need to find out what the index of your interface is. You can do this by typing the following:
Get-NetAdapter
The output lists all network adapters. In this case, you want the one that says Ethernet. After you have the index number, you can set the IP address and the DNS servers. On my server, the index is 4.
Use the following command to set the static IP address. InterfaceIndexis the index number for my network card, IPAddressis the IP address I want to assign, PrefixLengthis the subnet mask that I want to use, and DefaultGatewayis the gateway address for the local network (see Figure 4-4).
New-NetIPAddress -InterfaceIndex 4 -IPAddress 192.168.1.50 -PrefixLength 24 -DefaultGateway 192.168.1.1
 I haven't discussed PowerShell much at this point, and this is a more complex bit of PowerShell. The
 New-NetIPAddressis a cmdlet that allows you to work with IP addresses on Windows Server systems. The parameters that come afterward, like -InterfaceIndex, help to identify the object you want to work with (the network adapter, in this case) or to make changes to the settings, like the -IPAddressparameter where you specify the IP address you want to set on the network adapter.
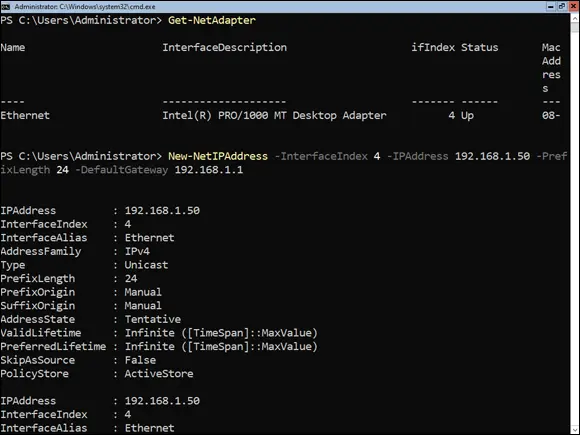
FIGURE 4-4:Setting the IP address with PowerShell.
To set the DNS Server after that, the command uses the same index number for my network card. ServerAddressesis used to identify the DNS servers that the system should use (see Figure 4-5). If you have more than one, you can separate them with a comma.
Set-DNSClientServerAddress -InterfaceIndex 4 -ServerAddresses 8.8.8.8, 8.8.4.4
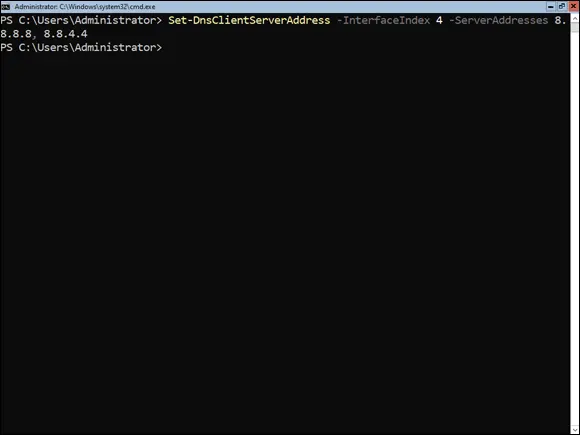
FIGURE 4-5:Setting the DNS servers with PowerShell.
Updating Windows Server 2022
After you have installed your brand-new Windows Server, and maybe even done some of the basic configuration work like changing the name and joining the domain, you'll want to update the server. Updates contain fixes for security vulnerabilities and new features, and should always be installed before turning a server over to the team that requested it.
Windows Server 2022 with Desktop Experience
Considering how important it is to stay up to date on Windows Server updates, most organizations are going to set up automatic updates. You may have a server that can’t be set to receive updates automatically, or there may be an emergency patch that was issued and you want to apply it right away. In this section, I explain how to do automatic updates and manual updates.
Automatic updates
Most organization use automatic updates. The following directions walk you through setting up your server to reach out to Microsoft’s update servers (the default behavior).
Many organizations have patching solutions that handle the scheduling of updates, and could still be considered an automatic update because the tool will schedule the deployment of approved patches.
1 Click the Start menu and type gpedit.msc.
2 Navigate to the Windows Update section by clicking on Computer Configuration, then Administrative Templates, then Windows Components, and finally Windows Update.
3 Double-click Configure Automatic Updates.
4 Select Enabled.You’re given configuration options.Under Configure Automatic Updating, you can see that it’s set to Auto Download and Notify to Install. This is the default setting.
5 Click the drop-down box and select the setting that works best for your environment.In my case, I’ve chosen Auto Download and Schedule the Install. See Figure 4-6 for an example.
6 Click OK to save the change.
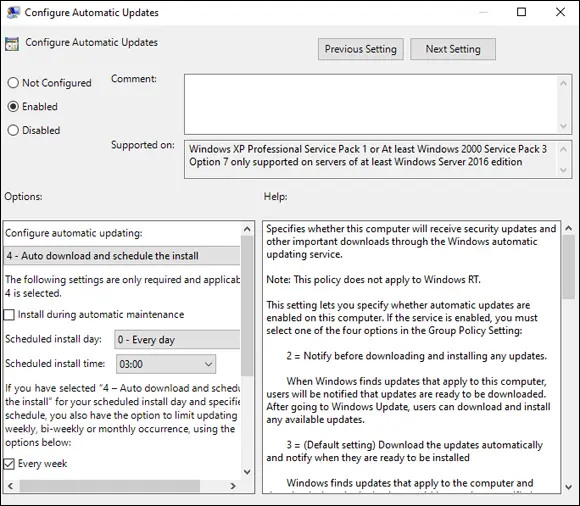
FIGURE 4-6:Using the Local Group Policy Editor to change the automatic updates setting in Windows Server 2022.
Downloading and installing updates
You hear about the next big security vulnerability on the news media, and vendors release patches to the vulnerability very quickly after that. When a security vulnerability impacts your Windows Server systems, you may want to start a manual update — that way, your systems are protected outside of your normal patching windows. If your organization uses a patching solution, the patch may be pushed from that system, but there are always a few systems that don’t take the patch for whatever reason. You may have to manually update when that occurs.
Читать дальшеИнтервал:
Закладка:
Похожие книги на «Windows Server 2022 & Powershell All-in-One For Dummies»
Представляем Вашему вниманию похожие книги на «Windows Server 2022 & Powershell All-in-One For Dummies» списком для выбора. Мы отобрали схожую по названию и смыслу литературу в надежде предоставить читателям больше вариантов отыскать новые, интересные, ещё непрочитанные произведения.


Обсуждение, отзывы о книге «Windows Server 2022 & Powershell All-in-One For Dummies» и просто собственные мнения читателей. Оставьте ваши комментарии, напишите, что Вы думаете о произведении, его смысле или главных героях. Укажите что конкретно понравилось, а что нет, и почему Вы так считаете.