Chris McCain - Mastering VMware® Infrastructure3
Здесь есть возможность читать онлайн «Chris McCain - Mastering VMware® Infrastructure3» — ознакомительный отрывок электронной книги совершенно бесплатно, а после прочтения отрывка купить полную версию. В некоторых случаях можно слушать аудио, скачать через торрент в формате fb2 и присутствует краткое содержание. Город: Indianapolis, Год выпуска: 2008, ISBN: 2008, Издательство: WILEY Wiley Publishing, Inc., Жанр: Программы, ОС и Сети, на английском языке. Описание произведения, (предисловие) а так же отзывы посетителей доступны на портале библиотеки ЛибКат.

- Название:Mastering VMware® Infrastructure3
- Автор:
- Издательство:WILEY Wiley Publishing, Inc.
- Жанр:
- Год:2008
- Город:Indianapolis
- ISBN:978-0-470-18313-7
- Рейтинг книги:5 / 5. Голосов: 1
-
Избранное:Добавить в избранное
- Отзывы:
-
Ваша оценка:
Mastering VMware® Infrastructure3: краткое содержание, описание и аннотация
Предлагаем к чтению аннотацию, описание, краткое содержание или предисловие (зависит от того, что написал сам автор книги «Mastering VMware® Infrastructure3»). Если вы не нашли необходимую информацию о книге — напишите в комментариях, мы постараемся отыскать её.
Mastering VMware® Infrastructure3 — читать онлайн ознакомительный отрывок
Ниже представлен текст книги, разбитый по страницам. Система сохранения места последней прочитанной страницы, позволяет с удобством читать онлайн бесплатно книгу «Mastering VMware® Infrastructure3», без необходимости каждый раз заново искать на чём Вы остановились. Поставьте закладку, и сможете в любой момент перейти на страницу, на которой закончили чтение.
Интервал:
Закладка:
esxcfg-vswitch -A Storage vSwitch2
2. Configure the VMkernel NIC with an IP address of 172.28.0.106 and a subnet mask of 255.255.255.0:
esxcfg-vmknic -a -i 172.28.0.106 -n 255.255.255.0 Storage
3. Set the default gateway of the VMkernel to 172.28.0.1:
esxcfg-route 172.28.0.1

Figure 4.27The VMkernel and Service Console must be able to communicate with the iSCSI storage device.
From the Storage Adapters node on the Configuration tab, shown in Figure 4.28, enable the iSCSI initiator. Alternatively, open an SSH session with root privileges and type the following command:
esxcfg-swiscsi -e
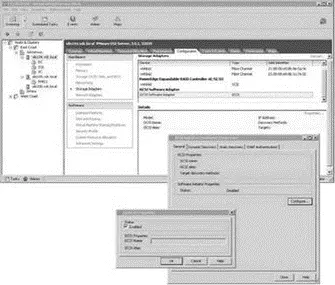
Figure 4.28Enabling the iSCSI will automatically populate the iSCSI name and alias for the software initiator.
4. Select the vmhba40 option beneath the iSCSI Software Adapter and click the Properties link.
5. Select the Dynamic Discovery tab and click the Add button.
6. Enter the IP address of the iSCSI device and the port number (if it has been changed from the default port of 3260).
7. Click OK. Click Close.
8. Select the Rescan link from the Storage Adapters node on the Configuration tab.
9. Click OK to scan for both new storage devices and new VMFS volumes.
10. As shown in Figure 4.29, any available iSCSI LUNs will now be reflected in the Details section of the vmhba40 option.
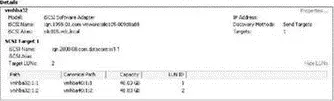
Figure 4.29After configuring the iSCSI software adapter with the IP address of the iSCSI storage target, a rescan will identify the LUNs on the storage device that have been made available to the ESX host.
The vmki scsi -tool [options] vmhba## command allows command-line management of the iSCSI software initiator. The options for this command-line tool include:
♦ -I is used with -l or -a to display or add the iSCSI name.
♦ -k is used with -l or -a to display or add the iSCSI alias.
♦ -D is used with -a to perform discovery of a specified target device.
♦ -T is used with -l to list found targets.
Review the following examples:
♦ To view the iSCSI name of the software initiator:
vmkiscsi-tool -I -l
♦ To view the iSCSI alias of the software initiator:
vmkiscsi-tool -k -l
♦ To discover additional iSCSI targets at 172.28.0.122:
vmkisci-tool -D -a 172.28.0.122 vmhba40
♦ To list found targets:
vmkiscsi-tool -T -l vmhba40
Network Attached Storage and Network File System
Although Network Attached Storage (NAS) devices do not hold up to the performance and efficiency of fibre channel and iSCSI networks, they most certainly have a place on some networks. Virtual machines stored on NAS devices are still capable of the advanced VirtualCenter features of VMotion, DRS, and HA. With a significantly lower cost and simplified implementation, NAS devices can prove valuable in providing network storage in a VI3 environment.
Unlike the block-level transfer of data performed by fibre channel and iSCSI networks, access to a NAS device happens at the file system level. You can access a NAS device by using Network File System (NFS) or Server Message Block (SMB), also referred to as Common Internet File System (CIFS). Windows administrators will be most familiar with SMB traffic, which occurs each time a user accesses a shared resource using a universal naming convention (UNC) like \\servername\sharename. Whereas Windows uses the SMB protocol for file transfer, Linux-based systems use NFS to accomplish the same thing.
Although you can configure the Service Console with a Samba client to allow communication with Windows-based computers, the VMkernel does not support using SMB and therefore lacks the ability to retrieve files from a computer running Windows. The VMkernel only supports NFS version 3 over TCP/IP.
Like the deployment of an iSCSI storage network, a NAS/NFS deployment can benefit greatly from being located on a dedicated IP network where traffic is isolated. Figure 4.30 shows a NAS/NFS deployment on a dedicated network.
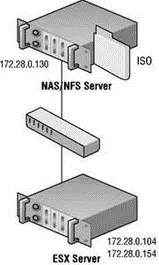
Figure 4.30 An NAS Server deployed for shared storage among ESX Server hosts should be located on a dedicated network separated from the common intranet traffic.
Without competition from other types of network traffic (e-mail, Internet, instant messaging, etc.), the transfer of virtual machine data will be much more efficient and provide better performance.
NFS is unique because it does not force the user to enter a password when connecting to the shared directory. In the case of ESX, the connection to the NFS server happens under the context of root, thus making NFS a seamless process for the connecting client. However, you might be wondering about the inherent security. Security for NFS access is maintained by limiting access to only the specified or trusted hosts. In addition, the NFS server employs standard Linux file system permissions based on user and group IDs. The user IDs (UIDs) and group IDs (GIDs) of users on a client system are mapped from the server to the client. If a user or a client has the same UID and GID as a user on the server, they are both granted access to files in the NFS share owned by that same UID and GID. As you have seen, ESX Server accesses the NFS server under the context of the root user and therefore has all the permissions assigned to the root user on the NFS server.
When creating an NFS share on a Linux system, you must supply three pieces of information:
♦ The path to the share (i.e., /nfs/ISOs).
♦ The hosts that are allowed to connect to the share, which can include:
♦ A single host identified by name or IP address.
♦ Network Information Service (NIS) groups.
♦ Wildcard characters such as * and ? (i.e., *.vdc.local).
♦ An entire IP network (i.e., 172.30.0.0/24).
♦ Options for the share configuration, which can include:
♦ root_squash, which maps the root user to the nobody user and thus prevents root access to the NFS share.
♦ no_root_squash, which does not map the root user to the nobody user and thus provides the root user on the client system with full root privileges on the NFS server.
♦ all_squash, which maps all UIDs and GIDs to the nobody user for enabling a simple anonymous access NFS share.
♦ ro, for read-only access.
♦ rw, for read-write access.
♦ sync, which forces all data to be written to disk before servicing another request.
The configuration of the shared directories on an NFS server is managed through the /etc/exports file on the server. The following example shows a /etc/exports file configured to allow all hosts on the 172.30.0.0/24 network access to a shared directory named NFSShare:
root: # cat /etc/exports/mnt/NFSShare 172.30.0.0/24 (rw,no_root_squash,sync)
The next section explores the configuration requirements for connecting an ESX Server host to a shared directory on an NFS server.
Читать дальшеИнтервал:
Закладка:
Похожие книги на «Mastering VMware® Infrastructure3»
Представляем Вашему вниманию похожие книги на «Mastering VMware® Infrastructure3» списком для выбора. Мы отобрали схожую по названию и смыслу литературу в надежде предоставить читателям больше вариантов отыскать новые, интересные, ещё непрочитанные произведения.


Обсуждение, отзывы о книге «Mastering VMware® Infrastructure3» и просто собственные мнения читателей. Оставьте ваши комментарии, напишите, что Вы думаете о произведении, его смысле или главных героях. Укажите что конкретно понравилось, а что нет, и почему Вы так считаете.