Mark Middlebrook - AutoCAD 2005 for Dummies
Здесь есть возможность читать онлайн «Mark Middlebrook - AutoCAD 2005 for Dummies» — ознакомительный отрывок электронной книги совершенно бесплатно, а после прочтения отрывка купить полную версию. В некоторых случаях можно слушать аудио, скачать через торрент в формате fb2 и присутствует краткое содержание. Город: Indianapolis, Год выпуска: 2004, ISBN: 2004, Издательство: Wiley Publishing, Inc, Жанр: Программы, на английском языке. Описание произведения, (предисловие) а так же отзывы посетителей доступны на портале библиотеки ЛибКат.

- Название:AutoCAD 2005 for Dummies
- Автор:
- Издательство:Wiley Publishing, Inc
- Жанр:
- Год:2004
- Город:Indianapolis
- ISBN:0-7645-7138-9
- Рейтинг книги:5 / 5. Голосов: 1
-
Избранное:Добавить в избранное
- Отзывы:
-
Ваша оценка:
AutoCAD 2005 for Dummies: краткое содержание, описание и аннотация
Предлагаем к чтению аннотацию, описание, краткое содержание или предисловие (зависит от того, что написал сам автор книги «AutoCAD 2005 for Dummies»). Если вы не нашли необходимую информацию о книге — напишите в комментариях, мы постараемся отыскать её.
AutoCAD is more than just another application program, it’s a complete environment for drafting and design. So if you’re new to AutoCAD, you need to know several things to get off to a good start — especially how to use the command line area and set up your drawing properly. These key techniques are described in this part of the book.
If you’ve used earlier versions of AutoCAD, you’ll be most interested in the high points of the new release, including some newer interface components. The lowdown on what’s new is here, too.
AutoCAD 2005 for Dummies — читать онлайн ознакомительный отрывок
Ниже представлен текст книги, разбитый по страницам. Система сохранения места последней прочитанной страницы, позволяет с удобством читать онлайн бесплатно книгу «AutoCAD 2005 for Dummies», без необходимости каждый раз заново искать на чём Вы остановились. Поставьте закладку, и сможете в любой момент перейти на страницу, на которой закончили чтение.
Интервал:
Закладка:
□ Noun/Verb Selection
□ Implied Windowing
□ Object Grouping
□ Enable Grips
□ Enable Grip Tips
Grab It
Part of AutoCAD’s editing flexibility comes from its object selection flexibility. For example, command-first editing offers 16 selection modes! (I describe the most useful ones in this chapter.) Don’t worry though; you can get by most of the time with three selection modes:
□ Selecting a single object
□ Enclosing objects in a window (pick left corner; then right corner)
□ Including part or all objects in a crossing window (pick right corner; then left corner)
The most obvious way to select objects is to pick (by clicking) them one at a time. You can build up a selection set cumulatively with this “pick one object at a time” selection mode. This cumulative convention may be different from what you’re used to. In most Windows programs, if you select one object and then another, the first object is deselected, and the second one selected. Only the object you select last remains selected. In AutoCAD, all the objects you select, one at a time, remain selected and are added to the set, no matter how many objects you pick. (You can change this behavior to make AutoCAD work like Windows does by turning on ‘Use Shift to add to selection’ on the Option dialog box’s Selection tab, but I suggest you not change it.) Most editing commands affect the entire group of selected objects.
Selecting objects one at a time works great when you want to edit a small number of objects, but many CAD editing tasks involve editing lots of objects. Do you really want to pick 132 lines, arcs, and circles, one at a time?
Like most Windows graphics programs, AutoCAD provides a selection window feature for grabbing a bunch of objects in a rectangular area. As you may guess by now, the AutoCAD version of this feature is a bit more powerful than the analogous feature in other Windows graphics programs and, therefore, slightly confusing at first. AutoCAD calls its version implied windowing.
If you click a blank area of the drawing —, that is, not on an object — you’re implying to AutoCAD that you want to specify a selection window, or box. If you move the cursor to the right before picking the other corner of the selection box, you’re further implying that you want to select all objects that reside completely within the selection box. If you instead move the cursor to the left before picking the other corner of the selection box, you’re implying that you want to select all objects that reside completely or partially within the selection box. The AutoCAD terminology for these two kinds of selection boxes gets a little confusing:
□ The move-to-the-right, only-select-objects-completely-within-the-box mode is called Window object selection.
□ The move-to-the-left, select-objects-completely-or-partially-within-the-box mode is called Crossing object selection.
You might think of these modes as bounding box (to the right) and crossing box (to the left). Fortunately, AutoCAD gives you a visual cue that there’s a difference. As you move to the right, the bounding box appears as a solid rectangle. As you move to the left, the crossing box appears as a ghosted, or dashed, rectangle.
Figures 6-1 and 6-2 show a bounding box and a crossing box, respectively, in action.
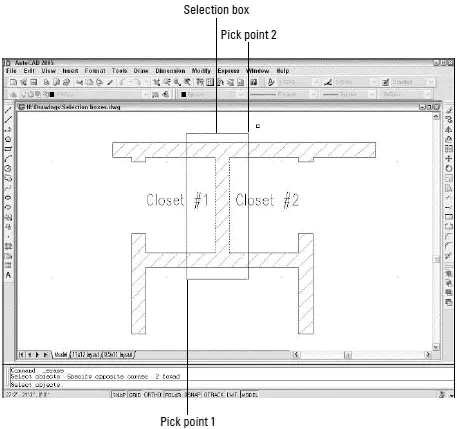
Figure 6-1:A bounding selection box (Window), drawn left to right, selects only objects completely within the box.
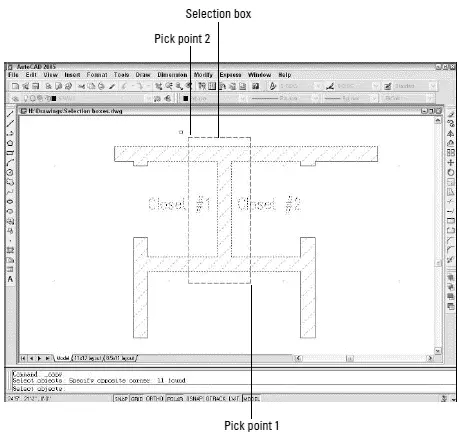
Figure 6-2:A crossing selection box (Crossing), drawn right to left, selects objects that are completely or partially within the box.
You can mix and match selecting individual objects, specifying a bounding box, and specifying a crossing box. Each selection adds to the current selection set, allowing you to build up an enormously complicated selection of objects and then operate on them with one or more editing commands.
 You can press the Shift key in combination with any of the three standard selection modes — single object, bounding box (Window), and crossing box (Crossing) — to remove already selected objects from the selection set. This feature is especially useful when you’re building a selection set in a crowded drawing; you can select a big batch of objects by using Window or Crossing, and then hold down the Shift key while selecting to remove the objects that you want to exclude from the editing operation.
Perfecting Selecting
When you edit in command-first mode, you have all the selection options described in the previous section — single object, bounding box (Window), and crossing box (Crossing) — plus a slew of others. If you type ?and press Enter at any Select objectsprompt, AutoCAD lists all the selection options:
Window/Last/Crossing/BOX/ALL/Fence/WPolygon/CPolygon/Group/
Add/Remove/Multiple/Previous/Undo/AUto/SIngle
Table 6-1 summarizes the most useful command-first selection options.
Table 6-1 Some Useful Command-First Selection Options
| Option | Description |
|---|---|
| Window | All objects within a rectangle that you specify by picking two points |
| Last | The last object you drew that’s still visible in the drawing area |
| Crossing | All objects within or crossing a rectangle that you specify by picking two points |
| ALL | All objects on layers that aren’t frozen and that are in the current space (model space or paper space) |
| Fence | All objects touching an imaginary polyline whose vertices you specify by picking points |
| WPolygon | All objects within a polygonal area whose corners you specify by picking points |
| CPolygon | All objects within or crossing a polygonal area whose corners you specify by picking points |
| Previous | The previous selection set that you specified |
To use any of the command-first selection options at the Select objectsprompt, type the uppercase letters corresponding to the option and press Enter. After you’re finished selecting objects, you must press Enter again to tell AutoCAD that you’ve finished selecting objects and want to start the editing operation.
The following example demonstrates how to use the Erase command in command-first mode with several different selection options. The selection techniques used in this example apply to most AutoCAD editing commands:
1. Press Esc to make sure that no command is active and no objects are selected.
 If any objects are selected when you start an editing command, the command in most cases will operate on those objects (selection-first editing) instead of prompting you to select objects (command-first editing). For the reasons that I describe earlier in this chapter, you should use the command-first editing style until you’re thoroughly familiar with it. Later, you can experiment with selection-first editing if you like. (Just reverse the sequence of commanding and selecting that I describe in this chapter.)
Интервал:
Закладка:
Похожие книги на «AutoCAD 2005 for Dummies»
Представляем Вашему вниманию похожие книги на «AutoCAD 2005 for Dummies» списком для выбора. Мы отобрали схожую по названию и смыслу литературу в надежде предоставить читателям больше вариантов отыскать новые, интересные, ещё непрочитанные произведения.


Обсуждение, отзывы о книге «AutoCAD 2005 for Dummies» и просто собственные мнения читателей. Оставьте ваши комментарии, напишите, что Вы думаете о произведении, его смысле или главных героях. Укажите что конкретно понравилось, а что нет, и почему Вы так считаете.