Bruce Barnbaum - The Art of Photography - An Approach to Personal Expression
Здесь есть возможность читать онлайн «Bruce Barnbaum - The Art of Photography - An Approach to Personal Expression» весь текст электронной книги совершенно бесплатно (целиком полную версию без сокращений). В некоторых случаях можно слушать аудио, скачать через торрент в формате fb2 и присутствует краткое содержание. Жанр: Старинная литература, на английском языке. Описание произведения, (предисловие) а так же отзывы посетителей доступны на портале библиотеки ЛибКат.

- Название:The Art of Photography: An Approach to Personal Expression
- Автор:
- Жанр:
- Год:неизвестен
- ISBN:нет данных
- Рейтинг книги:5 / 5. Голосов: 1
-
Избранное:Добавить в избранное
- Отзывы:
-
Ваша оценка:
The Art of Photography: An Approach to Personal Expression: краткое содержание, описание и аннотация
Предлагаем к чтению аннотацию, описание, краткое содержание или предисловие (зависит от того, что написал сам автор книги «The Art of Photography: An Approach to Personal Expression»). Если вы не нашли необходимую информацию о книге — напишите в комментариях, мы постараемся отыскать её.
The Art of Photography: An Approach to Personal Expression — читать онлайн бесплатно полную книгу (весь текст) целиком
Ниже представлен текст книги, разбитый по страницам. Система сохранения места последней прочитанной страницы, позволяет с удобством читать онлайн бесплатно книгу «The Art of Photography: An Approach to Personal Expression», без необходимости каждый раз заново искать на чём Вы остановились. Поставьте закладку, и сможете в любой момент перейти на страницу, на которой закончили чтение.
Интервал:
Закладка:
Let’s play with this example just a little further. Suppose you decide that the dark (Zone 3) mass of rock in the midst of the light snow is too heavy, and you want the rock lighter. First, give the negative additional exposure, placing the rock in Zone 5, which automatically places the snow in Zone 11, given the zone spread between the two. Now, cut the development time substantially, perhaps to 4½ minutes based on the schematic. The Zone 11 exposure now is developed to a Zone 8 density, while the Zone 5 exposure ends up with a density of about 4¼. The spread of zones in the field is reduced to only 3¾ zones via clever exposure and development. The snow is the same density as before, but the rock is now 1¼ zones lighter, just what you wanted.
Note
I don’t recommend adhering to the “underexpose and overdevelop” rule for increasing contrast. Underexposure severely limits your ability to increase contrast because the lower zones move very little during extended negative development .
Both the snow and the rock are easily printable, yet notice how high your exposure placed the snow initially in Zone 11! That’s 2 full zones beyond the range of the paper in a straight print, yet well within the limits of tonal separations of the negative and thus a fully usable zone. In this case, you then reduced development to bring the final density down within the range of enlarging papers. In Chapter 10, you’ll learn that even denser zones can be used in printing. The important point is that you shouldn’t limit yourself to exposures within the Zone 1 to Zone 9 range. Overcome your fear of putting the higher zones to use.
From this example, you can see how the common rule of “overexpose and underdevelop” has become accepted. If you want to cut contrast, start with extra exposure because density is lost in less-than-normal development. Without the extra exposure initially, you can lose valuable tonalities and textures in the lower zones.
Please note in the examples above that the decision of how to expose the negative is based on your initial determination of the tones you want in the final print (i.e., the end point, as noted in Chapter 8). Then readings are made with the gray meter to determine the spread of tonalities (the starting point ). Finally, exposure and development are simultaneously determined in order to arrive at the desired contrast level and overall placement for the negative.
Before going on to an example of expanded contrast, let’s see what would have happened if you took an average meter reading at the scene described above and used it without thinking further. The snow would dominate the scene, while the rock would be a relatively small part of it. Therefore, the snowfield’s reading would dominate the gray meter, and the overall reading of the scene (including the rock) would be only slightly lower than that of the snow without the rock. Suppose this overall reading was f/11 @  second, or one full stop below the reading of the snow alone (it probably would not drop that much). If we used that exposure and developed normally, the snow would have a Zone 6 density and would print as a medium light gray. That would be a rather dingy rendering of snow. The rock, 6 zones lower, would be exposed as Zone 0. You would end up with a featureless black blob in a medium light gray morass. That should demonstrate the value of the zone system and the importance of learning it thoroughly!
Now let’s turn to an example of expanded contrast. Suppose you are in a forest on a cloudy day and you see a leafy bush next to the base of a Douglas fir tree. The scene is beautiful, but the contrast is low. The gray meter reads the dark furrows of the bark at f/4 @  second and the bush’s reflective green leaves at f/5.6 @
  second. There is only a difference of 2 stops between the two readings, and averaging them would place the bark in Zone 4 and the leaves in Zone 6—a bit dull for me.
If you place the leaves in Zone 5 (i.e., expose the negative at the meter reading on the leaves), the bark would be exposed at Zone 3. Now you can give the negative substantially increased development. According to Figure 9-3, developing it for 15 minutes (roughly 2½ times normal), would raise Zone 3 to about Zone 3  and Zone 5 to just above Zone 6 , increasing the spread between the leaves and bark about 1 zone. If you want still more contrast, you can print using high-contrast paper.
I don’t recommend adhering to the “underexpose and overdevelop” rule for increasing contrast. Underexposure severely limits your ability to increase contrast because the lower zones move very little during extended negative development. That is evident from Figure 9-3. The lower you place them in your exposure, the less you can separate them during development. For example, if you place the bark and bush at Zones 2 and 4 respectively, the same 15 minutes of development would raise the density of the bark to just barely above Zone 2, while the Zone 4 placement would increase to just above Zone 4½. Thus, the underexposure would limit the increase in contrast to ½ zone.
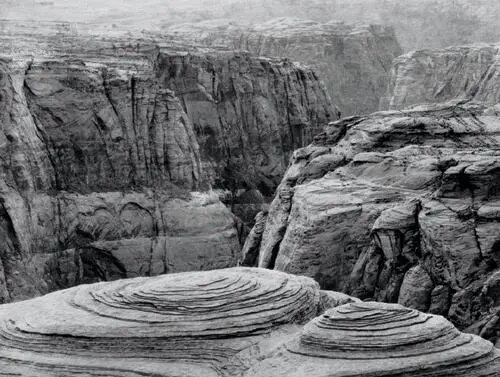
On a cloudy day—with no shadows and no real highlights, but simply low contrast—I photographed the turret-like tops of the Navajo sandstone formations above the Colorado River. I developed the Ilford HP5 negative to maximum contrast to produce the needed snap .
Figure 9-4. Slickrock and Colorado River Cliffs
However, if you expose the leaves at Zone 6 instead of Zone 5 (and therefore the bark at Zone 4 instead of Zone 3), the 15 minutes of development would raise the leaves to Zone 8 and the bark to Zone 4¾. Here, you have increased the tonal spread by almost 1¼ zones. If you exposed one zone higher, at Zones 7 and 5 respectively, the increased development time would raise the leaves to about Zone 10 and the bark to Zone 6¼, a 1¾ zone increase in contrast. Thus, the higher the initial exposure, the greater the contrast expansion through development (within reasonable limits, of course).
There are some trade-offs with this approach, to be sure. First, the negative is quite dense and therefore requires long exposures in the darkroom to achieve appropriate print tonalities. Second, the graininess of the negative increases with density. While these drawbacks must be considered, contrast has increased twice as much as with the “underexpose and overdevelop” approach. It should be noted that some of Edward Weston’s most famous negatives are so dense by today’s standards that they almost can be used for viewing solar eclipses! Yet they obviously produced extraordinary prints. I think too much emphasis today is placed on producing the thinnest usable negatives, and I see little merit to that approach.
My normal contrast negatives aren’t so dense that they’re bulletproof, but they certainly aren’t thin. If I want to greatly increase contrast, I expose at mid-densities and then overdevelop. I get a dense negative, but I also increase contrast substantially (Figure 9-4). As for the graininess, it shows up only in areas of smooth tonality, such as clouds or sky or smooth skin, but not in areas of sharp modulation, such as the hypothetical tree trunk example above. I do consider whether grain will be a factor in the final print, but it’s rarely a real problem. For small or medium format roll film, increased grain and density are greater problems than with larger negatives; but all things considered, I would always prefer having increased grain over a negative lacking in sufficient contrast.
Читать дальшеИнтервал:
Закладка:
Похожие книги на «The Art of Photography: An Approach to Personal Expression»
Представляем Вашему вниманию похожие книги на «The Art of Photography: An Approach to Personal Expression» списком для выбора. Мы отобрали схожую по названию и смыслу литературу в надежде предоставить читателям больше вариантов отыскать новые, интересные, ещё непрочитанные произведения.


Обсуждение, отзывы о книге «The Art of Photography: An Approach to Personal Expression» и просто собственные мнения читателей. Оставьте ваши комментарии, напишите, что Вы думаете о произведении, его смысле или главных героях. Укажите что конкретно понравилось, а что нет, и почему Вы так считаете.