Bruce Barnbaum - The Art of Photography - An Approach to Personal Expression
Здесь есть возможность читать онлайн «Bruce Barnbaum - The Art of Photography - An Approach to Personal Expression» весь текст электронной книги совершенно бесплатно (целиком полную версию без сокращений). В некоторых случаях можно слушать аудио, скачать через торрент в формате fb2 и присутствует краткое содержание. Жанр: Старинная литература, на английском языке. Описание произведения, (предисловие) а так же отзывы посетителей доступны на портале библиотеки ЛибКат.

- Название:The Art of Photography: An Approach to Personal Expression
- Автор:
- Жанр:
- Год:неизвестен
- ISBN:нет данных
- Рейтинг книги:5 / 5. Голосов: 1
-
Избранное:Добавить в избранное
- Отзывы:
-
Ваша оценка:
The Art of Photography: An Approach to Personal Expression: краткое содержание, описание и аннотация
Предлагаем к чтению аннотацию, описание, краткое содержание или предисловие (зависит от того, что написал сам автор книги «The Art of Photography: An Approach to Personal Expression»). Если вы не нашли необходимую информацию о книге — напишите в комментариях, мы постараемся отыскать её.
The Art of Photography: An Approach to Personal Expression — читать онлайн бесплатно полную книгу (весь текст) целиком
Ниже представлен текст книги, разбитый по страницам. Система сохранения места последней прочитанной страницы, позволяет с удобством читать онлайн бесплатно книгу «The Art of Photography: An Approach to Personal Expression», без необходимости каждый раз заново искать на чём Вы остановились. Поставьте закладку, и сможете в любой момент перейти на страницу, на которой закончили чтение.
Интервал:
Закладка:
Pre-Exposure—What It Is, Where It Works, Where It Fails
Pre-exposure of film is the procedure of putting a small amount of blank exposure on the film, either before or after the actual exposure, to yield greater density in the shadow areas of the final print. Some well-intentioned practitioners advocate the use of this technique. In large part, they are wrong. Pre-exposure works for positive transparencies; it has no beneficial effect for negatives, either black-and-white or color.
To understand why it fails for negatives, look at the Exposure/Density Curve again (Figure 9-5). If you add a few units of blank light to a negative via a pre-exposure, you raise the density of the lower zones by that number of units. (Of course, you raise the density of all the zones by that same amount, but the effect is progressively less noticeable as you move up the density scale. Since each successive zone doubles the light of the previous zone, initial pre-exposure makes less and less of a difference as you go up the scale.)
But while you have raised the density of the negative, you have not increased the separations, i.e., the angle of the toe of the curve. In other words, all you’re doing is pushing the toe of the curve a little higher on the density scale. Creating greater density without creating greater separations is of no value in the final print. The problem on the toe of the curve is not lack of density; the real problem is lack of separations, which translates to a lack of tonal separations in the final print.
Pre-exposure works effectively for positive transparencies only, and the technique can be put to use in a very interesting way. In transparencies, the toe of the curve is already dead black (remember, three stops below Zone 5 is below Zone 2). So if you use pre-exposure to bring those extremely dark or black areas into visibility, they are already on the straight-line portion of the curve. Pre-exposing a transparency brings some dark areas into visibility with reasonable separations.
In addition, since transparency films are balanced for sunlight, shadows tend toward a blue cast. Pre-exposure to a warm color (red, orange, magenta, etc.) can neutralize the blue cast in shadow areas without materially altering the exposure or color balance in the mid-tones or highlights.
Those who promote the benefits of pre-exposure often demonstrate the effects by using Polaroid film to instantly show the difference. But Polaroid prints are positive transparencies on paper! Therefore, the technique appears to be beneficial. Even Ansel Adams touted the procedure in one of his early basic photo books. Unfortunately, he was just as wrong as everyone else in his advocacy of pre-exposure for negatives.
Developing the Exposed Negative
The time/temperature charts for negative development shown below are my personal guides for each film/developer combination. As stated above, I rate Tri-X at ASA 160 rather than the recommended ASA 320 to ensure sufficient density and separation in the shadows. For Ilford HP5+ I do much the same thing, rating the film at ASA 300 rather than the recommended 400. It has been my experience that rating films lower than the recommended times produces denser negatives that yield greater tonal separation in the shadows and a greater feeling of spatial separation in the deeper toned areas of the final print.
The greater shadow density is primarily a product of greater exposure, not development . This is often the difference between a print that is flat and one that has snap. When shadow densities are placed on the toe of the exposure/density curve, they are not materially moved by changes in development. Low placement, therefore, ensures thin shadow areas with little density difference. When the negative is printed, those densities translate into close-tone differences in the final print. They tend to print as blacks, without textural or spatial differences, or as muddy charcoal grays, also lacking textural or spatial separations. The print has a flat look—in which the the word “flat” is appropriate for two reasons. First, the image is tonally flat in the shadows; second, it is spatially flat, showing little of the illusion of three-dimensional depth that makes a photograph so compelling. You can avoid this problem by giving your negatives higher exposures.
I strongly advise you to use the time/temperature charts only as a guide and starting point. Modify them as necessary for the best results. Even if you use the same negative/developer combination, a number of variables could make your results different from mine: the water in your area, your agitation procedure, your thermometer being a degree or two different, etc. As is so often the case, a little experimentation will give you optimum results.
If you use a different negative/developer combination, you’ll find that once you determine your normal development time, the percentage changes to N–, N– –, N+, and N++ are approximately the same as those on the charts—making them very useful as a starting point.
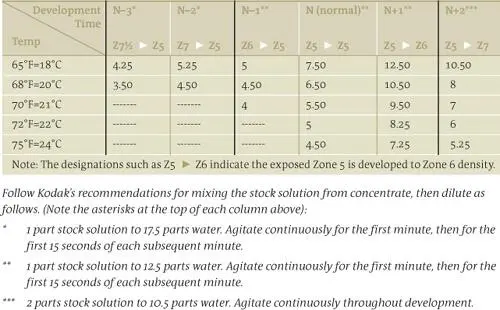
Figure 9-6. Time/Temperature Chart for Developing Kodak Tri-X Film (ASA 320) with Kodak HC110 Developer in Tanks (for Tri-X film rated ASA 160)
Table 9-3. Compensating Development of Kodak Tri-X Film with Kodak HC110 Developer
For a dramatic reduction in contrast, use the following:
C–3#
C–2 ##
C–1 ##
C ##
8
9.5
13
22
Dilute 1 part stock solution to 65 parts water. Agitate as noted below the chart. All development should be at 68°F (20°C). (Note the # signs at the top of each column above):
#
Agitate for the first 30 seconds, then for the first 15 seconds at 1 minute, 2 minutes, 3 minutes, 4 minutes, 6 minutes, and 8 minutes .
##
Agitate continuously for the first minute, then for the first 15 seconds of each subsequent minute .
Some Additional Comments on Figure 9-6 and Table 9-3
In Figure 9-6, designations such as Z6  Z5 indicate an exposed Zone 6 will be developed to Zone 5 density. “N” is normal development, in which each zone is developed to its exposed sensitization level.
“C” in Table 9-3 is roughly equivalent to N–4 in the Figure 9-6 (if it existed!). Highlights are greatly reduced in contrast yet still maintain good separations. C–1, C–2, and C–3 produce still lower contrast.
When using the compensating developer, give 2–3 stops extra exposure to the negative.
Read the section under Two-Solution Compensating Development for Negatives later in this chapter for a significant improvement on this procedure.
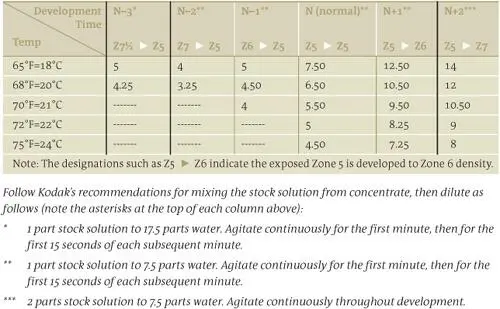
Figure 9-7. Time/Temperature Chart for Developing Ilford HP5+ Film with Kodak HC110 Developer (for HP5+ film rated at ASA 300) Note: times and dilutions are different from Tri-X
Table 9-4. Compensating Development of Ilford HP5+ Film with Kodak HC110 Developer
For a dramatic reduction in contrast, use the following Compensating Development:
C-3#
C-2 ##
C-1##
C ##
10
11.5
15.5
22
Dilute 1 part stock solution to 45 parts water. Agitate as noted below. All development should be at 68°F (20°C). (Note the # signs at the top of each column above):
#
Agitate for the first 30 seconds, then for the first 15 seconds at 1 minute, 2 minutes, 3 minutes, 4 minutes, 6 minutes, and 8 minutes .
Читать дальшеИнтервал:
Закладка:
Похожие книги на «The Art of Photography: An Approach to Personal Expression»
Представляем Вашему вниманию похожие книги на «The Art of Photography: An Approach to Personal Expression» списком для выбора. Мы отобрали схожую по названию и смыслу литературу в надежде предоставить читателям больше вариантов отыскать новые, интересные, ещё непрочитанные произведения.


Обсуждение, отзывы о книге «The Art of Photography: An Approach to Personal Expression» и просто собственные мнения читателей. Оставьте ваши комментарии, напишите, что Вы думаете о произведении, его смысле или главных героях. Укажите что конкретно понравилось, а что нет, и почему Вы так считаете.